Creating Movement in the Studio: Photographing Flowing Fabric
By Cristina Pascu-Tulbure
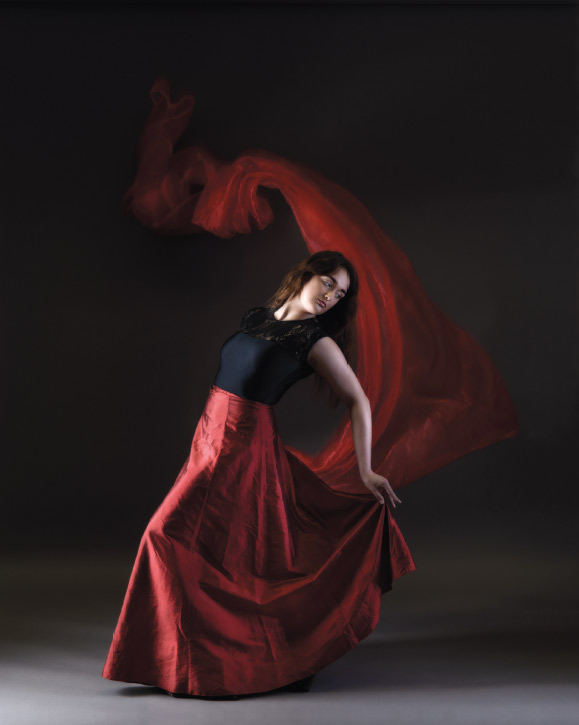
How do you combine controlled studio lighting with movement to create a dramatic fashion or portrait image? Cristina Pascu-Tulbure explains how she created the flowing fabric in her photograph Flamenco.
A studio portrait doesn’t have to be static.
Adding movement to fabric, hair or other elements within the frame can transform an otherwise conventional portrait into something much more dynamic. It can introduce energy, atmosphere and a sense of movement while the subject themselves remains relatively still.
For Flamenco, I wanted to explore exactly that idea.
The photograph was inspired in part by the work of Edward Burne-Jones, particularly his use of richly coloured fabric and the contrast between still figures and more dynamic elements within the composition.
The central figure is relatively still, while a piece of chiffon sweeps through the frame above her.
The movement was created practically, in the studio, rather than added afterwards.
Start with the visual idea
The starting point was the fabric.
I wanted heavy red silk for the dress, with strong highlights emphasising the folds. The weight of the silk was important because it produced relatively structured folds rather than the softer appearance of lightweight material.
A second piece of chiffon was then introduced above the model.
The contrast was deliberate:
- The model remains still.
- The heavy red silk creates structure.
- The lightweight chiffon provides movement.
- The lighting emphasises the texture and folds.
- The darker surroundings help the subject and fabric emerge from the background.
This contrast between stillness and movement became an important part of the image.
Using a dragged shutter
One of the simplest ways to introduce movement into a studio photograph is to deliberately allow some movement during the exposure.
For this image, a shutter speed of approximately ¼ second was used.
The longer exposure allows the moving fabric to blur while the flash provides a sharper representation of the subject.
This combination of ambient exposure and flash can produce an interesting result.
The flash effectively freezes part of the scene, while the longer shutter speed records the movement taking place during the exposure.
The exact balance will depend on your lighting, camera settings and how much ambient light is present.
If the shutter is too fast, you may not get enough movement.
If it is too slow, the entire subject can become blurred.
Experimenting with different shutter speeds is therefore an important part of the process.
The lighting setup
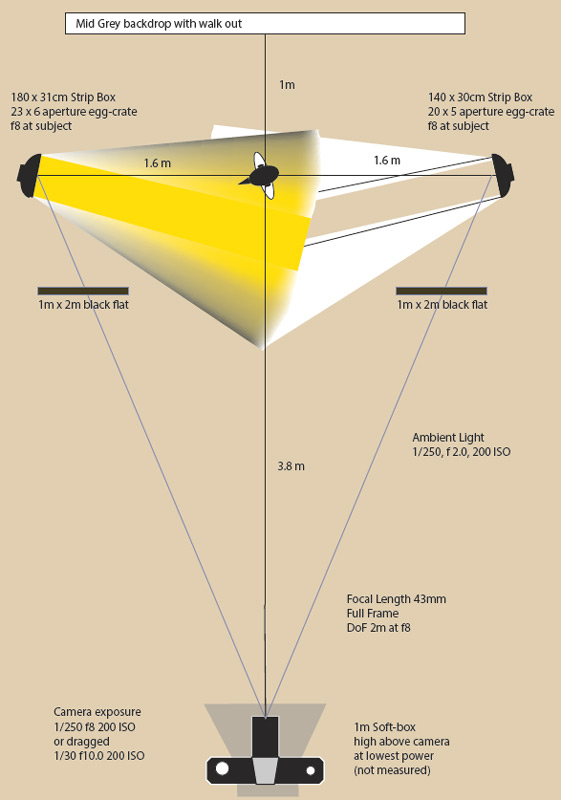
The lighting was influenced by a setup originally designed for dance photography.
Two vertical strip boxes with egg-crate grids were positioned either side of the subject.
The lights were feathered away from the background so that the model was illuminated by the edge of the light rather than having the whole scene brightly lit.
This produced a more controlled, directional effect.
The position of the model was particularly important.
Moving the subject by only around a foot could make a dramatic difference to the result. Too far forward and the subject became much more fully illuminated, losing the controlled rim-light effect.
A small marker on the floor helped the model return to exactly the correct position.
This may sound like a minor detail, but when the fabric is covering the floor, having a physical reference point can make positioning considerably easier.
What is feathering?
Feathering a light is essentially about using the edge of the light rather than pointing the brightest part directly at the subject.
With a gridded softbox, the grid restricts the direction in which light travels.
Imagine looking directly through the grid towards the light source. You would see a much stronger light.
Move away from that direct line and you’re using more of the softer light spilling from the edge of the source.
This gives you greater control over where the light falls.
In a studio portrait, feathering can be particularly useful when you want to illuminate the subject while keeping the background relatively dark.
Controlling spill
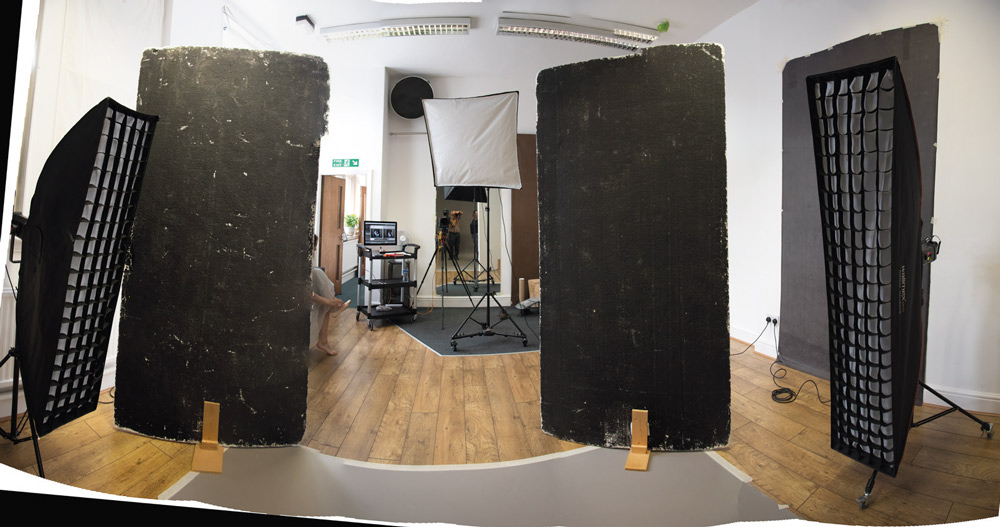
The position and direction of the strip boxes meant that there was a risk of the lights being visible directly to the camera.
Large black flags were therefore used to prevent unwanted light from reaching the lens.
The flags created a narrow gap through which the photograph could be made.
This kind of negative control is often just as important as adding light.
Instead of asking only:
“Where do I need light?”
also ask:
“Where do I not want light?”
That question can make a huge difference to the atmosphere of a studio image.
Adding a small amount of fill
A gentle fill light was positioned above the camera at a very low power.
The aim wasn’t to make the subject evenly illuminated.
It was simply to lift some of the deepest shadows and retain a little detail.
When creating a dark, dramatic portrait, it can be tempting to remove all fill light. But retaining a small amount of detail in the shadow areas can give you considerably more control over the final image.
The important thing is that the fill remains subordinate to the main lighting.
Getting the movement right
The most unpredictable part of the shoot was the fabric.
Someone had to throw the chiffon at exactly the right moment while the model maintained her position and expression.
It was inevitably hit and miss.
That’s normal.
When you’re photographing movement, you often need to take many frames to get the exact combination of:
- Fabric position
- Model expression
- Body position
- Lighting
- Shutter timing
- Fabric shape
The trick is not to expect every frame to work.
Instead, create a setup that allows you to repeat the action quickly and consistently.
Once everything else is controlled, you can concentrate on timing.
Let the fabric become part of the composition
The fabric isn’t simply an accessory.
It needs to contribute to the composition.
Look at its shape and ask:
- Does it lead the eye?
- Does it balance the subject?
- Does it create a frame?
- Does it add movement?
- Does it emphasise the direction of the subject’s gaze?
- Does it create an interesting negative space?
With Flamenco, the chiffon creates a visual counterpoint to the still figure.
Without it, the image would have a very different sense of energy.
Post-production
The final image required relatively restrained post-production.
A neutral-toned treatment was applied, along with adjustments to the lighting on the model’s face.
Some additional space was created around the image to accommodate the intended cover design.
The important point is that the movement of the fabric was created in camera.
While Photoshop can be used to add or manipulate movement, there is something particularly satisfying about capturing an unpredictable physical event photographically.
You also get natural variations in the folds and transparency of the material that can be difficult to reproduce convincingly afterwards.
Experiment with your own version
You don’t need an elaborate studio to experiment with this technique.
Try a simple setup with:
- A model or willing assistant
- A piece of lightweight fabric
- One or two lights
- A dark background
- A tripod
- A camera capable of manual exposure
Start with a relatively short shutter speed and gradually lengthen it.
Compare the results.
Then introduce flash and experiment with the balance between flash and ambient exposure.
Try moving the fabric in different directions.
Throw it upwards.
Move it across the frame.
Have an assistant pull it from outside the frame.
Try different materials.
Silk, chiffon, cotton and heavier fabrics will all behave differently.
Don’t overlook the practical details
When photographing movement, preparation matters.
Make sure:
- The model knows where to stand.
- The lighting is already tested before you begin.
- The fabric is large enough to produce an interesting shape.
- Everyone knows when the exposure will be made.
- The shooting area is clear.
- The model has enough space to move safely.
- Your camera settings are consistent.
- You take plenty of frames.
A small marker on the floor, as simple as a piece of tape or even a coin, can make a surprisingly big difference.
Stillness versus movement
Perhaps the most interesting lesson from Flamenco is that movement doesn’t have to dominate an image.
In fact, movement can be more effective when everything else is controlled.
A still subject surrounded by moving fabric creates contrast.
That contrast gives the viewer something to explore.
The same principle can be applied far beyond fabric.
Try combining:
- A still portrait with moving hair.
- A dancer with a long exposure.
- A static architectural scene with a moving person.
- A sharp subject with blurred surroundings.
- Flash-frozen movement against an ambient exposure.
The goal isn’t simply to create blur.
It’s to use movement as part of the visual story.
Try this
Set up a portrait with a dark background and introduce a piece of lightweight fabric.
Start with a shutter speed around 1/15 second and work progressively towards longer exposures.
Once you find a shutter speed that produces the amount of movement you want, introduce flash and experiment with the balance between sharpness and blur.
Then change the direction and shape of the fabric.
Don’t worry about producing a finished image immediately. The first objective is to discover what the technique can do.
Once you’ve found something interesting, start thinking about the composition and story.
Movement is most effective when it has a reason to be there.