How to Photograph White Objects on a White Background
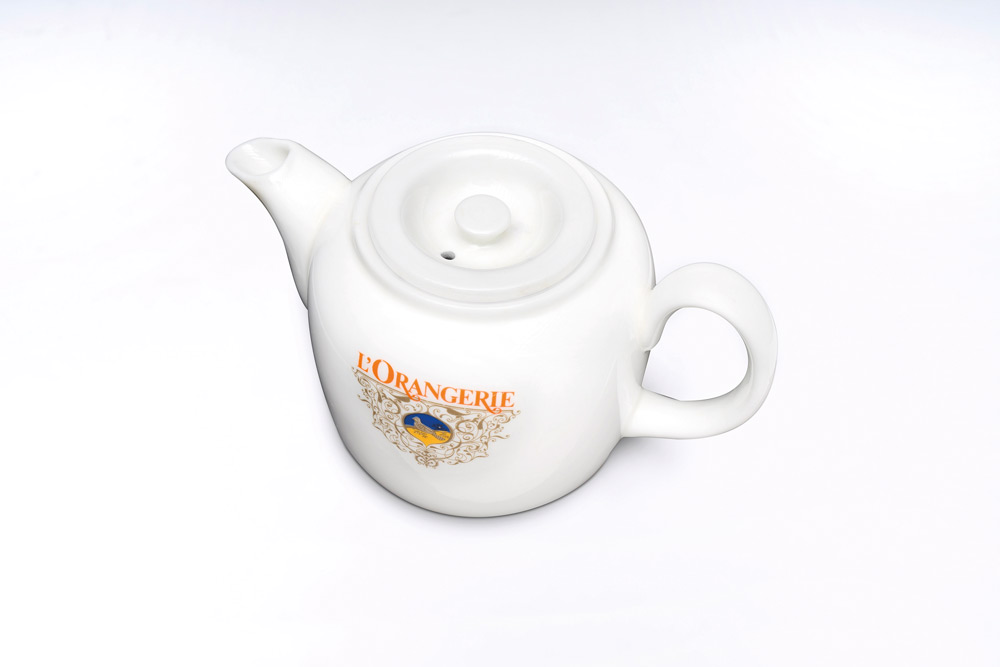
Photographing a white object against a white background sounds simple. After all, how difficult can it be to photograph something white on something else that is white?
Quite difficult, as it turns out.
The problem is that without some form of tonal or lighting contrast, the subject can simply disappear into the background. You end up with the photographic equivalent of a polar bear in a snowstorm.
This is particularly noticeable with commercial and product photography, where a clean white background is often required. White ceramics, clothing, cosmetics, furniture and other products can all present the same problem.
The solution isn’t necessarily to make the background darker. Instead, you need to think carefully about how light is being reflected by the subject and how you can use shadows and controlled reflections to reveal its shape.
Why does a white object disappear against a white background?
A photograph needs differences in tone to describe shape.
If the edge of a white object is almost the same brightness as the background behind it, there is very little for the camera to record as a boundary. The object may still be physically there, but visually it starts to merge with everything around it.
This becomes particularly challenging with rounded objects.
A curved white surface can reflect a large amount of the surrounding environment. If the object is sitting on a white tabletop or sweep, that white surface can be reflected back into the sides of the subject, making them extremely bright.
A white glazed ceramic object is a good example. Its colour is light, but its glossy surface can also produce strong reflections.
The result can be a white object surrounded by white reflections with almost no separation at its edges.
Don’t just light the white object — control what it sees
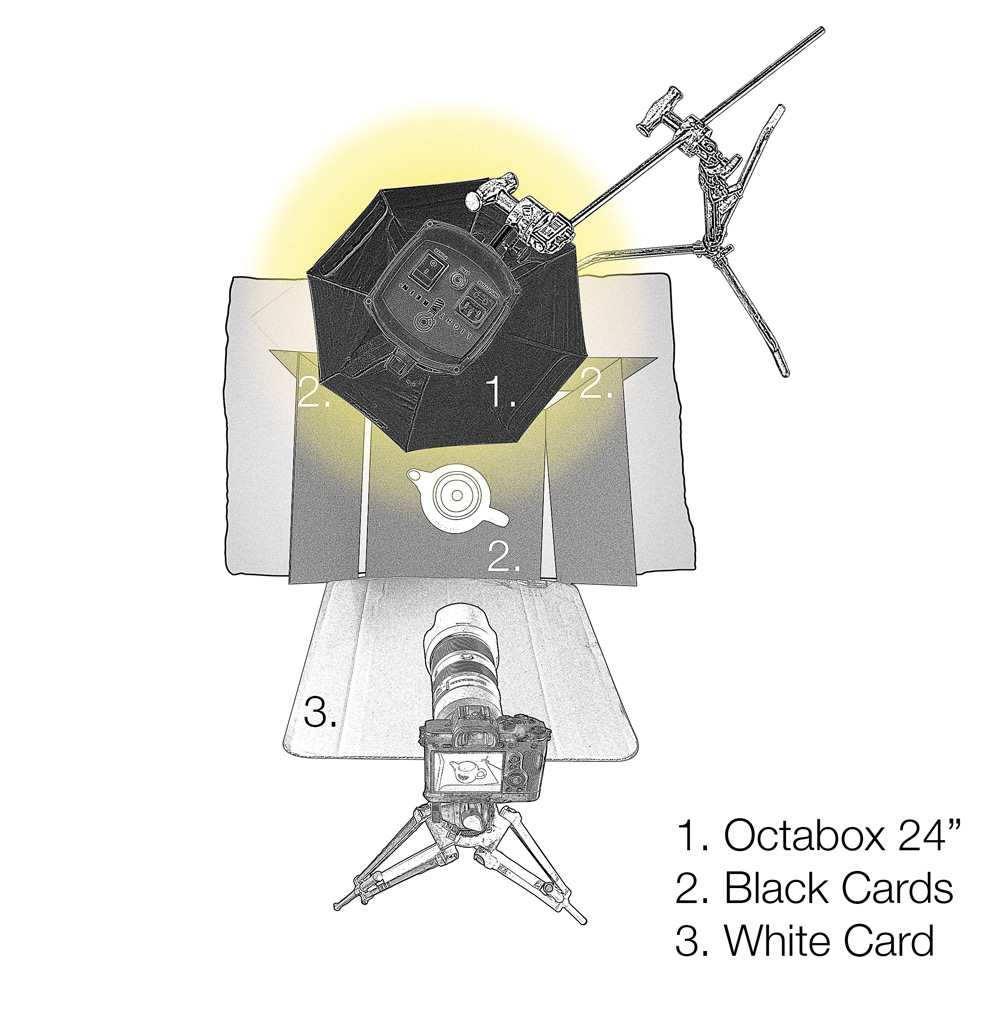
One of the most useful ways of thinking about reflective subjects is that you’re not simply lighting the object.
You’re lighting what the object reflects.
This is particularly important with glossy white surfaces.
A large white tabletop placed around a subject may appear harmless, but the subject can effectively “see” that surface and reflect it back towards the camera.
If you want to reduce that reflection, you can introduce something much darker.
This is where black cards, flags and gobos become extremely useful.
Use black cards to create separation
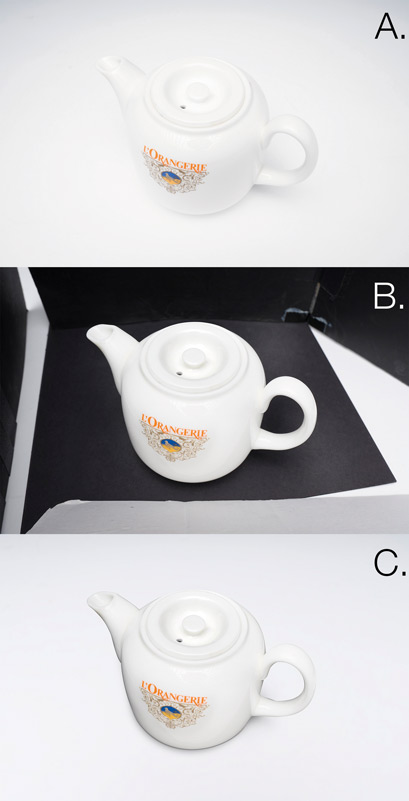
Place pieces of black card or black fabric around the subject, just outside the camera’s view.
These act as negative fill, reducing the amount of light reflected back from the surrounding white surfaces.
Instead of the side of a white object reflecting a large white area, it can now reflect the much darker card.
The result is a darker edge or area on the subject, creating the tonal separation needed to reveal its shape.
This can be surprisingly effective.
You aren’t necessarily making the subject itself darker with a light. You’re changing the environment that the subject is reflecting.
Black cards can also control highlights
With a shiny white subject, the black card can do another useful job.
A glossy surface may be reflecting the white background directly into the camera. Replacing that reflected white area with a black card creates a darker reflection and gives the subject much more definition.
This is sometimes described as using a specular gobo.
It is particularly useful with curved or highly reflective products where conventional lighting alone doesn’t give you enough control.
Watch how far you take it
There is a catch.
Black cards can work too well.
If you surround a white subject with too much black, areas that previously reflected the white surroundings can become excessively dark.
The answer isn’t necessarily to remove the black card completely.
Instead, introduce a small amount of controlled reflection back into the subject.
A white card or reflector placed carefully on the opposite side can return some light to the darker area. By moving it closer or further away, you can fine-tune the brightness.
This gives you much more control than simply turning the main light up or down.
Think of the black cards as removing unwanted reflections and the white cards as putting back exactly the amount of light you need.
Curved surfaces are particularly difficult
The more curved the subject, the more of its surroundings it can reflect.
A flat white product is relatively straightforward because the camera sees a fairly limited section of the environment reflected from its surface.
A rounded object is different.
Its curved surfaces can reflect large areas of the surrounding studio, including the white tabletop, walls, light sources and other equipment.
That is why something as apparently simple as a white teapot can be surprisingly difficult to photograph cleanly.
When photographing curved white products, spend some time looking at the reflections rather than simply looking at the position of the lights.
Move a black card a few centimetres and watch what happens.
Small changes in position can produce surprisingly large changes in the final image.
You don’t always need a perfectly white background
Another option is to photograph the subject against a slightly darker background.
Light grey, mid-grey or even a dark background can make a white subject considerably easier to define.
This can be an especially effective approach when the background does not have to be pure white.
The important point is to decide what the photograph actually needs.
If you’re producing an e-commerce image that requires a clean white background, you may need to use controlled reflections, negative fill and careful post-production.
If you’re creating an advertising or editorial photograph, however, there is no rule saying that a white object must be photographed against white.
Sometimes a little contrast is exactly what the image needs.
What about fixing it in Photoshop?
Post-processing can certainly help, and separating a simple product from a plain background is much easier than it used to be.
You can photograph the subject with black cards providing the necessary definition, then replace or clean up the background afterwards.
There is an important consideration, though.
If you simply remove the original background and replace it with pure white, the subject can appear to float.
That’s because the background isn’t just providing colour. It also provides visual clues about where the object is sitting.
Use shadows to anchor the subject
A natural-looking shadow can make a considerable difference.
A drop shadow can extend slightly away from the object and suggest that light is falling across the surface.
A contact shadow is smaller and darker, sitting immediately underneath the subject where it meets the surface.
The contact shadow is particularly important because it tells the viewer that the object is actually resting on something.
Without it, even an otherwise convincing product photograph can look as though the object has been cut out and placed onto a white background.
The best result is often a combination of good lighting at capture and restrained post-production rather than trying to manufacture everything afterwards.
A simple approach to try in the studio
If you’re struggling with a white object on a white background, try this basic process:
1. Start with your normal lighting
Set up the subject and light it as you normally would. Take a test shot and look carefully at where the object is disappearing into the background.
2. Identify the problem areas
Don’t just look at the overall image. Look around the edges and across curved surfaces.
Where is the white background being reflected into the subject?
3. Add black cards
Place black cards or flags just outside the frame, particularly alongside the areas where the subject is blending into the background.
Take another test shot.
4. Adjust the position
Move the black cards rather than immediately changing the power of your lights.
You’re trying to control the reflection, so the position of the card can be more important than its distance from the light.
5. Add white reflectors where necessary
If an area has become too dark, introduce a white card or reflector to return some light.
Move it until you get the amount of detail and separation you want.
6. Check the background separately
If you need a pure white background, make sure you’re getting the background exposure you require without allowing it to overwhelm the subject.
7. Finish carefully in post-production
Clean up the background if necessary, but retain believable shadows and contact with the surface.
The important lesson: contrast doesn’t always mean black and white
When photographers hear that an image needs more contrast, they often think about increasing contrast in editing.
But contrast can be created at the point of capture.
It can come from:
- A darker reflection on a white object
- A shadow beneath the subject
- A change in the brightness of the background
- The direction of the light
- The shape of a highlight
- A change in surface texture
- Negative fill from a black card
- A controlled reflection from a white card
The aim isn’t simply to make the photograph more contrasty.
The aim is to give the viewer enough information to understand the shape, surface and position of the subject.
Don’t be afraid of the black card
For photographers used to adding light, using a black card can initially feel slightly counter-intuitive.
But controlling light also means controlling where light doesn’t fall — or, with reflective subjects, controlling what is reflected back towards the camera.
A few inexpensive pieces of black card can therefore become extremely useful studio tools.
They can help define edges, reveal curves and prevent a white subject from disappearing into a white background.
And that is the secret to solving the polar bear in a snowstorm problem: you don’t necessarily need more light. You need more control over the light and reflections already there.