How to Use Off-Camera Flash Outdoors for Better Portraits
By Damian McGillicuddy
Outdoor portraits don’t have to mean relying entirely on whatever light happens to be available.
One of the great advantages of a portable flash system is that you can take the control you normally have in the studio outside with you. With the right approach, a battery-powered flash and a suitable modifier can give you a great deal of control over the direction, quality and balance of the light.
The trick is not simply to add more light. It’s to make the flash and the existing daylight work together.
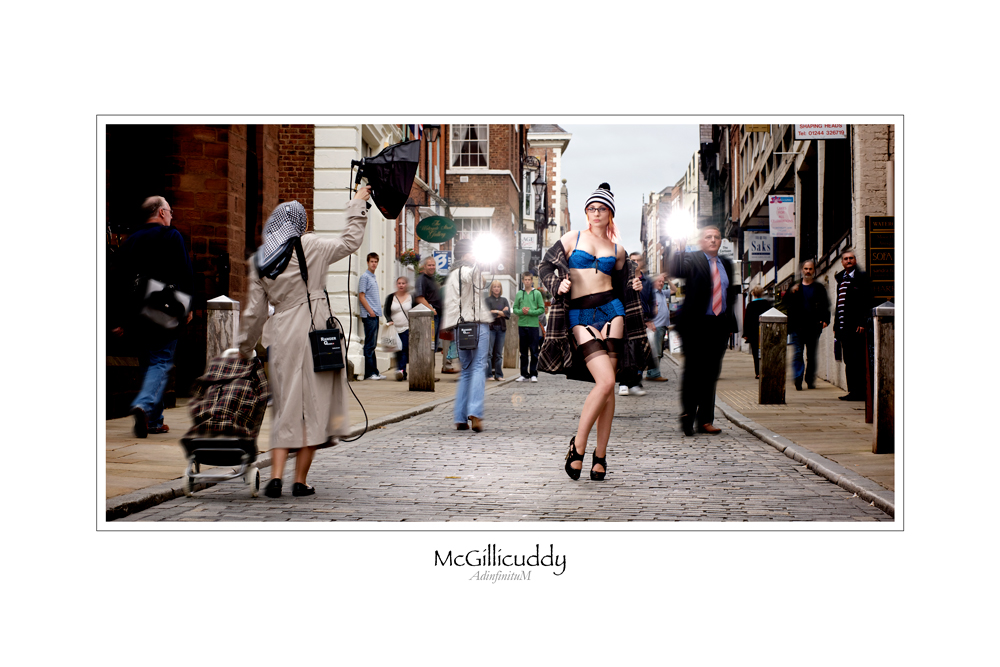
That was the thinking behind one of my favourite outdoor shoots, where the brief was to demonstrate how a portable lighting system could produce studio-style results away from the studio.
The equipment has changed over the years, but the lighting principles remain just as useful today.
Start with the concept, not the lights
Before thinking about where to put a light, think about what you’re trying to say with the photograph.
For this particular shoot, I wanted the finished image to have a strong sense of narrative. The model wasn’t simply going to stand in a nice location and be lit attractively. The idea was to create a visual story around her, with styling, props and other people becoming part of the image.
That meant the lighting had to support the concept rather than simply demonstrate that the flash system could produce technically good light.
This is something I think photographers sometimes overlook.
A technically perfect photograph can still be an uninteresting photograph. If there is no reason for the viewer to stop and look at it, perfect exposure and beautiful lighting aren’t enough.
The concept comes first. The lighting then helps you communicate it.
Why use flash outdoors?
Natural light can be wonderful, but it isn’t always going to give you the look you have in mind.
You might be dealing with:
- Flat or overcast light
- Harsh sunlight
- A distracting background
- A subject that doesn’t separate from their surroundings
- Light coming from the wrong direction
- Changing conditions during the shoot
Off-camera flash gives you another layer of control.
Rather than accepting the light that is available, you can decide where your key light comes from and how much influence it has over the final image.
Portable battery-powered flash makes this particularly useful because you aren’t tied to a studio or mains electricity.
A simple three-light setup
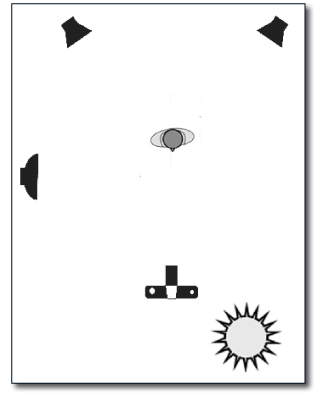
For the original shoot, I used three portable flash heads, with each light powered independently.
The two lights behind the subject were positioned to the sides and slightly behind. Their job wasn’t to illuminate the subject from the front. Instead, they helped separate her from the background and added additional visual interest to the scene.
The main light was positioned to one side of the camera and fitted with a beauty dish.
You don’t necessarily need three lights to reproduce this approach. In fact, I’d recommend starting with one.
A single well-positioned key light, combined with natural daylight, can be surprisingly powerful.
Once you’ve established what that light is doing, you can decide whether the image genuinely needs anything else.
Use the edge of the light
One of my favourite techniques with a beauty dish or similar directional modifier is to feather the light across the subject.
Instead of pointing the centre of the light directly at your subject, angle it so that you’re using the edge of the light.
This can produce a more sculptural result, with a gradual transition across the face and body.
It’s particularly useful when you want to create a sense of shape and depth.
Remember that you’re photographing a three-dimensional subject on a two-dimensional surface. Your lighting needs to help create the illusion of that third dimension.
Don’t automatically assume that pointing the brightest part of the modifier directly at the subject will give you the best result.
Try moving the light across them.
Watch what happens to the highlights and shadows.
Then adjust the angle until the light starts doing something interesting.
Let the daylight become your fill light
One of the simplest ways to create a balanced outdoor portrait is to let the existing daylight act as your fill.
Here’s the basic principle.
Imagine you meter your flash exposure and decide that you want the subject to be exposed at f/8.
You then meter the ambient daylight and find that the correct exposure is also 1/125 sec at f/8.
If you set the camera to 1/125 sec at f/8 and adjust the flash to provide the equivalent of an f/8 exposure on the subject, the flash and ambient light are broadly balanced.
The flash becomes your controlled light source while the daylight illuminates the surrounding scene.
This is a useful starting point because it gives you a reference from which you can deliberately alter the balance.
Underexpose the background for more drama
For the original image, I didn’t want the daylight and flash to be perfectly balanced.
Instead, I wanted the surroundings to become slightly darker so that the area illuminated by the flash would stand out.
If the ambient exposure is 1/125 sec at f/8, increasing the shutter speed to 1/250 sec, where your camera and flash system allow it, reduces the ambient exposure by roughly one stop.
The flash exposure on the subject can remain essentially the same, depending on the flash duration and camera settings.
The result is that the ambient surroundings become darker while the flash-lit subject remains prominent.
This is a very useful technique for outdoor portraits.
You’re not simply adding flash. You’re controlling the relationship between your subject and the environment.
Try different levels of ambient underexposure and watch how the character of the image changes.
A small adjustment can take you from a natural-looking portrait to something considerably more dramatic.
Don’t forget the background
When using off-camera flash, it’s tempting to concentrate entirely on the subject.
But the background is an important part of the photograph.
Ask yourself:
What happens if I make the background one stop darker?
Then try two stops.
Does the subject separate more effectively?
Does the location become less distracting?
Does the photograph feel more atmospheric?
You can often create a much stronger image simply by controlling the relationship between the subject and everything behind them.
The aim isn’t necessarily to make the background disappear. Sometimes the environment is an important part of the story.
It’s about deciding how much attention you want the viewer to give it.
Portable lighting gives you creative freedom
One of the reasons I enjoy portable lighting so much is the freedom it gives you.
You’re no longer restricted to a studio environment.
You can take a controlled lighting setup into a street, a field, an industrial location, a beach or almost anywhere else your idea takes you.
Modern battery-powered flash systems also make this considerably easier than it once was.
You can position lights away from the camera, trigger them wirelessly and adjust their output without constantly running backwards and forwards to the light stands.
That means you can concentrate more on the photograph and less on the logistics.
The people behind the photograph matter too
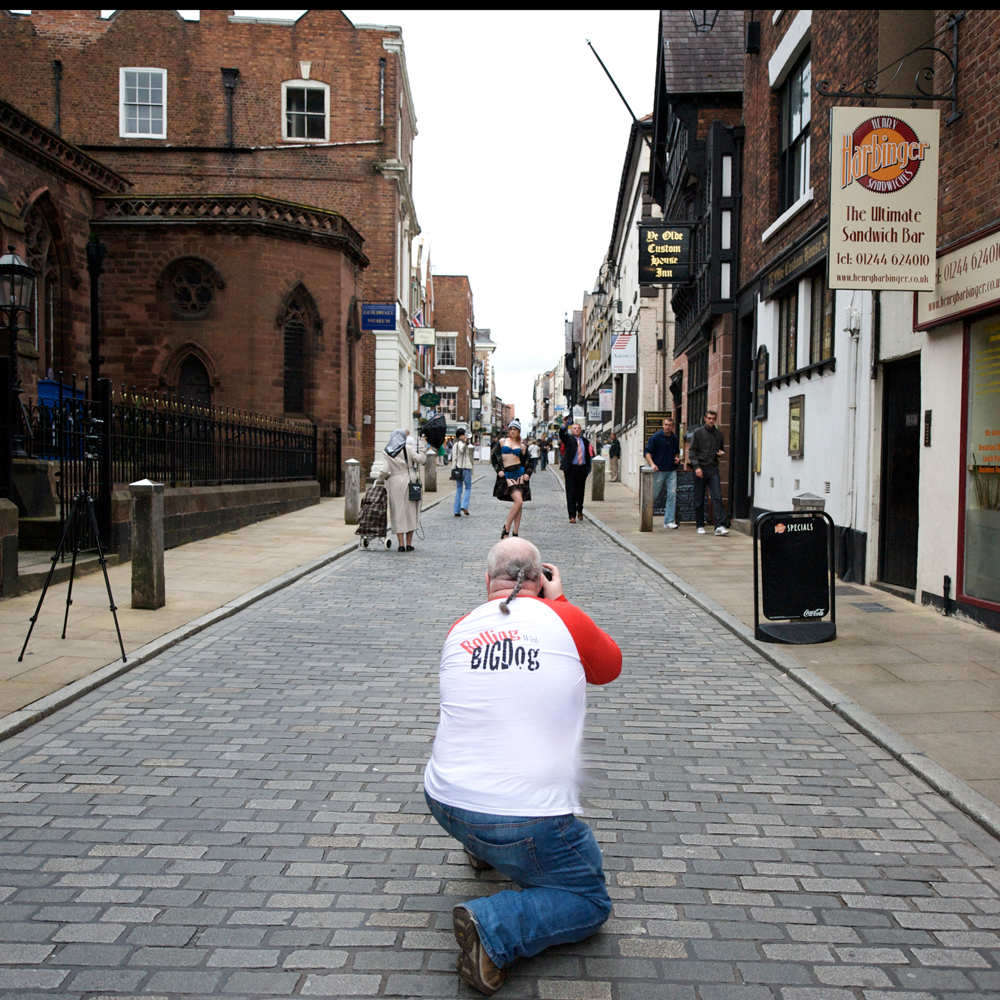
There is another lesson from this shoot that has nothing to do with exposure or lighting.
The finished photograph was very much a team effort.
The styling, props, assistants, models and people appearing in the background all had a part to play.
We had to source clothing and props to create the character in the scene, position people at the right moment and persuade members of the public to move through the frame in roughly the right place.
That’s the reality of professional photography.
The photograph might have your name on it, but that doesn’t mean you created it entirely on your own.
A reliable network of people who can help with styling, lighting, assisting, modelling, locations or production can make an enormous difference.
Even if you’re working as a one-person business, developing good relationships with other creative people can make ambitious shoots much easier to realise.
Don’t let the equipment become the idea
The original commission was designed around a particular portable lighting system, but the important thing I took from it wasn’t the name written on the side of the flash.
It’s the control that portable lighting gives you.
You can decide:
- Where the key light comes from
- How hard or soft it should be
- How much the daylight contributes
- How dark the background becomes
- How the subject separates from the environment
- Where the viewer’s eye is drawn
The equipment is simply the means of achieving that.
A good lighting system won’t rescue a weak concept, just as an expensive camera won’t automatically produce a compelling photograph.
Start with the photograph you want to make.
Then work backwards to determine what lighting, location, styling and equipment will help you create it.
Try this on your next outdoor portrait
You don’t need a complicated setup to experiment with this technique.
Take a single portable flash and a directional modifier outdoors.
First, photograph your subject using only the available light.
Then introduce the flash as your key light.
Next, deliberately reduce the ambient exposure by around one stop and compare the result.
Move the flash further to the side.
Feather it across the subject.
Change the height.
Change the angle.
Watch what happens to the background.
You may find that the most interesting result isn’t the one that looks the most natural.
That’s the beauty of working with off-camera flash outdoors. You can take the control and precision of studio lighting and use it to create something that simply wouldn’t be possible with the available light alone.
And once you understand that relationship between flash, daylight and subject, you have a technique that can be applied to far more than one particular shoot.