How to Photograph and Edit Stained Glass in Photoshop
Photographing stained glass windows can be surprisingly difficult. The contrast between brightly illuminated glass and darker stonework can exceed the dynamic range of a camera sensor, while mixed lighting inside historic churches can introduce unwanted colour casts, flare and uneven exposure.
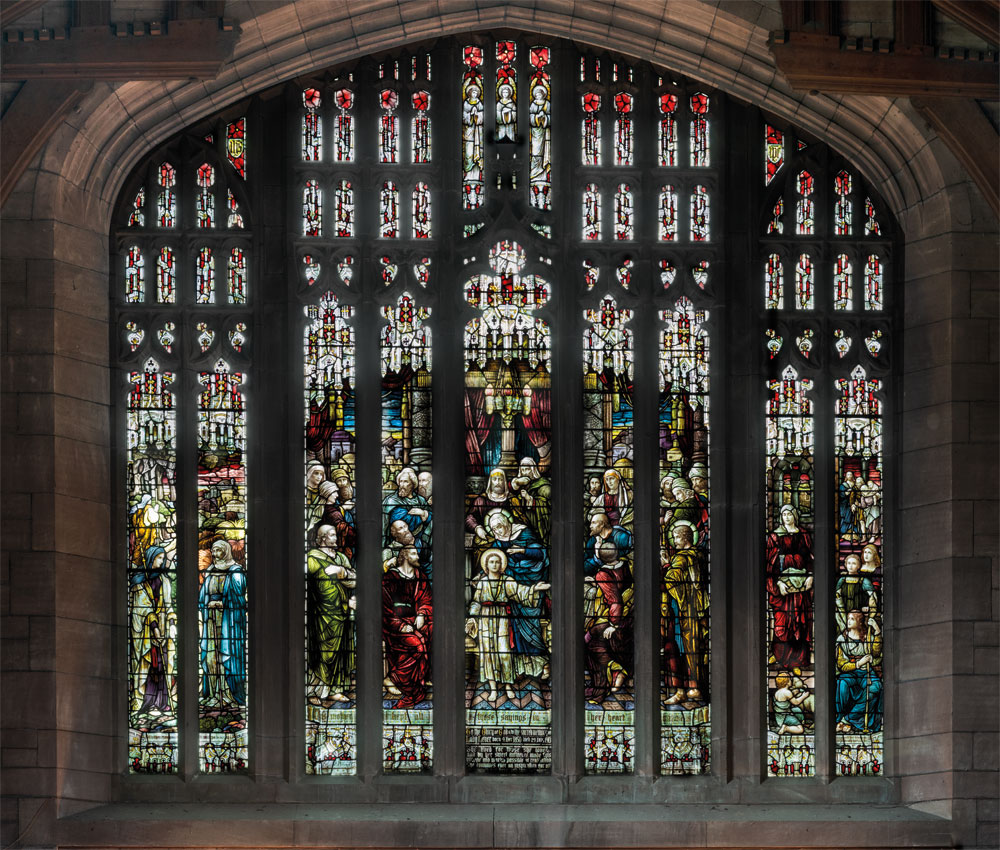
Mike McNamee and Cristina Pascu-Tulbure discovered exactly these problems when photographing the stained glass windows of Christ Church in Port Sunlight, Merseyside. Their experience provides some useful lessons in both stained glass photography and Photoshop post-processing.
Photographing the Stained Glass at Port Sunlight
Port Sunlight was founded by William Hesketh Lever, later 1st Viscount Lever, the entrepreneur behind Lever Brothers and the Sunlight soap brand. The village was created for his workers and is now recognised for its remarkable collection of historic architecture.
Christ Church was completed in 1904 and was built from red sandstone quarried at nearby Helsby. The building reflects the craftsmanship of the Arts and Crafts period, with extensive oak carving, masonry and stained glass.
The large west window is particularly impressive. Created by Heaton, Butler and Bayne of London, it contains several scenes, including Mary and Joseph discovering Jesus preaching in the Temple, Ruth and Naomi, and a depiction reflecting the contemporary ideal of the housewife.
It is also an excellent example of why photographing historic stained glass requires more than simply pointing a camera at the window and taking a picture.
Why Stained Glass Is Difficult to Photograph
One of the biggest problems is dynamic range.
The human eye is remarkably good at adapting to large differences in brightness. A camera cannot make the same adjustment, and the difference between a brightly backlit stained glass window and a dark church interior can be several stops.
At Christ Church, multiple exposures were needed to record the different parts of the scene.
The lighting inside the church created an additional complication. Sodium discharge lamps were mixed with tungsten, daylight and flash illumination, creating an extremely difficult colour environment.
There was also significant flare from almost-clear glass forming a medieval-style canopy across part of the scene. Although this was not particularly obvious when looking at the window, the effect became much more noticeable once the exposure was adjusted to reveal the detail in the stained glass.
The stone mullions were also affected by green flare, while the illumination across the gable end of the nave varied dramatically from the bottom of the window to the roof.
The luminance difference between the lower and upper areas approached four stops.
Plan the Exposure Before You Start
A useful lesson from this project is to consider the post-processing requirements before taking the photographs.
If the final image will be constructed from several exposures, the individual frames need to be consistent and accurately aligned.
For stained glass, this often means using exposure bracketing.
A correctly exposed image for the surrounding masonry may leave the stained glass completely blown out. Conversely, an exposure that preserves the delicate detail in almost-transparent areas of the glass can leave the darker coloured glass and surrounding interior far too dense.
Rather than trying to force everything into one exposure, it is often better to capture a series of exposures and combine them later in Photoshop.
If your camera has automatic exposure bracketing, use it. Digital exposures are inexpensive compared with discovering during post-production that an important highlight has been lost.
For particularly challenging windows, a bracket covering a very wide exposure range may be necessary.
Use Photoshop to Assess the Tonal Range
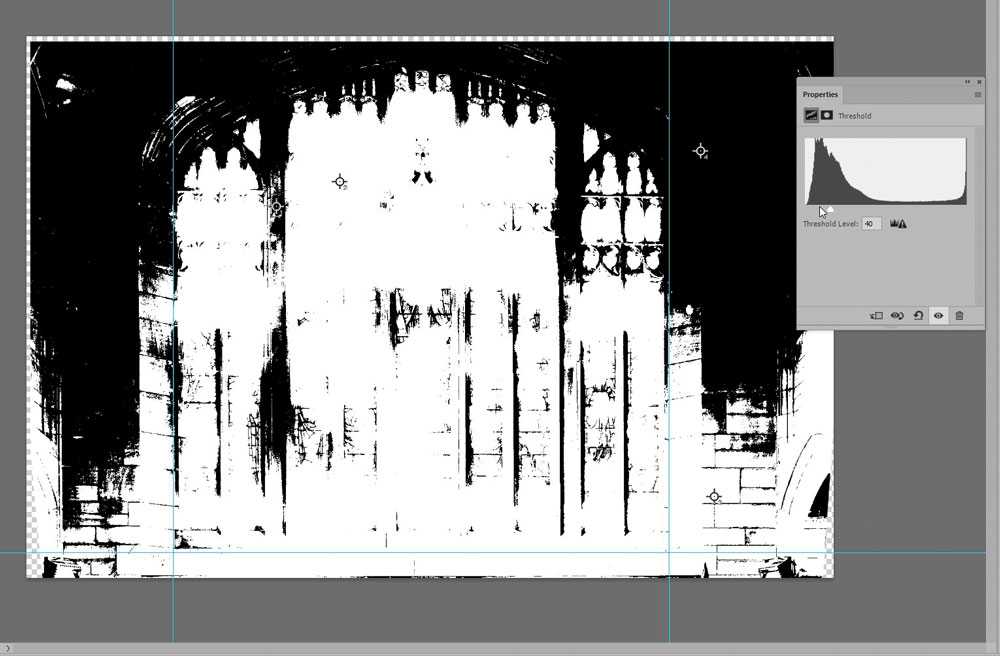
Before beginning detailed compositing, it can be useful to analyse the tonal range of the image.
A Threshold adjustment layer provides a quick way of identifying where the significant tonal transitions occur.
In the Port Sunlight example, Threshold was used at different settings to assess the variation in brightness across the stonework. This helped identify suitable points for placing Color Sampler markers.
The Photoshop Info panel can then be used to monitor colour and luminance values at those reference points.
Using Lab colour values is particularly useful when you want to assess luminance independently from colour.
This makes it easier to establish how much an area needs to be lightened or darkened during the correction process.
Correcting Uneven Exposure with an Adjustment Layer
Once the tonal differences had been measured, an Exposure adjustment layer could be used to bring the darker upper section of the church interior closer to the brightness of the lower section.
However, applying the correction uniformly would make the lower part of the image far too bright.
The solution is to use a layer mask and gradient.
The adjustment can be made stronger in the darker region and gradually reduced towards the correctly exposed area. This creates a much more natural transition than applying a global exposure correction.
Photoshop’s Gradient Tool is particularly useful for this type of correction because the gradient can be positioned and adjusted interactively to match the changing illumination across the scene.
Combining Multiple Exposures in Photoshop
The stained glass itself presented another problem.
Different areas of the window required different exposures to retain their detail. The pale canopy, for example, needed to remain bright and delicate while the much darker coloured robes and other details needed a substantially different exposure.
Photoshop makes it possible to bring the different exposures into the same document as layers.
The layers can then be aligned and masks used to reveal the correctly exposed parts of each photograph.
This approach gives you much greater control than simply increasing shadows or highlights on a single file.
It is particularly valuable when photographing historic stained glass, where preserving subtle detail in both the glass and surrounding architecture is more important than applying an aggressive automated HDR effect.
Photoshop Layer Masks for Stained Glass
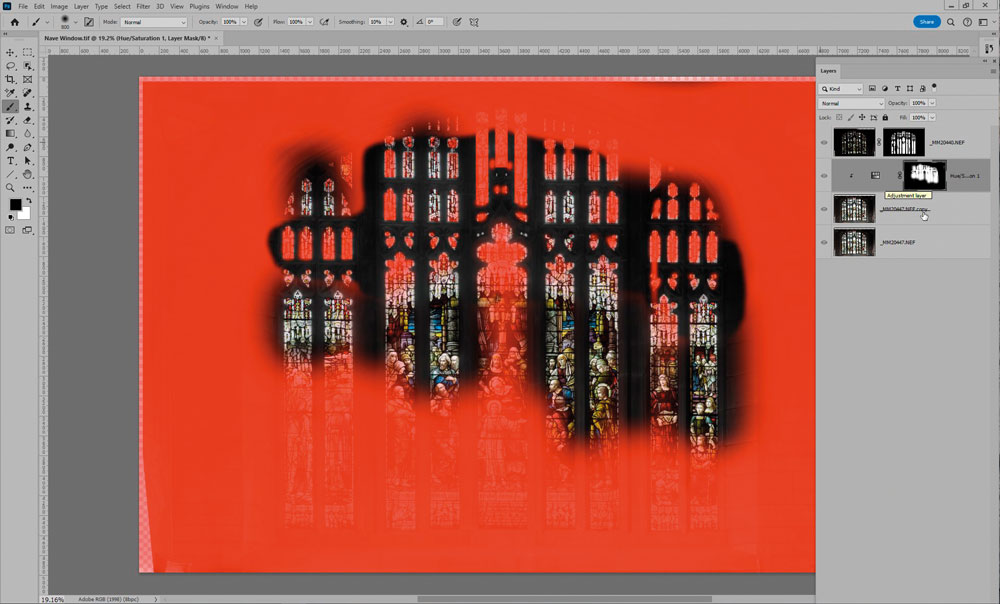
Layer masks are at the heart of this technique.
The basic principle is simple:
- White reveals the layer
- Black hides the layer
- Grey partially reveals the layer
The challenge is creating masks that follow the complicated shapes of the window accurately.
Fortunately, not every part of a stained glass window needs a complicated selection.
Use a Brush for Straight Edges
The vertical sections alongside the stone mullions can often be masked very quickly with a brush.
A square or appropriately shaped brush can be positioned at the edge of the glass and the Shift key used to constrain the brush movement to a straight horizontal or vertical line.
A slightly softened brush edge can help create a seamless transition between the glass and surrounding masonry.
Create Custom Brushes for Repeated Shapes
Historic windows often contain repeated architectural shapes.
The Port Sunlight window included numerous trefoil-shaped openings. Rather than manually drawing each selection, a custom brush can be created to match the shape.
Once the brush has been created, it can be resized using the square bracket keys and applied repeatedly to the individual openings.
This can save a considerable amount of time.
A useful rule is that if you have more than a few identical or very similar shapes to mask, creating a custom brush is often worth the initial effort.
Use Paths for Complex Shapes
For a complicated shape that only occurs once or twice, creating a custom brush may take longer than simply creating the selection manually.
Photoshop’s Pen tools can be used to trace the shape accurately before converting the path into a selection and applying it to the layer mask.
For highly complex windows this can be a time-consuming process, but it provides excellent control.
In the Port Sunlight window there were dozens of individual apertures, so choosing the appropriate technique for each type of shape was considerably more efficient than treating every section in exactly the same way.
Practical Tips for Photoshop Masking
A few simple techniques can make detailed masking much faster.
Start with a hard-edged mask
It is generally easier to begin with a precise, hard-edged mask and soften it afterwards using feathering or blur where necessary.
Saving important hard-edged masks as channels also gives you the option of returning to the original selection later.
Use guides to check alignment
When masking architectural features, guides can help determine whether an edge is truly horizontal or vertical.
The Shift key can then be used to keep brush strokes straight.
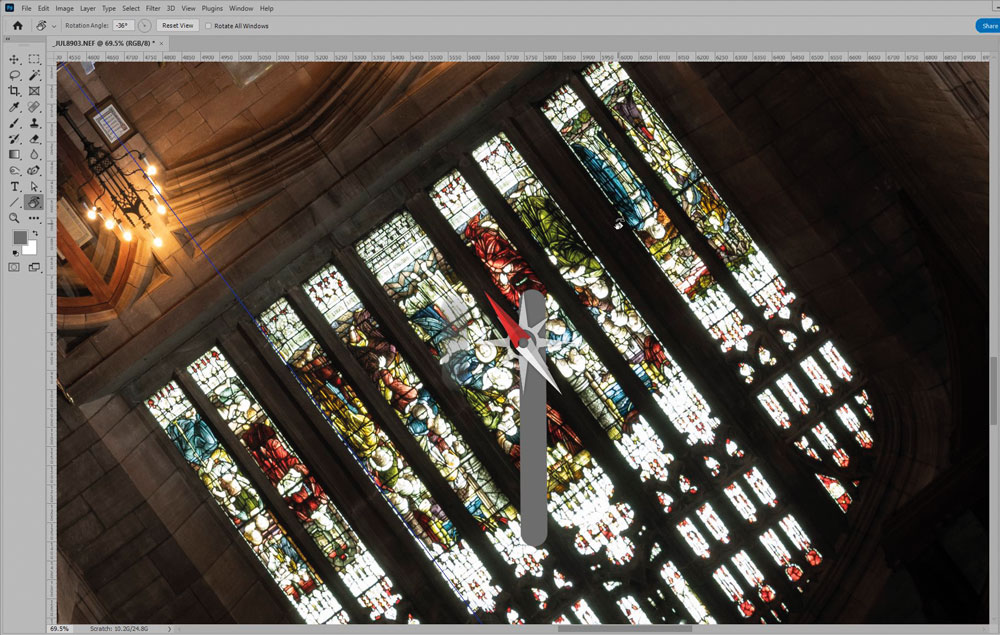
If the feature is at an awkward angle, Photoshop’s Rotate View function can be useful. Rotating the canvas so that the feature becomes horizontal or vertical allows the Shift key to constrain the brush movement more conveniently.
Don’t create complex selections unnecessarily
Not every shape requires painstaking path work.
Use the simplest method that produces an accurate result:
- Brush for simple edges
- Custom brushes for repeated shapes
- Paths for complex one-off shapes
- Gradients for gradual tonal transitions
The aim is not to use the most sophisticated Photoshop technique. It is to use the technique that solves the problem most efficiently.
Why Automatic HDR Isn’t Always the Answer
Modern Photoshop provides many automated tools for combining exposures, but they are not necessarily the best choice for every stained glass photograph.
Windows contain large areas of delicate detail, hard architectural edges and repeated shapes. Automated blending can produce unwanted transitions, halos or other artefacts.
Manual layer masks take more time, but they provide much greater control over exactly which exposure is visible in each part of the final image.
For a valuable historic building, that control can be worth the additional effort.
Camera Settings for Photographing Stained Glass
The shooting technique is just as important as the Photoshop work.
If the window is protected by exterior grilles or other structures, consider the depth of field carefully. Using too much depth of field can bring the protective grille into focus and make it more prominent than intended.
When making exposure adjustments for a series of bracketed images, changing shutter speed rather than aperture helps maintain consistent depth of field.
Where possible:
- Use a tripod for accurate alignment.
- Keep the camera position fixed between exposures.
- Use exposure bracketing.
- Capture more exposure range than you think you will need.
- Check the brightest glass for highlight clipping.
- Watch for flare and reflections.
- Record additional exposures if there is any doubt.
If the interior architecture is significantly darker than the window, additional lighting may also be worth considering.
In the Port Sunlight example, the experience suggested that a large amount of flash could have been used to raise the level of the interior masonry and reduce some of the variation in illumination.
What We Learned from the Project
The biggest lesson was that the dynamic range of the scene was greater than initially anticipated.
A wider exposure bracket would have provided more usable material for the final composite. Some areas of the stone mullions were also affected by diffraction and overexposure and had to be replaced using information from other exposures.
The interior masonry also showed significant variation in illumination from the centre towards the sides.
In retrospect, a more controlled lighting setup could have reduced these variations and made the compositing process considerably easier.
This illustrates an important point about architectural and heritage photography: good post-processing starts with good planning and good source photographs.
Photoshop can rescue many problems, but it is much easier to create a convincing composite when the photographs have been captured specifically with the final image in mind.
Photograph First, Photoshop Second
Photographing stained glass is a good example of where technical photography and careful Photoshop work need to complement each other.
The camera needs to capture enough information to cover the enormous tonal range of the scene. Photoshop can then be used to combine the exposures, correct uneven illumination and selectively reveal the best detail from each frame.
The most effective workflow is therefore not simply to rely on Photoshop to fix everything afterwards.
Instead:
- Assess the lighting before shooting.
- Determine the likely exposure range.
- Bracket generously.
- Keep the camera position fixed.
- Capture enough detail in both the glass and architecture.
- Analyse the tonal range before starting the composite.
- Use adjustment layers for tonal corrections.
- Use layer masks to combine the best parts of each exposure.
- Use custom brushes when repeated shapes make them worthwhile.
- Keep complex manual selections for areas where they are genuinely necessary.
The result is a controlled workflow that can produce a much more faithful representation of a historic stained glass window while retaining the character and craftsmanship of the original building.