How to Calibrate Colour in RAW Photography Using a Colour Chart
Getting accurate colour from a digital camera isn’t always as simple as setting the correct white balance. Different cameras, lenses and lighting conditions can all influence how colours are recorded, while the appearance of a subject can change significantly under different light sources.
For photographers working in commercial, product, reproduction or other colour-critical situations, a colour calibration target can provide a reliable starting point.
Mike McNamee and Cristina Pascu-Tulbure explored this process while testing the colour calibration facilities in DxO PhotoLab 7. Their results demonstrate both the benefits of creating a scene-specific colour profile and the limitations of relying on a relatively small colour target.
Why Colour Calibration Matters
Digital cameras don’t necessarily record colour exactly as we perceive it.
A camera sensor records red, green and blue information, which is then interpreted by the camera’s RAW processing software. The resulting colour depends on the camera’s sensor characteristics, the lighting and the software used to process the file.
For everyday photography, these differences may be insignificant.
For product photography, artwork reproduction, commercial photography and other colour-critical work, however, accurate colour can be much more important.
A calibration target provides known reference colours. By photographing the target under the same lighting conditions as the subject, software can compare the recorded colours against their known values and create a correction profile.
The result is a more controlled and repeatable starting point for processing the photograph.
What Is a Colour Calibration Target?
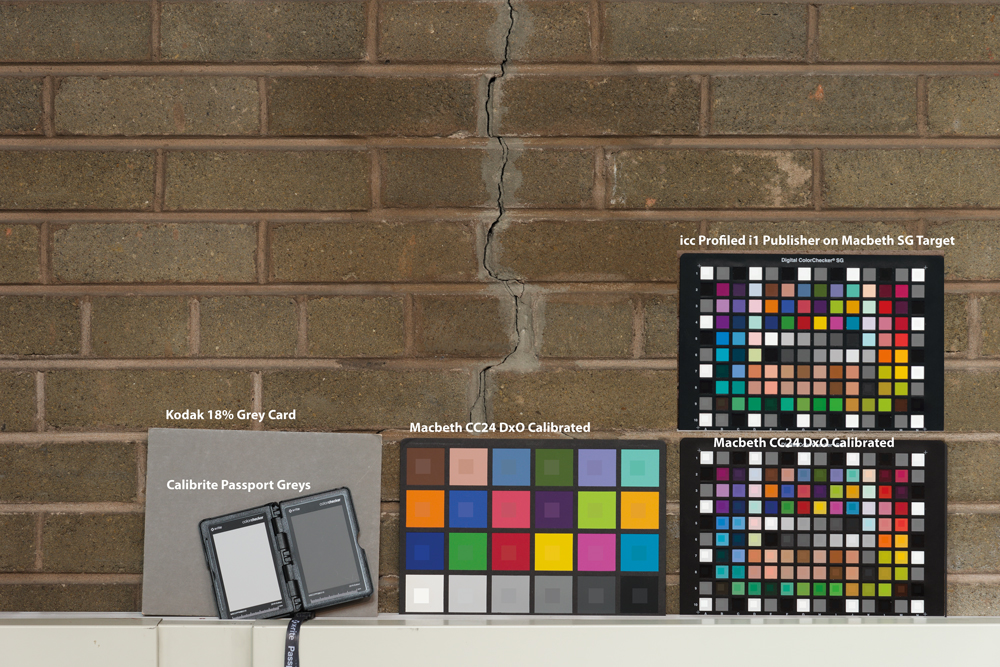
A colour calibration target contains a series of precisely manufactured colour and neutral patches.
One of the best-known examples is the 24-patch ColorChecker, although larger targets are available with many more colour samples.
The basic principle is straightforward:
- Place the colour target in the scene.
- Photograph it under the lighting that will be used for the subject.
- Remove the target.
- Photograph the subject without changing the relevant camera and lighting settings.
- Use calibration software to analyse the target.
- Apply the resulting profile or correction to the subject photographs.
The important point is that the target and subject need to be photographed under the same lighting conditions.
A profile created under one type of illumination should not automatically be assumed to be accurate under another.
Scene-Specific Calibration
Colour calibration is not necessarily a one-time camera setting.
The lighting conditions are an important part of the calibration process. If the light changes significantly, the colour response of the complete camera-and-lighting system can change too.
For example, a profile created in daylight may not produce the same result under tungsten, LED or flash lighting.
For this reason, a scene-specific calibration can be particularly useful when consistency is important.
The target should be photographed at the beginning of the session and ideally positioned so that it receives the same light as the subject.
Getting the Exposure Right
Colour calibration cannot compensate for badly exposed source material.
Before creating the profile, the target needs to be photographed with an appropriate exposure.
One useful reference is the neutral grey patch included on many calibration targets.
The mid-grey patch provides a known reference that can be used when assessing exposure and establishing a consistent starting point.
In testing the calibration workflow, a bracketed sequence was used before selecting the exposure that placed the mid-grey patch close to the intended value.
This illustrates an important principle:
Calibration should begin with a carefully captured photograph rather than trying to correct poor exposure afterwards.
White Balance and Colour Calibration Are Different
White balance and colour calibration are related, but they are not the same thing.
White balance establishes how the image should interpret the neutral tones under the prevailing light. This primarily involves correcting colour temperature and tint.
Colour calibration goes further by examining how a range of known colours have been recorded.
A grey card can therefore be useful for establishing white balance, but a multi-colour target provides considerably more information for creating a colour profile.
For colour-critical photography, using both approaches together can produce a more reliable result.
Using a Colour Profile in RAW Processing
Once the calibration target has been photographed, compatible software can analyse the colour patches and create a profile.
That profile can then be applied to the corresponding RAW photographs.
The exact workflow varies between applications.
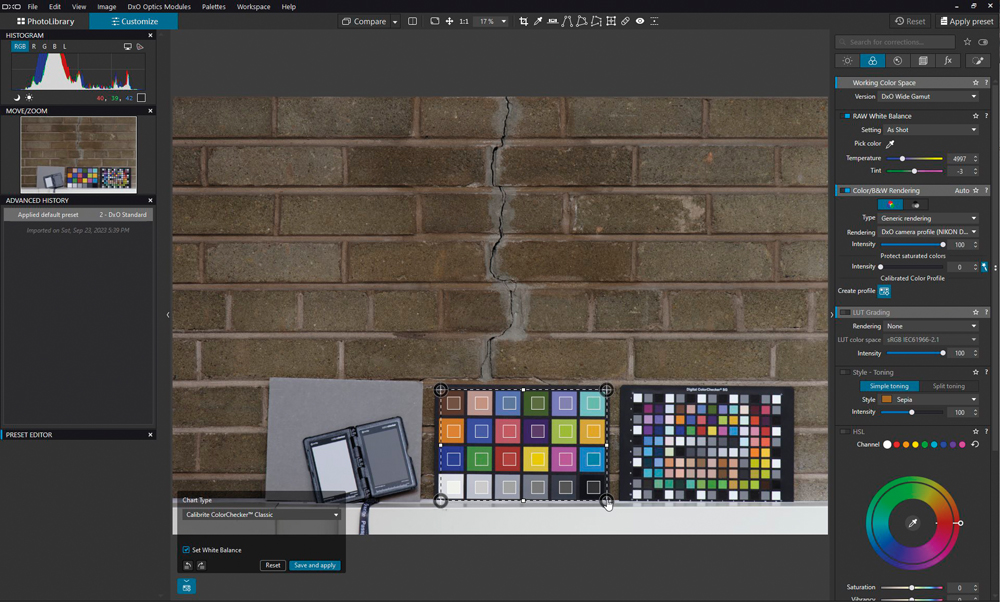
In DxO PhotoLab, for example, the calibration tools can be used to create a profile from supported colour targets. The resulting correction can then provide a more accurate colour baseline before further creative adjustments are made.
This is an important distinction.
The objective of calibration isn’t necessarily to create the final image.
Instead, it is to establish a known and repeatable colour starting point.
Once that baseline has been established, the photographer can make creative decisions about contrast, saturation, toning and colour grading.
How Accurate Can Colour Calibration Be?
The accuracy achievable depends on several factors.
These include:
- The calibration target being used
- The number and range of colour patches
- The quality and consistency of the lighting
- The accuracy of the exposure
- The camera’s colour response
- The calibration software
- The quality of the resulting profile
In testing the DxO PhotoLab workflow, a 24-patch target produced an average colour error of approximately 3.81 ΔE00 before calibration.
Applying the resulting PhotoLab profile reduced the average error to approximately 3.31 ΔE00.
These figures demonstrate that the calibration produced an improvement, although they also illustrate that a relatively small target has limitations when compared with a much larger reference target and a more comprehensive profiling workflow.
For many commercial applications, this level of accuracy can be perfectly adequate.
For highly demanding colour reproduction work, however, considerably more sophisticated profiling may be justified.
More Colour Patches Mean More Information
Not all calibration targets provide the same amount of information.
A basic grey card gives you very little information about the camera’s response to different colours.
A 24-patch colour target provides substantially more information.
Larger targets contain many more colour samples and can therefore provide a more detailed picture of how the camera records colour across a wider gamut.
In testing, the larger SG-style target produced dramatically more accurate results when used with a full ICC profiling workflow.
This doesn’t necessarily mean that every photographer needs the largest and most expensive target available.
For general commercial photography, a smaller target can provide a useful improvement without adding unnecessary complexity.
The right target depends on how accurately colour needs to be reproduced.
Why Lighting Consistency Is So Important
One of the less obvious challenges of colour calibration is achieving consistent lighting across the target.
Ideally, every patch should receive the same illumination.
In practice, achieving perfectly even lighting can be surprisingly difficult, particularly when working with large targets.
Uneven illumination can introduce errors into the calibration data because the software may interpret brightness differences as characteristics of the colour rather than variations in the lighting.
For critical work, it is therefore worth checking the illumination across the target rather than assuming that the lighting is perfectly even.
Calibration Before Creative Colour Grading
One of the strongest reasons to calibrate a RAW workflow is that it separates technical correction from creative interpretation.
Imagine beginning with a photograph where the colour response of the camera and lighting combination is unknown.
You then make adjustments to saturation, hue and individual colour channels until the image looks right.
The problem is that your creative decisions are being made on top of an uncertain colour baseline.
With a calibrated starting point, the workflow becomes more controlled:
Capture → Calibrate → Correct → Edit → Creative Colour Grade
The calibration establishes the technical foundation.
The creative grading then becomes a deliberate artistic decision rather than an attempt to compensate for an unknown colour response.
DxO PhotoLab as a RAW Processing Example
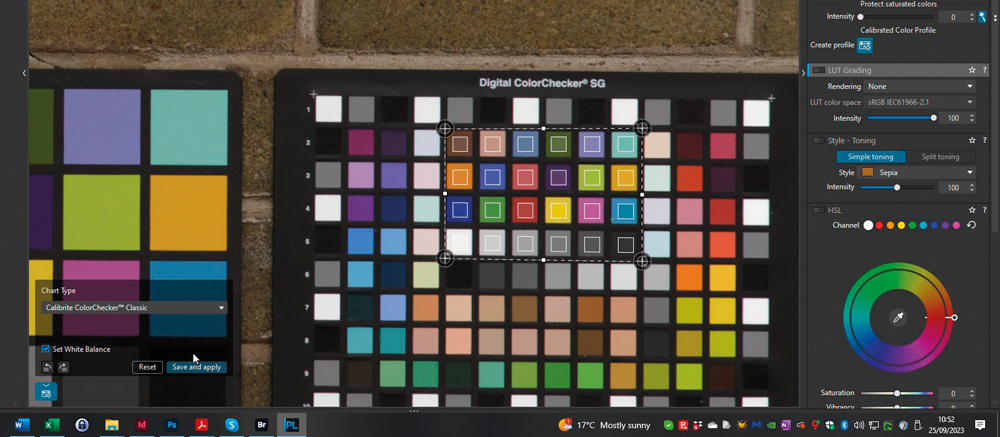
DxO PhotoLab provides a good example of how colour calibration can be incorporated into a RAW processing workflow.
Alongside calibration, its colour tools include white balance, rendering options, HSL adjustments, LUT-based grading and soft proofing.
The software also provides extensive RAW processing, lens corrections, noise reduction, sharpening and local adjustments.
However, it is important to understand where a RAW processor ends and a pixel editor begins.
RAW processing software can provide extensive control over an image, but some complex compositing tasks still require a dedicated pixel editor such as Photoshop or Affinity Photo.
This distinction is useful when designing a complete workflow rather than expecting a single application to perform every possible operation.
Should Every Photographer Calibrate Their Camera?
Not necessarily.
For many photographers, modern camera profiles and RAW-processing software produce perfectly acceptable colour without creating custom profiles.
Calibration becomes more worthwhile when colour consistency matters.
It can be particularly useful for:
- Product photography
- Artwork reproduction
- Commercial photography
- Catalogue photography
- Studio photography
- Copying paintings and prints
- Photography for clients with strict brand colours
- Multi-camera workflows
- Repeated shoots under controlled lighting
For casual photography, the additional equipment and workflow may not be justified.
A Practical Colour Calibration Workflow
For photographers who do need greater colour accuracy, the process can be kept relatively straightforward.
1. Set up your lighting
Make sure the target receives the same light as the subject.
2. Photograph the target
Place the calibration target within the scene and capture a properly exposed RAW photograph.
3. Photograph the subject
Remove the target and photograph the subject without changing the lighting.
4. Establish white balance
Use an appropriate neutral reference to establish the colour temperature and tint.
5. Create the profile
Use compatible calibration software to analyse the colour target and create a profile.
6. Apply the profile
Apply the profile to the corresponding RAW photographs.
7. Make your normal corrections
Adjust exposure, contrast, shadows, highlights and other technical settings.
8. Apply creative adjustments
Once the technical colour is under control, make your desired creative colour and tonal adjustments.
9. Soft proof when necessary
For print-critical work, use soft proofing with the appropriate output colour profile to preview how the image is likely to reproduce.
The Importance of a Reliable Starting Point
Colour calibration isn’t about removing creativity from photography.
Quite the opposite.
The advantage of starting from a known colour baseline is that it gives the photographer greater confidence in the technical accuracy of the file.
From there, creative decisions can be made deliberately.
The tests carried out with DxO PhotoLab demonstrated that even a relatively straightforward calibration workflow can improve colour accuracy, while more sophisticated targets and profiling systems can provide significantly greater precision when the assignment demands it.
For photographers working in colour-critical environments, a calibration target can therefore be a relatively simple way to bring greater consistency and repeatability to a RAW workflow.