How to Use Epson Print Layout for Better Photo Printing
Printing your photographs can be one of the most rewarding parts of the photographic process, but getting a consistent, high-quality print isn’t always as straightforward as it should be.
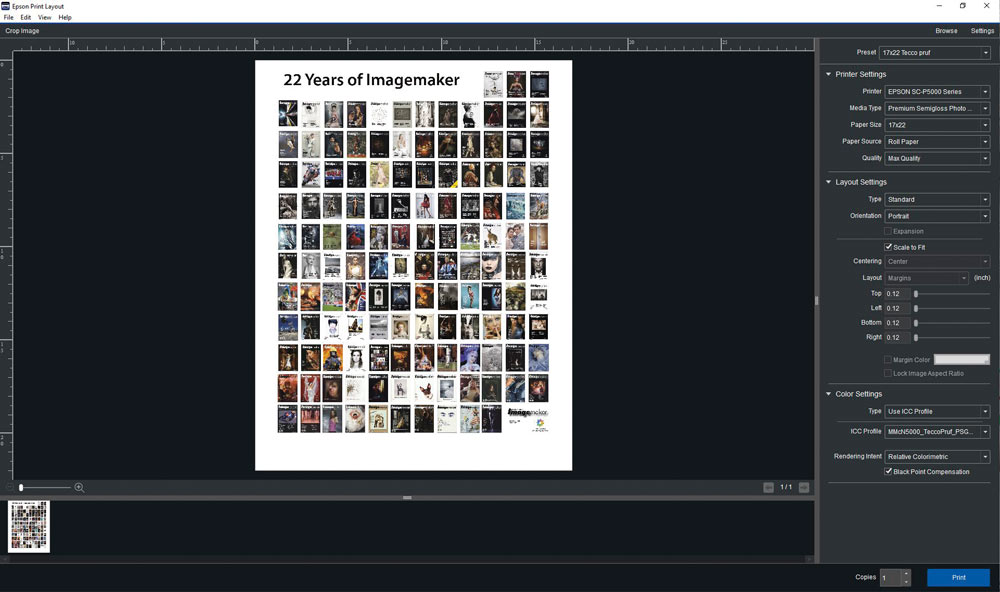
For photographers who use compatible Epson printers, Epson Print Layout provides a much simpler way to manage the printing process. Instead of working through multiple printer and application dialogue boxes, the software brings many of the key settings together in one interface.
That makes it particularly useful for photographers who want to produce high-quality prints without having to become experts in every aspect of printer drivers, ICC profiles and colour management.
What is Epson Print Layout?
Epson Print Layout is free software from Epson designed to simplify the process of printing photographs.
It provides a dedicated interface for preparing images for print, with controls covering paper, printer settings, image positioning, colour management and different print layouts.
The advantage is that you can make many of the important decisions in one place rather than repeatedly moving between your photo-editing software and printer dialogue.
For photographers who don’t print regularly, that can make the process considerably less intimidating.
It can also help experienced photographers by making repeatable printing workflows easier to manage.
Why use Epson Print Layout?
Modern photo printers offer an enormous amount of control. That’s useful when you need it, but it can also make printing unnecessarily complicated.
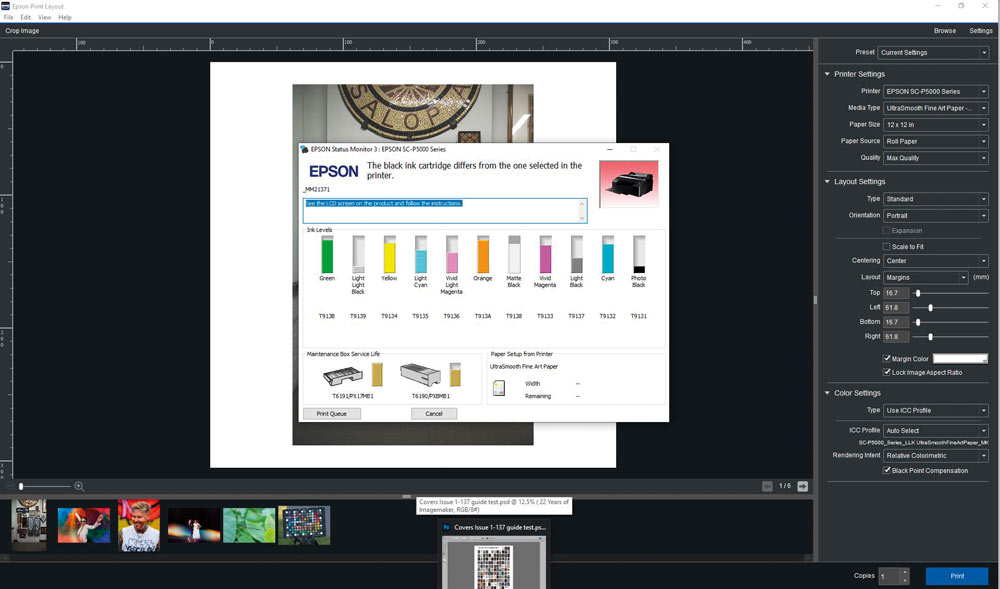
A typical photographic printing workflow can involve decisions about:
- Printer selection
- Paper type
- Paper size
- Paper source
- Print quality
- Colour management
- ICC profiles
- Rendering intent
- Black Point Compensation
- Image scaling
- Margins
- Image orientation
- Cropping
For an experienced printmaker, these options provide valuable control. For someone making an occasional print, however, they can be confusing.
One incorrectly selected setting can also result in a print that doesn’t look anything like the image on screen.
Epson Print Layout is designed to simplify this process.
Getting started with Epson Print Layout
Once installed, the first step is to select the printer you want to use.
You then select the paper and the size of the print you want to produce.
The exact options available will depend on your Epson printer, but the basic workflow is straightforward.
1. Select your printer
If you have more than one compatible printer installed, select the model you want to use.
This is particularly important if you have different printers for different types of work, such as everyday photographic printing and exhibition or fine-art printing.
2. Choose the paper
Selecting the correct media type is one of the most important parts of the process.
Your paper manufacturer’s instructions should tell you which media setting to select.
Don’t assume that two papers with similar finishes should use the same setting. The printer’s media selection can affect the amount of ink applied and how the printer handles the paper.
If you’re using third-party photographic or fine-art paper, check the manufacturer’s recommended printer settings.
3. Select the paper size
Choose the size of the sheet loaded into the printer, or the appropriate roll-paper settings if your printer supports roll media.
Make sure the physical paper and software settings agree. Otherwise, you can end up with unexpected cropping, incorrect positioning or wasted paper.
Understanding ICC profiles
If you’ve previously encountered the term ICC profile, it can sound considerably more complicated than it needs to be.
An ICC profile describes how a particular device or combination of printer, ink and paper reproduces colour.
For photographic printing, you may have an ICC profile specifically created for your printer and paper combination.
When the correct profile is used, your printing software has a much better understanding of how the colours in your digital image need to be translated into the printable colour space of your printer.
This is an important part of achieving predictable results.
Use the correct profile for your paper
If you’re using Epson paper, the appropriate profile may already be available as part of your printer software.
Third-party paper manufacturers may also provide ICC profiles for popular Epson printers.
If you’re using a custom or professionally created ICC profile, Epson Print Layout allows you to select it where appropriate.
The important thing is to make sure that the profile actually corresponds to the combination you’re using:
Printer + ink + paper + media setting
Changing one of those variables can affect the result.
What is a rendering intent?
Rendering intent determines how colours that cannot be reproduced within the printer’s colour gamut are handled.
Epson Print Layout provides different options, including Perceptual and Relative Colorimetric.
For photographers who are new to colour-managed printing, Perceptual can be a sensible starting point, but there isn’t one rendering intent that is automatically best for every image.
If you’re producing colour-critical work or proofing for a particular output, it is worth understanding the differences and testing which option produces the best result for your image.
Black Point Compensation
You may also encounter Black Point Compensation, usually abbreviated to BPC.
In simple terms, it helps manage the relationship between the darkest tones in your source image and the darkest tones that can actually be reproduced by the output device.
For photographers who are just getting started with colour-managed printing, leaving Black Point Compensation enabled is generally a sensible starting point when using an appropriate workflow.
As you become more experienced, you can experiment with different settings and compare the results.
Choosing your print layout
One of the strengths of Epson Print Layout is that it provides a visual representation of how your photograph will sit on the paper.
The interface allows you to control the size and position of the image and provides several layout options.
Standard
The standard layout is designed for straightforward printing of one photograph on a sheet of paper.
This is likely to be the option you’ll use most often.
Panorama
If you’re printing a panoramic photograph, the panorama layout can make it easier to prepare the image, particularly when working with roll paper on a compatible printer.
Gallery Wrap
The Gallery Wrap option is designed for images that will be printed onto material that will subsequently be wrapped around a box frame.
Depending on the available options, the extended area can be created in several ways, including extending the image, mirroring the image or using a background colour.
This can save considerable time compared with creating the extended canvas manually in your editing software.
Templates
Templates allow multiple images to be arranged on a single sheet.
This can be particularly useful for contact sheets, proof prints or producing several smaller photographs from one larger sheet of paper.
If you regularly use the same arrangement, saving it as a preset can make future print jobs much faster.
Scaling your photograph
The layout area gives you a visual indication of how your photograph will appear on the selected sheet.
One useful option is Scale to Fit, which adjusts the image to make the largest possible print within the available printable area.
However, always pay attention to the aspect ratio of your photograph.
If your image and paper have different proportions, you may need to crop the photograph before printing or accept that some areas of the paper will remain unused.
For important prints, don’t simply rely on the preview. Check the image carefully and make sure important details aren’t being unintentionally cropped.
Print quality settings
Modern photographic printers can offer different quality levels, and it can be tempting to assume that the highest setting should always be selected.
For exhibition-quality or particularly important prints, using the highest appropriate quality setting can make sense.
However, the difference between settings isn’t always dramatic, and higher-quality modes can significantly increase print time and ink consumption.
For everyday proofs and test prints, a faster setting may be perfectly adequate.
For a final exhibition print, however, taking the extra time can be worthwhile.
Don’t overlook test prints
Even with a carefully colour-managed workflow, producing a small test print can save money.
This is particularly important when you’re working with:
- An expensive fine-art paper
- A large print
- A new paper/printer combination
- A new ICC profile
- An image with critical shadow or highlight detail
Spending a little time checking a smaller print can prevent an expensive mistake later.
What about older Epson printers?
One of the interesting things about printer software is that older models can sometimes continue to work with newer workflows, but compatibility should never be assumed.
If you’re using an older Epson printer, check Epson’s current compatibility information and software requirements before relying on Epson Print Layout.
The same applies if you’re considering buying a second-hand professional photographic printer specifically to use with the software.
A printer may still physically produce excellent photographs, but that doesn’t necessarily mean that it is officially supported by current software.
Is Epson Print Layout worth using?
For photographers using a compatible Epson photo printer, Epson Print Layout is certainly worth investigating.
Its biggest advantage isn’t necessarily that it gives you more control. In many cases, it does the opposite.
It makes the important controls easier to understand and access.
For photographers who are new to printing, that can remove a significant barrier between having an image on a computer and producing a physical photograph.
For more experienced photographers, it can also provide a more consistent workflow and make repeat printing jobs easier to manage.
The key is to understand the fundamentals: use the correct paper, select the appropriate media setting, use the correct ICC profile where required and check your image carefully before committing to an expensive sheet of paper.
Once those basics are under control, printing becomes much less intimidating.
And that’s ultimately what good printing software should do: get out of the way and let you concentrate on making a great print.