Creepy Monk: How to Create Dramatic Catchlights with Off-Camera Flash
By Dave Montizambert
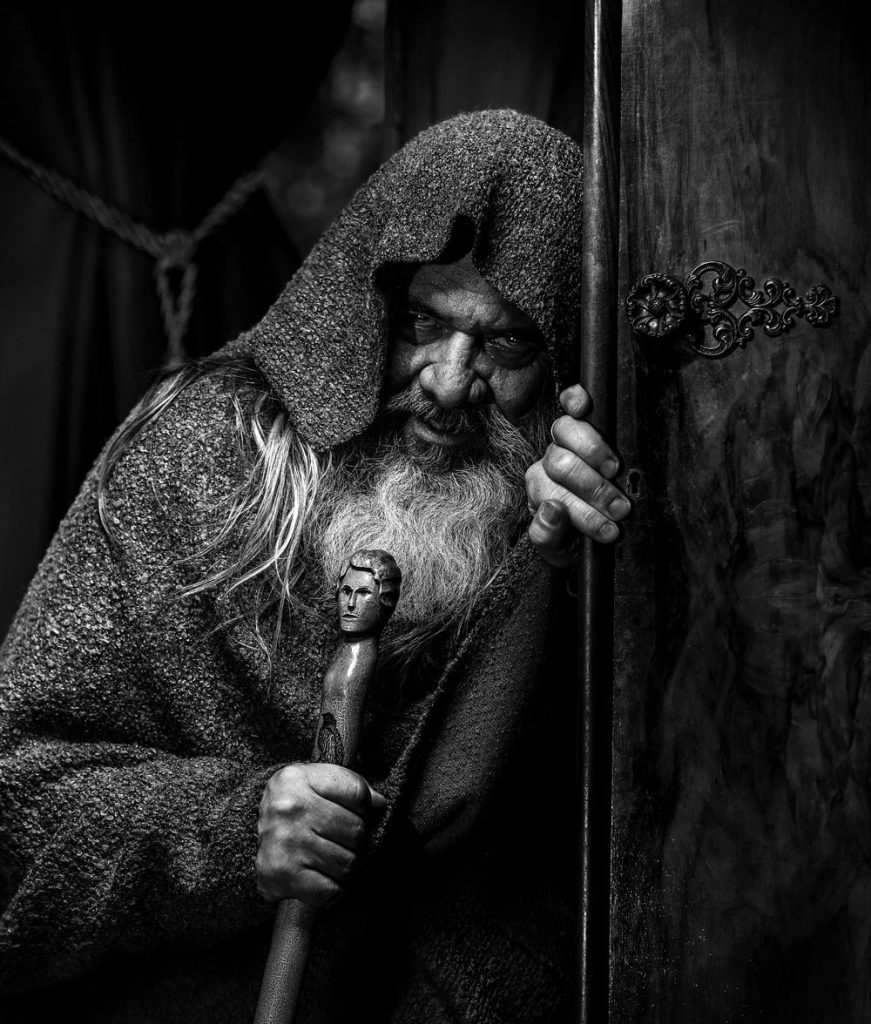
Sometimes a lighting technique comes from a carefully planned shoot. Sometimes it comes from testing equipment with a friend who happens to turn up looking like he belongs in a medieval horror film.
For photographer and lighting educator Dave Montizambert, it was the latter.
While testing new lighting equipment with commercial photographer John Watson, Dave was struck by John’s impressive beard and cinematic appearance. John also worked as a film extra, regularly taking on roles such as zombies, medieval knights and Vikings, so the idea quickly developed into a character portrait.
The result was the “Creepy Monk”.
But beneath the sinister character was a fascinating lighting lesson: how to control the brightness and size of catchlights independently from the overall shadow detail in a portrait.
It’s a technique that can be particularly effective when creating dramatic, cinematic or film-noir-inspired portraits.
Why catchlights matter in portrait photography
Catchlights are the reflections of a light source visible in a subject’s eyes.
They might seem like a small detail, but they can make a considerable difference to a portrait.
Without a catchlight, eyes can appear dark, flat or lifeless, particularly when the lighting is intentionally dramatic.
Adding a controlled reflection introduces a sense of life and depth.
The challenge is that dramatic portrait lighting often relies on deep shadows. Add too much fill light and you can destroy the atmosphere you’re trying to create.
Dave wanted to find a balance.
The Creepy Monk needed deep, sinister shadows while retaining enough detail to prevent the darker areas of the face from becoming featureless.
And the eyes needed a little more life.
Creating the initial lighting setup
The first step was to establish the dramatic main light.
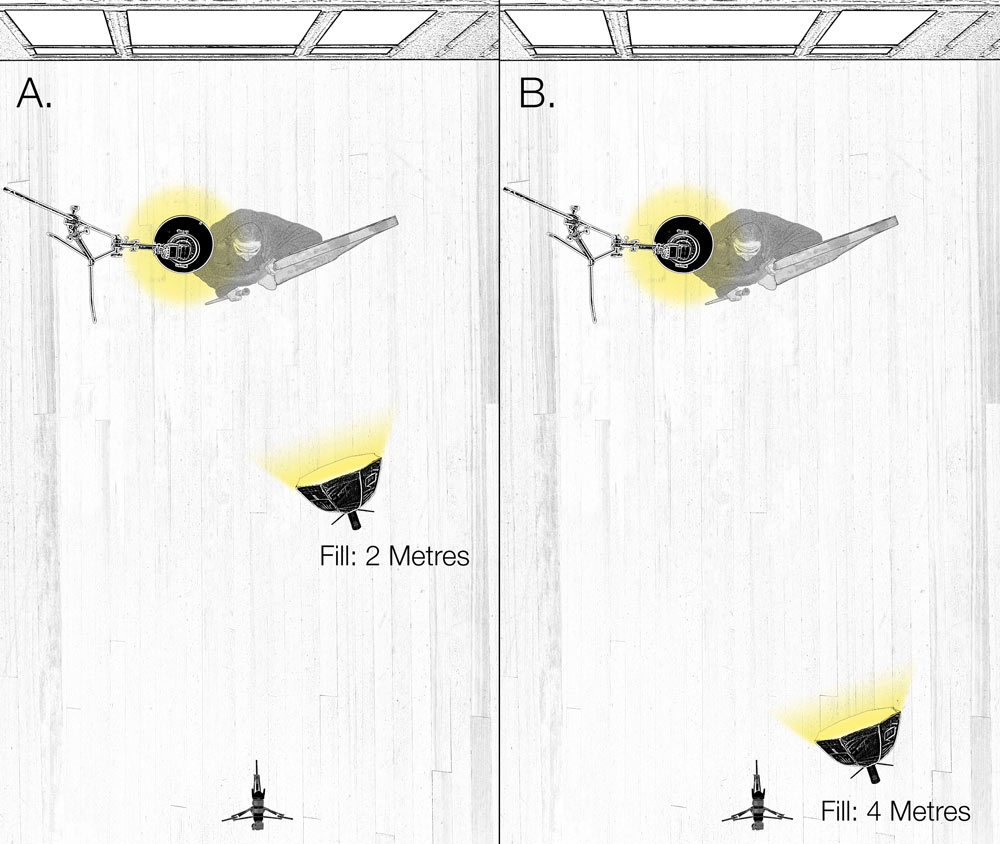
Dave used a 30cm beauty dish with an off-camera flash positioned above and to camera left of John.
Because of the position of the light relative to John’s pose, much of his face – particularly the eye sockets – fell into shadow.
That immediately created the darker, more sinister appearance Dave wanted.
Deep shadows can be extremely effective when creating atmosphere. They encourage the viewer to imagine what might be hidden within those darker areas.
However, Dave didn’t want the shadows to become completely black.
He wanted subtle detail to remain.
Adding fill light without losing the atmosphere
To bring some detail back into the shadows, Dave introduced a second light source.
A monobloc studio strobe fitted with a 53cm octabox was positioned approximately two metres in front of John.
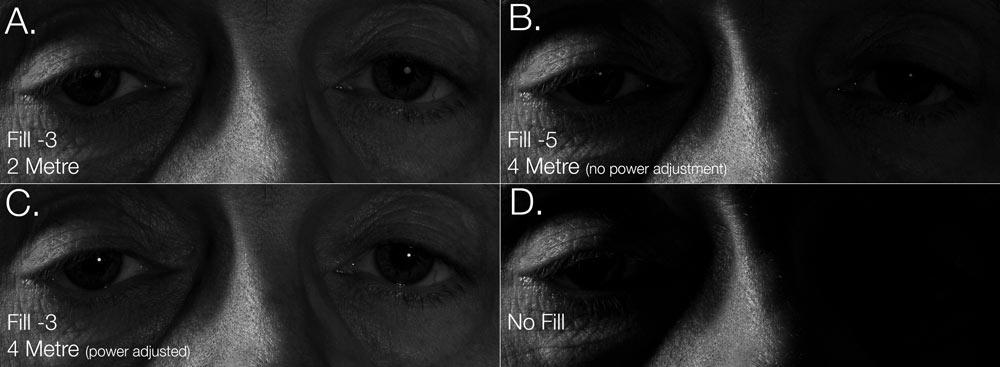
Using an incident light meter, Dave adjusted the fill light to approximately three stops below the camera exposure.
This provided enough illumination to lift the shadows while maintaining the dramatic lighting ratio.
It also introduced catchlights into John’s eyes.
But there was a problem.
The catchlights weren’t bright enough.
Dave wanted the eyes to have more intensity without making the rest of the portrait brighter.
This is where the technique becomes particularly interesting.
How to make catchlights brighter without lifting the shadows
The solution involved changing the distance of the light source.
Rather than simply increasing the power of the fill light, Dave moved it further away.
The fill light was moved from approximately two metres to four metres from John.
At first, that might seem counterintuitive.
Moving the light further away makes the subject darker, so why would you do this if you want brighter catchlights?
The answer lies in the relationship between the light source and its reflection in the eye.
The inverse square law
When you double the distance between a light source and a subject, the light falling on that subject is reduced significantly.
This is known as the inverse square law.
In simple terms, moving the light further away spreads its energy over a much larger area.
In Dave’s setup, moving the light from two metres to four metres meant the illumination falling on John dropped by approximately two stops.
The shadow areas therefore became considerably darker.
That wasn’t the final result Dave wanted.
But it gave him the starting point for the next step.
Increasing the flash power
Once the fill light had been moved back to four metres, Dave increased its power by two stops.
This compensated for the loss of illumination caused by moving the light further away.
The overall shadow brightness therefore returned to approximately the same level as before.
But something else had changed.
The catchlights in John’s eyes had become smaller and more intense.
That’s the key to the technique.
Why did the catchlights become smaller?
Think of the surface of the eye as a curved mirror.
The apparent size of the reflected light source depends partly on how large that source appears from the subject’s position.
Move the light closer and it appears larger in the eye.
Move it further away and it appears smaller.
By moving the octabox from two metres to four metres, Dave reduced the apparent size of the catchlight.
He could then increase the power of the light to compensate for the reduction in overall illumination.
The result was a smaller, brighter catchlight while maintaining the desired level of shadow detail.
The final lighting effect
The result was a portrait that sat somewhere between reality and fantasy.
John’s face retained the deep shadows needed to create the sinister character, while the eyes had a more intense glow.
The technique also affected the subtle specular reflections across the skin.
Some of the areas that might initially appear to be lifted shadows are actually reflections from the fill source.
This distinction is important.
The final image isn’t simply a matter of making the entire face brighter.
Instead, Dave was controlling different aspects of the light to create a specific visual effect.
Try this catchlight technique yourself
The technique can be adapted to many types of portrait photography.
If you’re working with off-camera flash or studio lighting, try experimenting with the following:
1. Start with your main light
Create the mood and shadow pattern you want before worrying about the catchlights.
2. Add a subtle fill light
Use a larger light source positioned towards the camera to introduce some detail into the shadows.
3. Move the fill light further away
Try doubling its distance from the subject.
Remember that this will reduce the illumination falling on the subject.
4. Increase the light power
Increase the output to compensate for the increased distance.
5. Watch the eyes
Pay close attention to the catchlights.
Moving the light further away should change their apparent size.
6. Compare the results
Take photographs before and after moving the light.
Look not only at the overall exposure but also at:
- Catchlight size
- Catchlight brightness
- Shadow detail
- Skin reflections
- Overall contrast
- The mood of the portrait
Small changes in light position can have a surprisingly significant effect.
Use catchlights to control the mood of a portrait
Catchlights aren’t simply about making eyes look brighter.
They can become part of the creative lighting design.
A large softbox close to the subject can create large, soft catchlights that contribute to a bright, open portrait.
A smaller or more distant source can create a smaller, more concentrated reflection.
For dramatic portraits, controlling the size and intensity of that reflection can help create a much more cinematic appearance.
This is particularly useful when working with:
- Character portraits
- Editorial photography
- Film-inspired portraits
- Low-key portraits
- Actor headshots
- Fantasy photography
- Costume photography
- Dramatic studio portraits
Lighting doesn’t always have to be complicated
One of the most useful lessons from Dave’s Creepy Monk portrait is that dramatic lighting doesn’t necessarily require a huge collection of equipment.
The effect came from understanding where the lights were positioned, how their distance affected the exposure and how the eye responded to the reflected light.
That’s the real value of learning lighting.
Rather than simply adding another light every time something doesn’t look right, understand what the existing light is doing first.
Move it.
Change its size.
Change its distance.
Change its power.
Then look carefully at the result.
Sometimes the smallest adjustment produces the biggest creative difference.