Sports Photography: Timing, Shutter Speed, Lenses and Technique
By Mike McNamee
McNamee goes back to his roots and tries to remember what it was like sitting by a pitch on a cold, foggy November day.
Sports photography is the macho end of the profession, all about action, timing, thrills and spills. It is also intensely competitive, as the number of slots for photographers is often severely limited by space or commercial restrictions.
The technology has also changed as rapidly – or more rapidly – than many other branches of photography.
Two of the major changes have been the ability to shoot for longer without changing film and the transmission of images by radio directly to the picture desk. With the technology comes expense, and certainly a lot more kit to lug along to a venue, including mobile phones, laptops and radio systems.
An indirect effect of not having to transport film across the film gate is that it became easier to speed up a camera, and framing rates rose, with relatively inexpensive cameras such as the Nikon D200 pushing 5fps while its D2X cousin could chug along at 8fps.
Some things, however, do not change.
Fast hands and good eyes are still as important as ever, as is knowledge of the sport you are photographing.
ISO speeds have stayed relatively constant, with 100 ISO still preferred. The difference with digital is that you can change the rating “mid-film”.
A desire to stay at 100 ISO demands f/2.8 lenses, as we will demonstrate later in this feature. One supreme advantage for the sports photographer is that the smaller digital chip gives additional focal length at little or no extra cost – what is the bane of the architectural photographer is a boon to his sports colleague.
The Exposure Value
This is simple deduction.
In average UK sunlight, you need 1/ISO as your shutter speed with f/11 as your aperture. For an ISO of 100 and an aperture of f/2.8, you are able to use a shutter speed of 1/2000th.
Editorial note: The exposure calculations and numerical examples in this section should be checked against the original tables before republication. They have been retained here as part of the author’s original material rather than silently rewritten.
The Database
An analysis of the lenses used and camera settings was conducted by the author some years ago, on film cameras rather than digital.
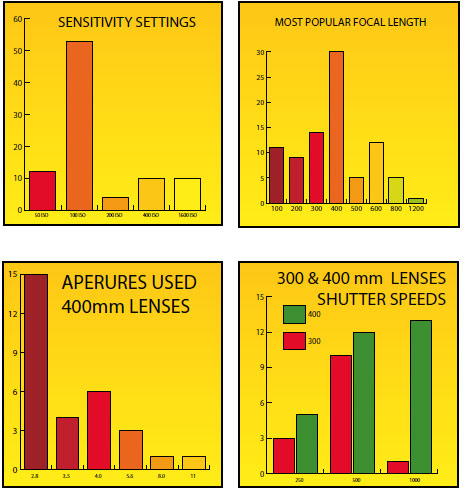
The images were all made by the All Sport photographers and were mainly award-winning pictures. Some of the data were reproduced in graphical form.
In a nutshell, it showed that the most common lens used was 400mm focal length, at f/2.8 and with shutter speeds of 1/1000th.
Shooting at these magnifications and shutter speeds requires a steady hand, smooth movement when following action, and an ability to follow-focus.
The question of whether to use autofocus or manual focus used to find in favour of manual, and that was certainly employed 10 years ago. Today’s autofocus is so good that the options are closer and you can use either, including autofocus to lock on and then blipping the focus lock just at the correct moment.
Editorial note: The references to autofocus should be regarded as historical context. Current autofocus systems are substantially different from those discussed in the original article.
Field Coverage 400mm Lens Soccer 300mm lens Hockey 35mm format
Why 400mm?
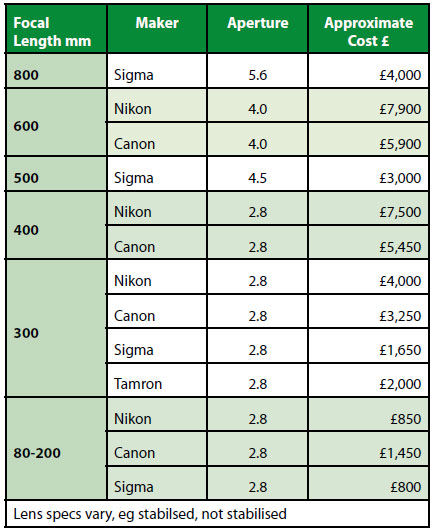
The costs of Nikon, Canon, Sigma and Tamron long lenses were tabled opposite.
None of them was inexpensive. You were going to have to sell a lot of images before getting your money back on a 400mm f/2.8, regardless of where you bought it!
Why do you need such a focal length?
The answer comes down to where you are photographing from and what you need to cover.
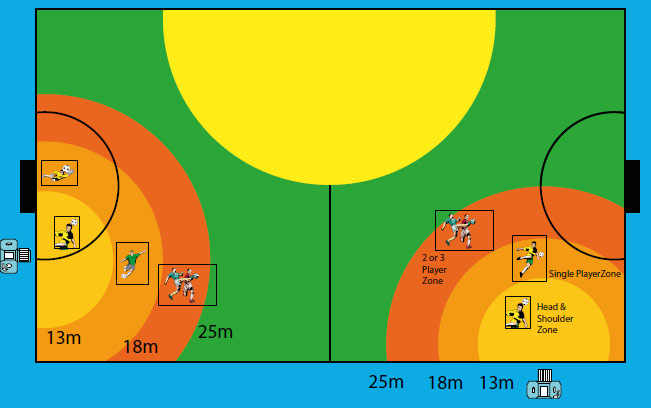
The original diagram was computed for field hockey and a 300mm focal length. It showed zones in which you would capture single players, pairs of players, head and shoulders and so on.
Sitting on the halfway line is the worst of all worlds if you want goalmouth action.
The two prime positions are behind and to the side of the goal. From the sideline, therefore, you can cover a goalmouth melee comfortably with a 300mm lens.
At most Premier Division grounds, you will be pushed back at least another 10 yards from the goal by the slightly wider pitch and by advertising banners.
The upshot is that a 400mm lens gives near-optimum coverage.
Remember that this is the 35mm effective focal length. A 300mm lens on a DSLR with a reduced chip might be just right also.
The underlying lesson remains important: lens choice is closely connected to your position at the venue and the type of action you are trying to capture.
Anyone for Cricket?
It would be foolish to pretend that all you needed was a 400mm f/2.8 lens.
If your ambitions are towards cricket, then even longer focal lengths are going to be needed – these guys regard a 300mm lens as a wide angle!
The distance to the centre of the square at Trent Bridge varies from 61 yards at the Radcliffe Road end to 72 yards to the Parr Stand. To that you need to add another six yards for advertising hoardings. The boundary rope is usually set close to the outer limits of the ground for Test matches.
In addition, you need to add a little under 11 yards for batsmen at the far wicket and subtract the same amount for those at the near crease.
For side-on shots, of course, you maintain a constant 60 to 70 yards depending on where the wicket has been set.
You are thus left staring down the barrel of an 800mm lens, and sometimes a converter as well.
Fortunately, cricket is most often played in good light. Even so, if you use 100 ISO as your speed, your baseline exposure speed is 1/500th – or 1/2000th at 400 ISO.
Using a 2x converter will cost you two stops, and so you drop to an almost unmanageable 1/125th if you stay on ISO 100.
Using a converter is a double whammy. You need faster shutter speeds to accommodate the higher magnification, but you are losing aperture at the same time.
As with all photography, the settings are a compromise between camera shake, subject speed, digital noise and sometimes the simple need to just get a shot at all costs.
Shutter Speed Selection
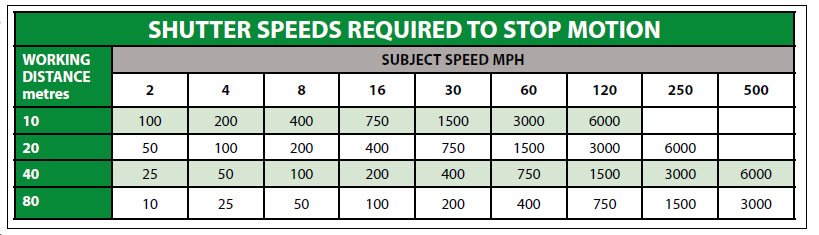
Assuming that you need sharp images, it is possible to compute the required shutter speed to stop action under various circumstances.
Typical subject speeds can be shown in a table, although they vary – international-class athletes go faster, hit faster, bowl faster and so on.
For a 300mm lens, the original analysis calculated shutter speeds at various distances and subject speeds.
By way of example, if we take a hockey player moving at 20mph and a distance of 20m, the original calculation gives a requirement of 1/6000th to stop the action.
This would need an aperture of f/2.8 and an ISO of 200 in bright sunshine, close to the limit of the technology available at the time.
If the subject is a bowler, he will be at 60m minimum, but you also have to add the arm action to his basic speed of 20mph. This brings the ball speed up to close to 90mph for a Test bowler.
Again, the original analysis gives a requirement of around 1/4000th. With an 800mm lens, you would have to go to 400 ISO, probably faster.
Editorial note: These calculations should be independently checked before publication. The purpose here is to preserve the author’s original analysis rather than present historic calculations as universally applicable modern exposure guidance.
Blur Isn’t Always the Enemy
These calculations assume that stopping action is vital.
In reality, this is not so.
Aesthetics demands a bit of blur to create a sense of movement. The trick is to make it look like you meant it, not that you were incompetent!
Note two other things.
An image-stabilising lens is of no help in stopping subject movement. All it will do is prevent you from adding camera shake to an already slightly fuzzy subject.
The calculations assume that the subject is moving across the field of view.
If the action is coming diagonally towards you, you can grab about a half stop to your benefit; if the action is directly towards you, you can grab just over a stop.
The subject movement can also be complex.
A bowler running up to deliver is travelling at around 20mph. If you are panning at that speed, he is effectively stationary on the film.
However, his arm is moving at 70mph at the ball but is effectively at zero mph at the shoulder. The ground is moving at an effective -20mph backwards across the frame.
This is why it is possible to have a near-sharp bowler with a nice blur on the crowd in the background.
The speed differential is even greater if you are panning a racing car.
Here the axle of the wheel has zero translational speed, the bottom of the wheel is stationary if you are panning exactly, but the top of the wheel is moving forward at twice the speed of the vehicle.
While all this is going on, the rotational speed of the wheel is whatever it is.
The net effect can be almost sharp writing on a driver’s helmet, a blurred background and rotationally blurred wheels.
If, in addition, the car is pitching under braking or due to a bumpy surface, then only the logos in the centre of that pitching motion will be sharp.
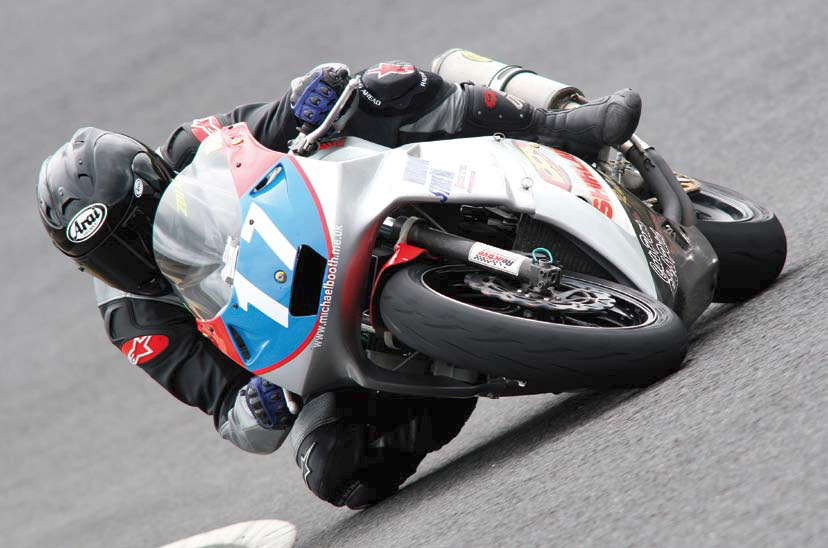
This is an effect you can sometimes see on motorbikes as they dig their noses in under heavy braking into a bend.
Look Carefully at Your Results
There is one piece of advice that jumps out from this analysis.
Subject movement is complex, so be careful when analysing your output and seeking improvements.
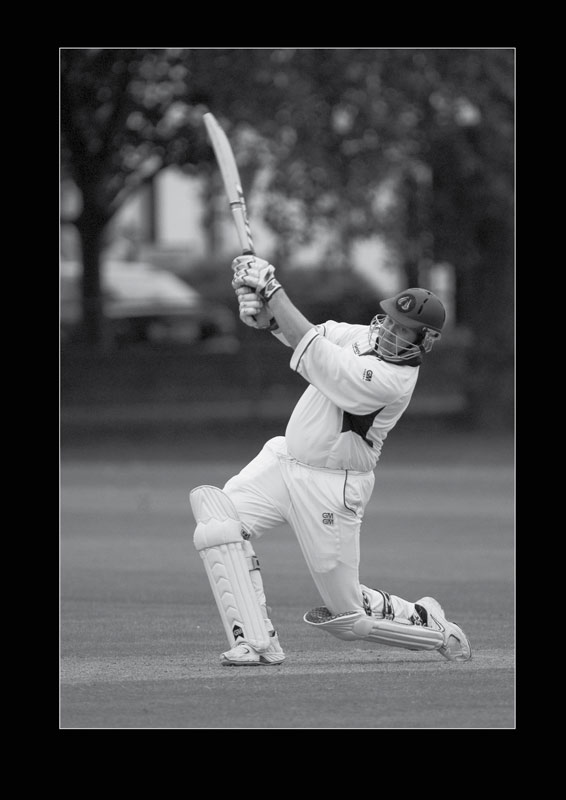
At first glance, the cricket shot on the opening spread looks suspect.
However, a more careful look shows that the feet are pin sharp – you can see the individual stitches – but the shot gets progressively more blurred as the rotational movement increases up the batsman’s body.
Hackett’s slash at the ball did not trouble the leather but sure did scare the life out of it!
The original caption gives the equipment and exposure as:
Sigma 500mm f/4.5; 1/800th at full aperture, 400 ISO, Nikon D200.
Depth of Field
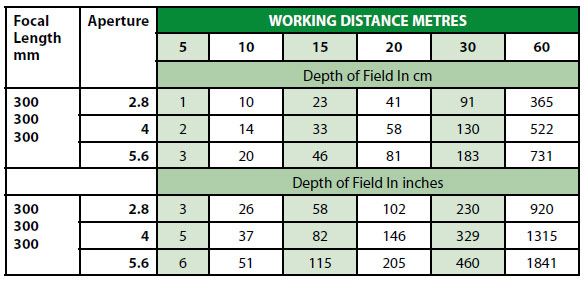
The next demon for the photographer to lay to rest is depth of field.
This is very small on telephoto lenses, especially at the wide apertures needed to get fast shutter speeds.
As we have already seen, apertures of around f/2.8 were being used to achieve optimum shutter speeds.
Harking back to our hockey example, the original analysis found that the depth of field for a 300mm lens at f/2.8 and a working distance of 20m was a little over half a metre.
That is around the length of an outstretched leg.
Unless you get your focus on the knee of the player, the torso and foot stand little chance of being sharp.
These compromises are ones that most sports photographers have to accept.
Peak-of-Action Shooting
One way of giving yourself a little more time – that is, allowing a slower shutter speed – is to shoot at the peak of the action.
Take a pole vaulter as an example.
They will be moving horizontally very quickly on the run-up, and this speed is translated to vertical motion as they climb upwards.
As the vaulter goes over the bar, they tend to be moving very slowly in all directions.
That is just the time to capture them sharply with a lower shutter speed.
You can gain two or three stops of leeway and still keep your image sharp with good timing.
There are other peak-of-action moments in other sports, for example:
- The tennis ball at the top of the service throw-up.
- The golfer at the top of their backswing.
- The basketball player at the top of their leap towards the basket.
The principle is simple: don’t always try to freeze the fastest part of the action. Look for the moment when the subject’s movement naturally slows or changes direction.
Framing and Timing
The uninitiated imagine that sports photographers hammer away at five or ten frames per second in all circumstances.
This is not so.
Timing a moment gives you a single chance to capture a cricket ball on the bat or pads.
If you fire at 5fps as the cricket ball moves through your field of view at 80mph, it moves as much as 23 feet between frames – little chance to be in a frame.
The secret is to anticipate the shot and time your shutter with the ball’s impact on the bat.
Timing comes with practice and good hand-to-eye coordination.
Some people have better timing than others and it has to be said that some will never make sports photographers as long as they live.
Although it pains us old codgers to admit it, it is also why young people are better than us!
Film Taught Timing
When shooting with film, we always had to keep an eye on the frame count, changing the film when the play had moved to the other end of the park and there were just a couple of frames to go.
Striving to use every frame on the roll was a recipe for missing a goal rebound. You use your last shot on the first attempt and are then film-less for the rebound.
Digital saved a lot of these issues because you get so many more shots before you have to pause.
Digital also gives more psychological freedom. On film, you would sometimes miss a shot from a split-second dither about whether it was going to be any good. Now you shoot and trash later!
The rate of shooting in field sports can be very varied.
At one game covered by your author, the first film was used in a six-second spell in the first 10 seconds of the match. Right from the whistle, play had moved to our end and all hell broke loose with shots, saves, rebounds and bodies flying all over the place.
This was followed by an 11-minute spell in which the ball never left the other half of the pitch and not a single frame was exposed.
When that happens, you just have to sit on your hands. Any exposures you make are likely to be scrappers anyway!
Changing Gear at the Right Moment
The time to change film or CompactFlash – or even lens – is while play is at the other end of the park.
When the action is unfolding before you there is time to focus, usually; time to zoom, rarely; time to change cameras, very rarely; and never ever time to change lenses!
Having a camera bag is a complete waste of time. It is one more thing to keep an eye on when you should be watching the action.
Use a vest or belt pack. A vest is often a little warmer as well.
If you need to be mobile – for example, tracking sideline play in rugby – you need a camera and lens. Everything else simply slows you down.
Protection
This piece was written in the middle of the highest summer temperatures on record. It was a little hard to remember cold November matches with sleet driving into your gear and fingers so numb that niggling a flash card out was a huge task.
You need to plan your strategy for keeping warm and dry.
You need boots rather than cotton trainers, a good hat, fingerless gloves, double- or fleece-trousers and a high-performance jacket – or two!
Jeans are the worst possible material for protection in cold, wet weather.
At the other end of the scale, don’t forget your sunscreen and something to protect the head and back of the neck.
A cricket match is a long time to be out in the sun.
Personal Safety
Personal safety is also a consideration.
Make sure that you are insured for what you are about to do, especially for extreme sports.
As Graham Lamb’s shot demonstrates graphically, you also need to keep your eyes open. Sometimes it is better to miss the shot rather than have it published posthumously.
We are pleased to report that Graham needed little more than a change of underwear!
Stability and Support
Although it is difficult to analyse, the body tells us when it is stable.
Note here that the linkages – limbs and torso – are braced in the form of stable pyramids.
The stool, a Flaghead in the original example, is a vital element as it is essentially fixed to the ground by the photographer’s weight and forms the third apex of the base along with the feet.
This is partly why the stool-monopod combination is so good for photography.
Are You Well Supported?
The stability of the photographer, camera, stool and monopod is a straightforward exercise in mechanics.
If you get the buttocks below the knees, that is more stable than having your thighs sloping down towards the knees.
A lower position also enables you to widen your stance while keeping the soles of your feet planted firmly on the ground.
In the original image, the difference between a tall photographer and a short one could be seen.
In this case, the 20-inch Flaghead was much better for the editor, with a 27-inch inside leg, than the 24-inch version, which felt significantly less stable.
The stool could be used collapsed, in which case the 20-inch version dropped to about 11 inches off the ground.
This was remarkably stable even though the unspread legs converged on a point and the stool would fall over if you stood up.
It was reasonably comfortable once you had got yourself set and stable.
Member Ryan Browne sits on his Peli case at soccer matches. As well as getting his three cameras, lenses and sundry electronics into place, the wheels are a boon. It is a good firm seat and is waterproof as well.
Standing with a monopod is less stable again, although some situations may demand that you operate that way, such as American football or rugby.
Measuring Camera Shake
How did we test all this?
Easy peasy!
We strapped a laser to the top of the lens and measured the camera shake by watching the laser spot moving up and down on a wall many yards away.
Using this method, you can even see the movement created by mirror bounce with the camera on a tripod.
There are some photographers who do not use support at all, preferring the freedom.
That’s for heroes only. Some can do it – most cannot!