How to Photograph Architecture from Above Without a Drone
By Cristina Pascu-Tulbure and Mike McNamee
An elevated viewpoint can transform architectural photography. Discover how camera poles and masts can help you photograph buildings from above and improve perspective without using a drone.
When photographing historic buildings and architecture, your viewpoint can have a huge effect on the final image.
Most photographers naturally work from ground level, but that isn’t always the best position.
A higher viewpoint can reveal more of a building’s structure, reduce unwanted perspective distortion and produce a more useful image for architectural photography or composite work.
The obvious solution today might be a drone.
But drones aren’t always practical or permitted. Historic sites, conservation areas, airports, military facilities and other locations can have restrictions, while commercial drone work may also involve additional requirements.
An alternative is to put the camera itself on a mast or camera pole.
Why photograph architecture from a higher viewpoint?
Standing at ground level and pointing a wide-angle lens upwards can produce significant perspective distortion.
Vertical lines can converge dramatically, making buildings appear to lean backwards.
This can be corrected to some extent in software, but there is a limit to how much correction can be applied before the image becomes compromised.
Raising the camera changes the geometry of the photograph.
Instead of looking steeply upwards at a building, you’re able to photograph it from a more level or elevated angle.
The resulting image can require considerably less perspective correction.
This can be particularly useful when photographing:
- Historic buildings
- Churches and cathedrals
- Castles
- Industrial architecture
- Large commercial buildings
- Statues and monuments
- Architectural details
- Buildings intended for composite photography
A camera pole can provide an alternative to a drone
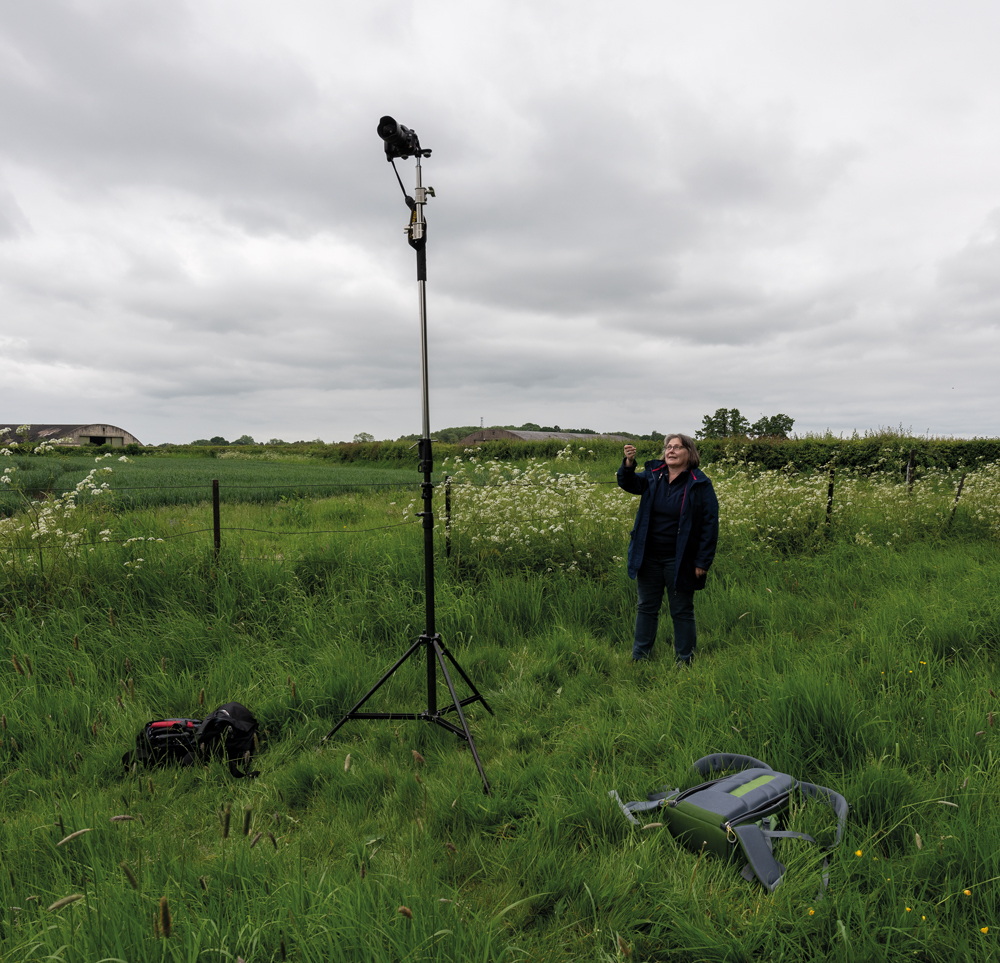
One solution is a telescopic camera mast.
These systems allow a camera to be raised several metres above the photographer.
Some are designed to be operated by hand, while larger systems can be mounted on a tripod or other support.
The principle is simple:
Put the camera higher, take the photograph, then bring it back down to check the result.
Modern systems can also incorporate remote controls and, depending on the equipment, remote monitoring.
The technique can therefore provide some of the benefits of an aerial viewpoint without putting a drone into the air.
The limitations of a camera mast
It isn’t quite as easy as using a drone.
A camera several metres above your head can be surprisingly difficult to position accurately.
Weight becomes an important consideration, particularly when using a full-size DSLR or mirrorless camera with a substantial lens.
The higher the camera goes, the more important stability becomes.
Wind can introduce movement, which can result in blurred photographs.
A heavy camera and lens also make the entire system harder to raise, position and control.
For this reason, the equipment needs to be chosen according to the height required and the camera system being used.
Use a wide-angle lens
A wider lens can be useful when working with a camera mast.
You won’t have the same ability to look through the viewfinder that you would when shooting from ground level, so estimating the field of view becomes more difficult.
A wider focal length gives you some margin for error.
You can then crop the photograph later if necessary.
However, avoid assuming that the widest lens available is automatically the best option.
Ultra-wide lenses can introduce their own distortions, particularly around the edges of the frame.
Choose a focal length that provides enough coverage while maintaining an acceptable level of optical distortion.
How to frame the photograph without seeing the camera
One of the biggest challenges is composition.
When the camera is several metres above you, you may not be able to see the screen or viewfinder.
There are several possible solutions.
Remote monitoring
Some modern camera systems can transmit a live view to a smartphone, tablet or dedicated remote controller.
This makes positioning considerably easier because you can see what the camera sees.
Estimate the composition
If remote monitoring isn’t available, you can estimate the field of view from ground level.
Take a photograph, lower the camera and check the result.
Adjust the position and repeat.
It’s slower, but if you only need one successful frame it can be perfectly practical.
Use a wider frame
Another option is simply to use a wider lens than you would normally choose.
This gives you more flexibility when cropping the final image.
For architectural work, having a little more space around the building can be preferable to discovering later that the top of the structure has been cut off.
Use a fast enough shutter speed
Camera movement becomes more significant as the height of the camera increases.
Even on a relatively calm day, a tall mast can move slightly.
Choose your shutter speed accordingly.
A tripod-mounted system with a rigid mast may provide greater stability than a lightweight hand-held pole, but every setup behaves differently.
Take a test frame and check the sharpness before committing to a complete sequence.
If conditions are windy, it may simply be better to wait.
Remote triggering
A remote trigger is essential when the camera is out of reach.
Depending on your equipment, this might be a radio trigger, wireless remote or smartphone-controlled system.
Before raising the camera, make sure that the triggering system is working reliably.
A frustrating lesson from elevated camera work is that it’s much easier to discover a problem when the camera is on the ground than when it’s several metres above your head.
Check:
- Battery level
- Wireless connection
- Camera sleep settings
- Autofocus settings
- Exposure settings
- Image format
- Memory card capacity
- Remote trigger operation
Turn off automatic sleep functions if your camera allows it and the shooting situation makes this appropriate.
Bracketing can be useful
If you’re unsure about the exact composition or exposure, a short bracketed sequence can give you some additional options.
For example, you might take several exposures or frames before bringing the camera back down to inspect the results.
This is particularly useful when the camera position is difficult to reproduce.
However, remember that every additional sequence means more time spent raising, positioning and lowering the equipment.
Plan carefully before you start.
Correct perspective in software
Even with an elevated viewpoint, some perspective correction may still be necessary.
Adobe Camera Raw, Lightroom and other image-editing applications provide tools for correcting geometry and perspective.
The important point is that software correction works best when the original photograph contains enough information around the edges.
Avoid framing the building so tightly that there is no room for correction.
A little extra space around the subject can give you considerably more flexibility later.
Why this can be valuable for composite photography
An elevated camera position isn’t only useful for conventional architectural photography.
It can also be valuable when creating composite images.
If you’re photographing a building, castle or other structure to use as a background, getting the camera into a more appropriate position can make the resulting image much easier to work with.
Perspective is critical when combining multiple photographs.
If the background has been photographed from an unsuitable height or angle, adding another subject to the scene can make the composite look immediately unrealistic.
A higher viewpoint can therefore provide a more natural perspective for certain composite projects.
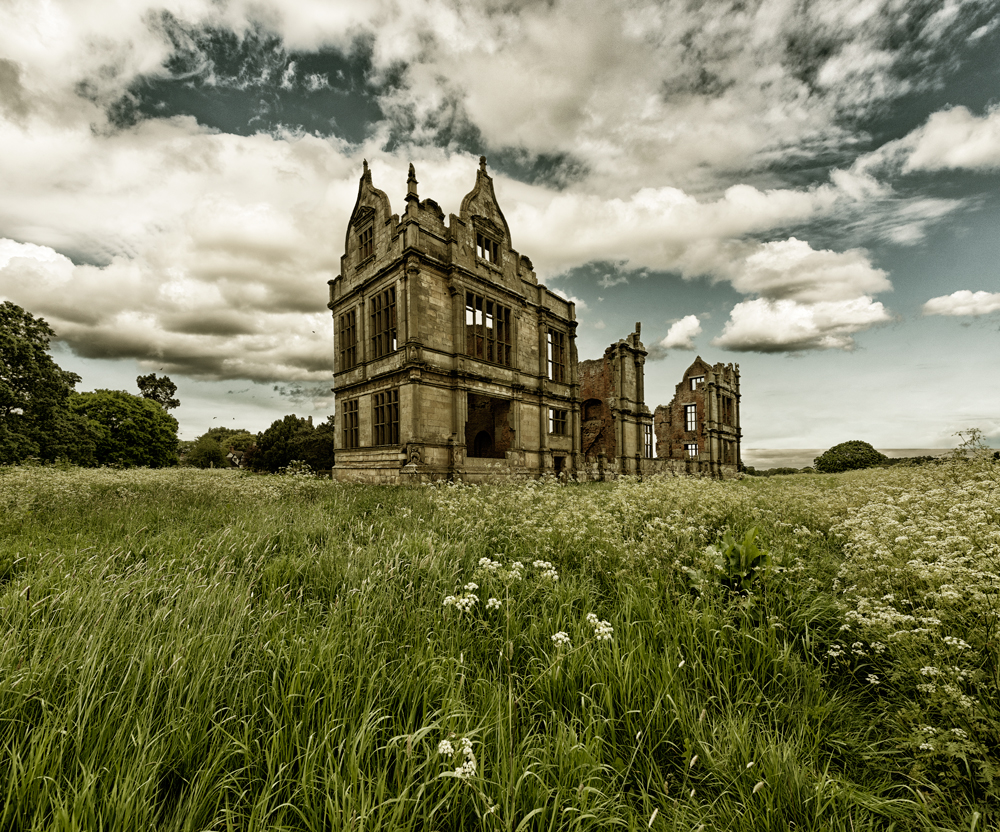
A real-world example: Moreton Corbet Castle
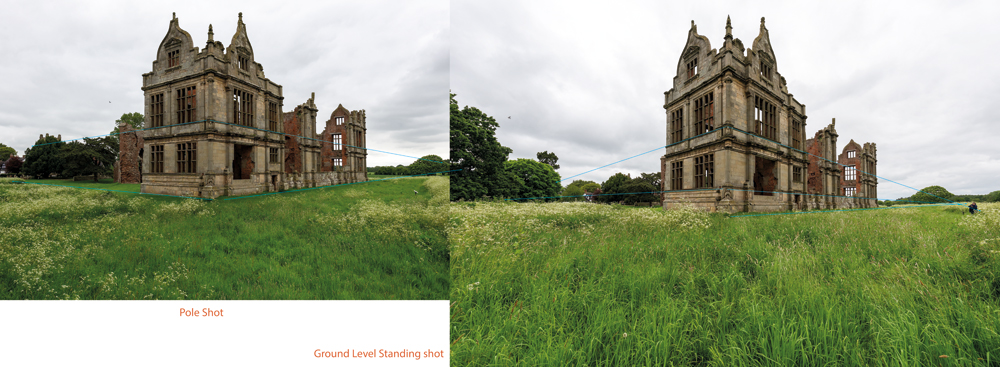
A useful example of this technique came from a visit to Moreton Corbet Castle in Shropshire.
The castle contains substantial surviving Elizabethan architecture, providing interesting opportunities for architectural photography and composite work.
From ground level, the height of the remaining elevations made perspective particularly challenging.
A camera mounted on an elevated mast provided another option.
The camera could be raised above normal eye level, allowing the building to be photographed from a higher position.
The resulting images required less perspective correction and produced a more useful representation of the architecture.
It demonstrated an important principle:
Sometimes changing the position of the camera is more effective than trying to fix the perspective afterwards.
Camera mast or drone?
A drone remains an extremely useful tool for photographers who are able to use one legally and safely.
It is considerably quicker to move through three-dimensional space, and modern drones can provide remarkably stable images from unusual viewpoints.
A camera mast has different advantages.
It can be useful when:
- Drone flights aren’t permitted
- You are working close to structures
- You need a relatively fixed viewpoint
- You want to use a larger camera and lens
- You need higher-resolution files
- You are working at a location where aerial photography is restricted
The trade-off is convenience.
A drone can move quickly from one position to another.
A mast generally needs to be physically positioned, raised, lowered and adjusted.
Don’t overlook lightweight cameras
You don’t necessarily need a professional DSLR or large mirrorless camera for every elevated-camera project.
Compact cameras and action cameras can be particularly useful when weight is a major concern.
A lightweight camera can make it possible to use a longer or more portable mast while reducing the physical demands on the operator.
The compromise is usually image quality and lens choice.
For commercial architectural work where maximum image quality is important, a larger camera may still be preferable.
For scouting, social media, documentation or situations where the camera will be raised very high, a lightweight system can make much more sense.
Safety comes first
Raising equipment several metres into the air introduces risks that don’t exist when shooting from ground level.
The equipment needs to remain under control and the photographer needs to consider the surrounding environment.
Particular care is required around:
- Overhead power lines
- Roads
- Pedestrians
- Buildings
- Trees
- Strong winds
- Uneven ground
Carbon-fibre equipment can also present particular hazards around electrical infrastructure.
Never assume that a camera mast is safe simply because it isn’t a drone.
Follow the manufacturer’s instructions and never raise equipment where it could come into contact with overhead electrical cables.
If you’re working in a public place, consider how equipment could affect other people and whether additional permissions or safety measures are required.
Plan the photograph before raising the camera
The best way to make elevated photography efficient is to do as much preparation as possible while the camera is still on the ground.
Work out:
- Where you want the camera to be positioned.
- The approximate height required.
- The lens and field of view.
- The shutter speed and aperture.
- The focus point.
- The exposure.
- How you will trigger the camera.
- How you will monitor the composition.
- How you will safely raise and lower the equipment.
Once everything is prepared, the actual shooting process becomes much simpler.
Think beyond the traditional viewpoint
One of the most useful lessons from elevated camera photography is that the position of the camera is part of the creative process.
Photographers can become accustomed to working from eye level simply because that’s where the camera naturally sits.
But moving the camera a few metres can completely change the relationship between foreground, background and architecture.
You don’t always need a drone to achieve that.
A carefully selected camera pole or mast can provide an alternative viewpoint, improve architectural perspective and open up new possibilities for composite photography.
And sometimes the most effective way to improve a photograph isn’t another plug-in, lens or Photoshop technique.
It’s simply to put the camera somewhere different.