Photography Light Modifiers Explained: Reflectors, Softboxes and Feathering
Understanding how light modifiers work can transform the way you approach studio photography.
A reflector, softbox or parabolic modifier is not simply an accessory that changes the appearance of a flash. Each one affects the direction, spread, softness and intensity of the light reaching your subject.
Once you understand what is happening to the light, you can make much more deliberate choices about which modifier to use, where to position it and how close to place it to your subject.
This guide looks at some of the key principles behind studio light modifiers, including parabolic reflectors, diffusion, softboxes and feathering.
What is a photography light modifier?
A light modifier is an accessory placed around or in front of a flash or continuous light source to alter the characteristics of the light.
Different modifiers can:
- Direct light into a narrower beam
- Spread light across a larger area
- Soften shadows
- Increase or reduce contrast
- Control spill onto the background
- Change the shape of catchlights
- Create more directional or more wrapping light
There is no single “best” modifier. The right choice depends on the subject, the effect you want and the space in which you are working.
For portrait photographers, for example, a large softbox can create soft, flattering illumination, while a reflector without diffusion can produce a harder and more directional effect.
How does a parabolic reflector work?
The parabola is a mathematical curve with a useful property for lighting.
When light is emitted from the focal point of a parabolic reflector, the reflector redirects the rays so that they travel approximately parallel to the reflector’s central axis.
In simple terms, the reflector takes light coming from a relatively small source and directs it forward in a much more controlled way.
This is one reason large parabolic modifiers can produce a combination of directional light and a very large apparent source.
The principle is not unique to photography. Parabolic shapes are used in applications ranging from satellite dishes and microphones to solar collectors because of their ability to collect or direct waves.
In photography, however, the important question is not the mathematics itself but what that behaviour does to your image.
Why use a large parabolic reflector?
A large parabolic modifier can provide a very different quality of light from a conventional reflector.
With the diffusion removed, the light can be relatively hard and directional while still benefiting from the enormous physical size of the modifier.
This can produce strong modelling across a subject while maintaining an impressive amount of coverage.
Elinchrom’s Litemotiv Para range, for example, includes 120cm and 190cm versions. The 190cm model is an exceptionally large modifier and can be used to create very broad, directional illumination.
Large modifiers can also provide considerable depth across a subject or set, making them useful for portrait, fashion and commercial photography.
However, there is an important distinction to understand.
A large reflector is not automatically a soft light source.
The softness of light depends on the apparent size of the source from the subject’s position. A large modifier can therefore produce different results depending on whether it is being used as a reflective source, with diffusion, or at different distances and angles.
What happens when you add diffusion?
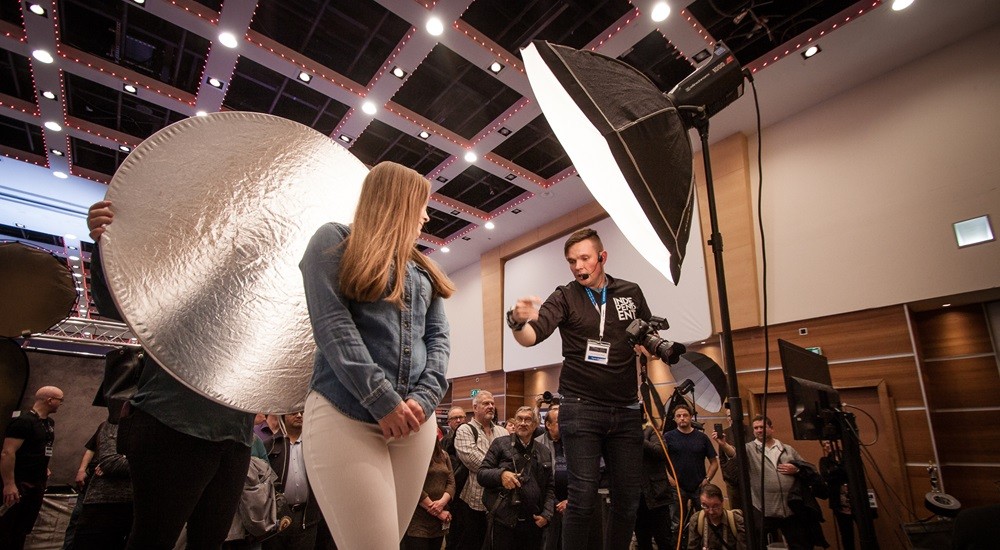
Put a diffusion panel over a reflector or softbox and the behaviour of the light changes considerably.
Instead of directing the light primarily through reflection, the diffusion material becomes a new light-emitting surface.
The larger that illuminated surface appears to your subject, the softer the resulting light can become.
This is the basic principle behind softboxes.
The diffuser effectively turns the front of the modifier into a large light source. Light is scattered across the surface and then travels towards the subject.
The result is generally:
- Softer shadows
- Smoother transitions between highlights and shadows
- Less obvious specular highlights
- More wrapping illumination
- A broader spread of light
The trade-off is that some light is lost during the diffusion process, so you may need to compensate with your flash power, aperture or ISO.
Why do softboxes often have two diffusers?
Many professional softboxes use more than one layer of diffusion.
An inner diffuser helps spread and even out the light within the modifier, while an outer diffuser provides another stage of diffusion before the light reaches the subject.
This can create a more even illumination across the front surface of the softbox.
It also affects the appearance of catchlights.
Because the catchlight is essentially a reflection of the light source in the subject’s eye, the shape of the modifier can often be seen reflected in the eye.
A rectangular softbox can therefore create a rectangular catchlight, while an octagonal modifier can produce a more rounded catchlight.
This is one of those small details that can make a surprising difference in portrait photography.
The inverse square law and studio lighting
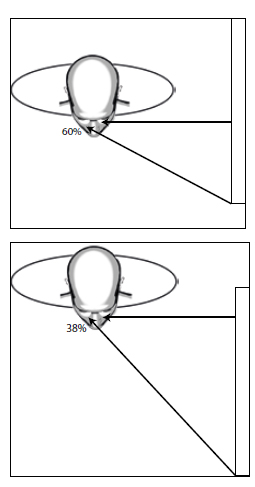
The inverse square law is one of the most useful pieces of physics for photographers to understand.
In simplified terms, the intensity of light from a point source decreases with the square of the distance.
If you double the distance between the light and your subject, the illumination does not simply become half as bright. It falls to approximately one quarter.
This has important consequences in the studio.
Move a light close to your subject and you can create a significant difference in illumination between areas that are near the light and areas further away.
Move the light further away and the relative difference in illumination across the subject can become less pronounced.
This is one reason photographers move lights around rather than simply adjusting their power.
The position of the light changes the character of the image.
Why does moving a softbox change the softness?
A common misconception is that a softbox always produces soft light.
It doesn’t.
The softness of the light depends largely on the apparent size of the light source relative to the subject.
A large softbox positioned close to the subject can appear enormous from the subject’s perspective. This produces broad, soft illumination and gradual shadow transitions.
Move the same softbox much further away and it appears smaller.
The light therefore becomes harder and the transition between light and shadow becomes more pronounced.
This is why large softboxes are frequently positioned surprisingly close to portrait subjects.
Don’t be afraid to bring the modifier in.
Provided you can position it where you need it without interfering with the composition or subject, moving a large light closer can often produce a more flattering result than simply turning up its power from across the studio.
What is feathering in photography?
Feathering is a technique used to control the way light from a softbox falls across a subject.
Rather than pointing the centre of the softbox directly at the subject, you rotate or angle it so that the subject is illuminated more by the edge of the light.
This can produce a very different result.
The centre of a softbox may be aimed past the subject while the edge of the illuminated surface provides the light that reaches them.
This is often called feathering the light.
Elinchrom also highlights feathering as an effective way to create a more controlled transition between light and shadow.
Why feather a softbox?
Feathering can help you control both the subject and the background.
For example, instead of aiming a softbox directly at a person’s face, try turning it slightly so that the edge of the light passes across them.
You may find that the resulting illumination is more controlled, with a pleasing transition from highlight to shadow.
It can also reduce unwanted illumination reaching the background.
This is particularly useful when you want to keep your subject bright while allowing the background to become darker.
Adding a grid to a softbox can provide even more control by restricting the spread of the light. Elinchrom’s current Rotalux and Rotagrid guidance specifically demonstrates this combination for isolating the subject from the background.
Feathering isn’t magic
Feathering is sometimes described as though it creates a special type of light.
It doesn’t.
The effect comes from changing the angle at which the light reaches the subject and using different parts of the modifier’s illuminated surface.
The important thing is to experiment.
Try the same softbox in three positions:
- Point the centre directly at the subject.
- Rotate it slightly so the edge illuminates the subject.
- Rotate it further so that the modifier is aimed beyond the subject.
Look at how the brightness, contrast and background illumination change.
You will quickly develop an instinct for how much feathering is appropriate for a particular subject.
Softbox shape affects the image
The physical shape of your modifier matters.
A rectangular softbox produces a different reflection in the eyes from an octagonal softbox. A strip box produces a narrow vertical source that can be particularly useful for edge lighting, full-length portraits and controlling the spread of illumination.
Deep softboxes can also provide more directional control than shallower designs.
Elinchrom’s own educational material demonstrates how changing between deep and shallow Rotalux softboxes changes the character and direction of the light, while larger modifiers provide increasingly broad illumination.
This is why choosing a modifier should not simply be about its size.
Think about:
- Shape
- Depth
- Diffusion
- Distance from the subject
- Direction
- Whether you are using a grid
- How much spill you want
- The type of catchlight you prefer
How many diffusers should you use?
More diffusion generally means more scattering and a softer, more even light source, but it also reduces the amount of light reaching your subject.
Rather than automatically using every diffuser supplied with a modifier, experiment with different combinations.
Try:
No diffuser:
More contrast and direction, with a harder quality of light.
Inner diffuser only:
A compromise between direction and diffusion.
Outer diffuser:
A broad, softer light source.
Inner and outer diffusers:
Typically the most even and diffused result.
The exact effect will depend on the modifier and the position of the light, so experimentation is more useful than treating these as fixed rules.
A simple softbox experiment
You can learn a great deal about modifiers without complicated lighting setups.
Take one large softbox and photograph the same subject several times.
Keep the camera, exposure and subject position consistent.
Then change only the position of the light.
Test 1: Close and straight on
Place the softbox close to the subject and point it directly towards them.
Look at the softness of the shadows and how much the light wraps around the subject.
Test 2: Close and feathered
Keep the softbox at roughly the same distance but rotate it so the edge of the light crosses the subject.
Compare the transition between highlights and shadows.
Test 3: Further away
Move the same softbox further from the subject.
The source now appears smaller and the character of the light changes.
Test 4: Add a grid
Add a grid if your modifier supports one.
Compare how much light reaches the background and surrounding areas.
This simple exercise will teach you more about light modifiers than memorising a list of lighting diagrams.
Choosing the right modifier
Rather than asking which modifier is “best”, ask what you need the light to do.
For soft portrait lighting
A large softbox or octabox close to the subject is a good starting point.
For directional light
A reflector or deeper modifier can provide greater control over the direction of the light.
For broad, even illumination
A large diffused modifier can cover a substantial area while producing softer transitions.
For edge or rim lighting
A strip box can provide a long, narrow source that follows the shape of the subject.
For greater control
A grid can restrict spill and help keep light away from the background.
For dramatic lighting
Try reducing the size of the light source, moving it further away or removing diffusion.
Small changes in position can produce surprisingly large changes in the final photograph.
The most important modifier is the one you understand
Studio lighting can appear complicated because there are so many modifiers available.
But you don’t need a cupboard full of equipment to learn how to control light.
Start with one good modifier and experiment with:
- Distance
- Height
- Angle
- Direction
- Diffusion
- Feathering
- Grids
- Flash power
Photographers sometimes concentrate too much on buying another modifier when moving the one they already own by a few feet could produce the result they are looking for.
Understanding the physics gives you the foundation. Practice turns that knowledge into instinct.
The more you experiment with how light behaves, the less you will need to rely on lighting diagrams or prescribed setups. You will be able to look at a subject, decide what you want the light to do and choose the position and modifier that will achieve it.
That is when studio lighting becomes much less about equipment and much more about photography.