How to Light Glass Bottles: Photography Lighting for Shiny Surfaces
By Dave Montizambert
Photographing glass bottles, liquids and other shiny surfaces can be one of the most rewarding types of still-life photography – and one of the most frustrating.
The problem is that you are not simply lighting the bottle. You are lighting the reflections of your light sources on the bottle.
That distinction is crucial.
With a matt subject, you can generally position a light to illuminate the surface and control the resulting shadows. Glass, polished metal, glossy packaging and liquids behave differently. They reflect their surroundings, including your softboxes, reflectors and even the room itself.
Understanding those reflections gives you a much greater degree of control.
One of the techniques I discovered early in my career is particularly useful when photographing cylindrical objects such as bottles: the orientation of a rectangular light source can change the appearance and brightness of its reflection.
In other words, sometimes you simply need to “line ’em up”.
Start with the visual idea
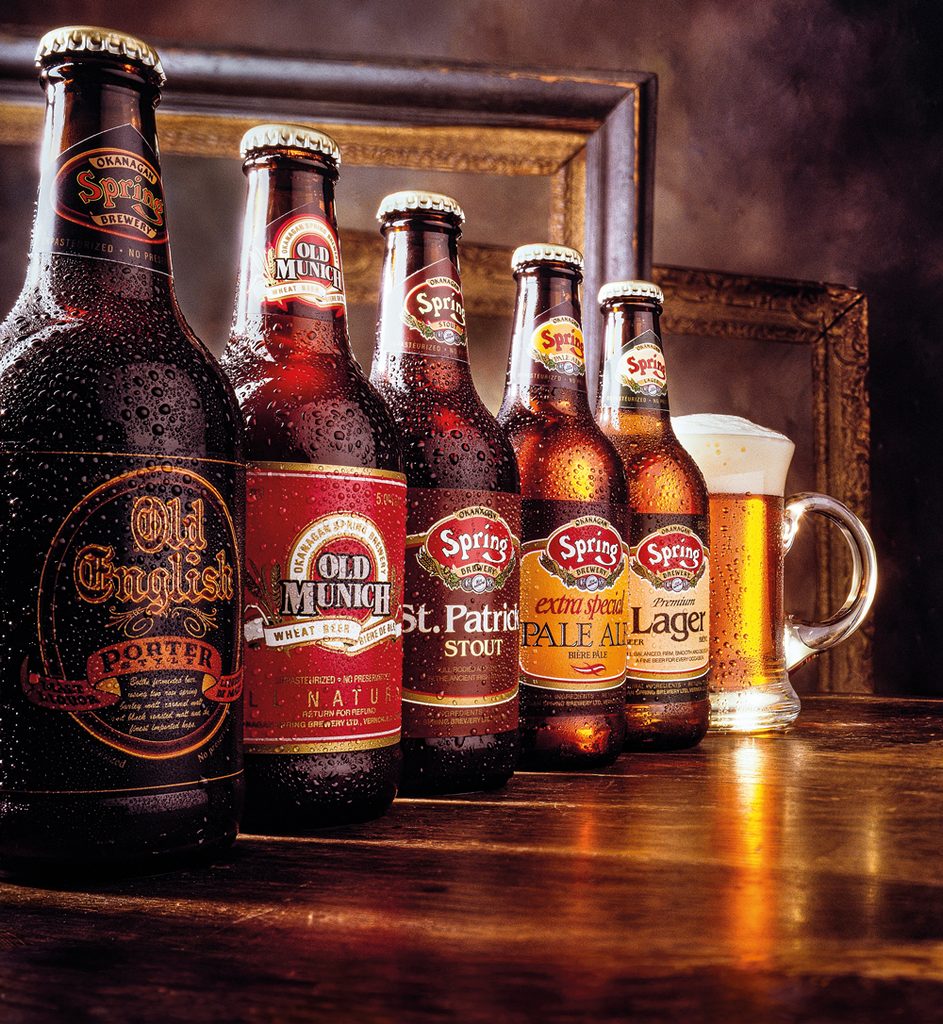
This technique came into play when I was commissioned by artisan brewery Okanagan Spring Brewery to create a promotional image featuring five of its beers together, with one of the products also shown as beer in a mug.
The previous promotional image had shown all the products clearly, but the lighting and arrangement were relatively flat. The bottles and mug looked more like a collection of products than a single visual story.
I wanted something more dramatic.
Before setting up the lights, I wrote down the qualities I wanted the finished image to communicate:
- artisanal
- traditional
- great taste
- refreshing
- excitement
- drama
- depth
That immediately suggested that this should be more than a conventional product photograph.
An old painted canvas became the background, while antique picture frames and a traditional tabletop helped suggest the heritage of the brewery. The bottles were arranged on an oblique line rather than simply placed side by side.
That arrangement was important because it created depth and converging lines, leading the viewer’s eye towards the glowing beer in the mug.
The lighting would then provide the drama.
Why glass is difficult to light
Glass is largely defined by its reflections.
When you photograph a bottle, you aren’t just recording the colour of the glass and its label. You are recording reflections from the light sources surrounding it.
These reflections are called specular highlights.
A specular highlight can reveal whether a surface is:
- smooth or rough
- glossy or matt
- wet or dry
- curved or flat
On a glass bottle, the highlight is often what makes the viewer understand that they are looking at glass.
The challenge is controlling it.
A reflection that is too weak can make a bottle look dull and lifeless. A reflection that is too bright can obscure the label and become the most obvious feature in the photograph.
The objective is not necessarily to eliminate reflections. It is to control them.
The size of the light source matters
One of the most important controls when lighting reflective objects is the apparent size of the light source.
A larger light source generally produces a larger reflection across a curved surface. That spreads the reflected light over a greater area, reducing its apparent intensity.
Moving a light source closer can have a similar effect.
If you move the light closer while reducing its power to maintain the same exposure, the source becomes effectively larger from the subject’s point of view. Its reflection spreads over more of the bottle, reducing the intensity of the highlight.
This is one reason large softboxes and diffusion panels are so useful when photographing glass.
But sometimes you simply don’t have enough room to move the light or make it larger.
That’s where orientation becomes interesting.
Rotate the softbox
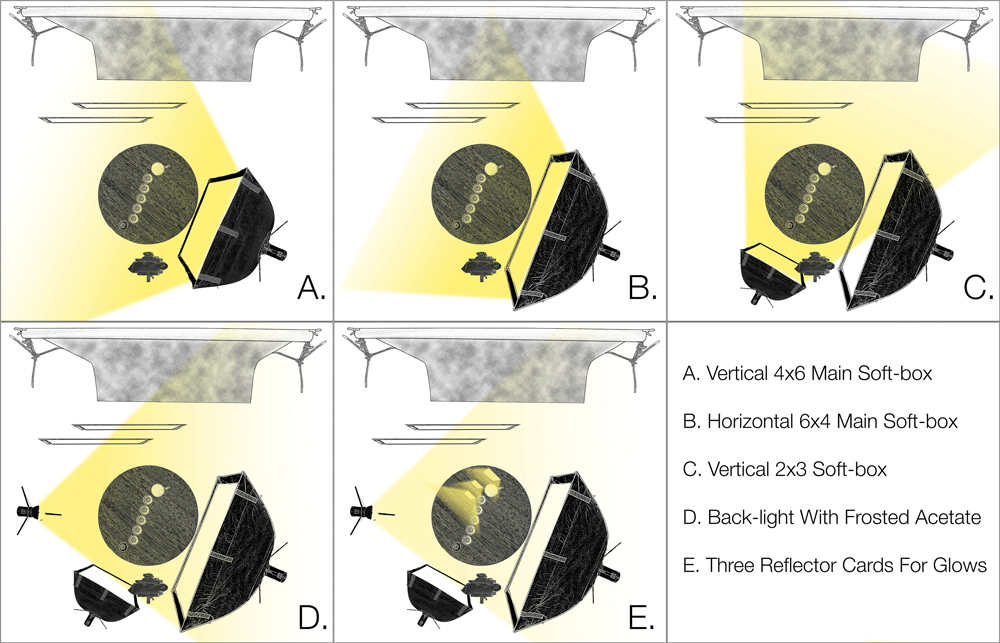
For the brewery photograph, I used a large rectangular softbox positioned to the camera-right of the bottles.
Initially, the softbox was positioned vertically.
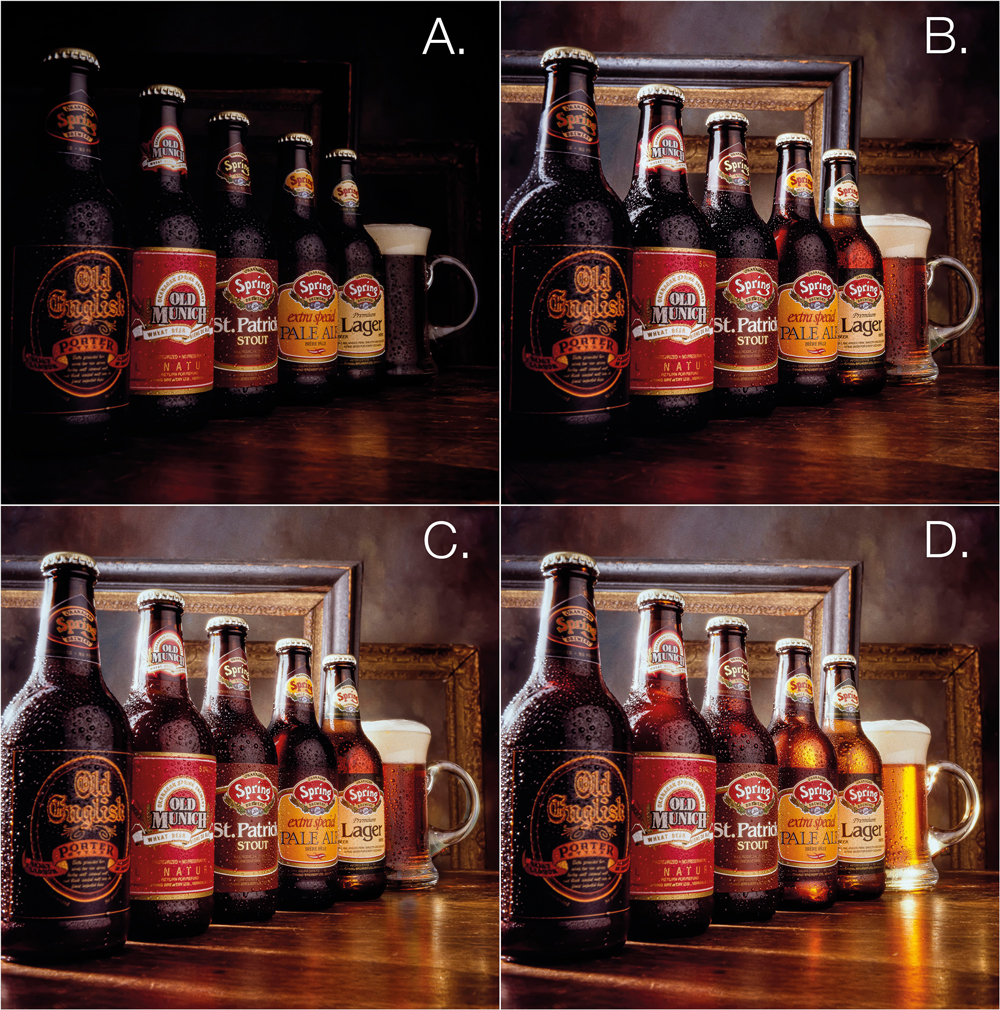
Because of the orientation of the bottle labels, the softbox produced a relatively strong reflection across them. The highlight was useful because it showed the glossy nature of the labels and glass, but it was also distracting – particularly on one of the red labels.
I couldn’t move the softbox any closer.
I could have replaced it with a much larger diffusion panel, but there wasn’t enough physical space around the set.
Instead, I rotated the softbox from vertical to horizontal.
The exposure on the subjects could remain essentially the same, but the shape and distribution of the reflection changed.
The reflected highlight became wider and less intense across the labels.
This is a remarkably useful control when working with rectangular light sources.
The important point
When photographing a cylindrical reflective object, don’t just ask:
“Where should I put the light?”
Also ask:
“Which way should I orient the light?”
A vertical rectangular source and a horizontal rectangular source can produce noticeably different reflections on the same bottle.
Experiment with the orientation before reaching for more power or complicated lighting.
Specular contrast
The brightness of a reflection relative to the surface beneath it can be thought of as specular contrast.
A highly contrasting reflection can appear almost white or even clipped, while a lower-contrast reflection allows more of the underlying surface to remain visible.
This is particularly important when photographing products with printed labels.
You need enough reflection to describe the surface, but not so much that it destroys the information you are trying to show.
This is one reason lighting glossy products is fundamentally different from simply illuminating a matt subject.
Don’t confuse reflection with shadow softness
There are two related but different aspects of lighting that are worth keeping separate.
The first is the appearance of reflections on the subject.
The second is the edge of a cast shadow.
A large light source generally produces softer shadow edges, while a small source produces harder, more defined shadow edges.
However, the brightness and appearance of a specular reflection are governed by the relationship between the light source and the reflective surface.
So a photographer can use the size, shape, position and orientation of a light source to control several different characteristics at once.
Understanding that distinction gives you more control than simply describing a light as “soft” or “hard”.
Add a second light for separation
The main softbox wasn’t responsible for everything in the brewery image.
A second, smaller softbox was positioned on the opposite side of the set.
This helped illuminate the background and created additional highlights along the shoulders and necks of the bottles.
Small highlights also appeared on the artificial condensation covering the bottles.
The condensation was created using a mixture of corn syrup and water, lightly sprayed onto the bottles and mug.
Those tiny highlights were useful because they helped define the edges of the bottles against the darker background.
This illustrates another useful principle:
You don’t always need to brighten the whole subject to make it stand out.
Sometimes a narrow highlight along an edge is enough.
Use backlighting for drama
The third major light source was placed behind the bottles.
This was deliberately much brighter than the other lights, creating a strong backlight.
Some of that light spilled through the gaps between the bottles and onto the tabletop, producing long shafts of illumination and shadows extending towards the camera.
Because the tabletop was relatively dark, the bright shafts of backlight became a strong graphic element.
This created the theatrical quality I was looking for.
The bottles were no longer simply sitting on a table. The lighting gave the scene something closer to the energy of a stage performance.
Making liquid glow
The final challenge was making the beer itself appear luminous.
Liquids inside bottles and glasses can be surprisingly difficult to make glow convincingly.
In the original setup, I used silver reflector cards positioned behind the bottles and mug. The cards were carefully angled so that they reflected the backlight through the glass and liquid and back towards the camera.
It became a game of angles.
The reflector cards had to be positioned and sometimes bent into curved shapes so that the camera could see the desired reflection through the liquid.
This took considerable time.
The result was a strong glow in the lighter-coloured liquids, with smaller highlights appearing in the darker, denser beers.
The lesson is important: when photographing transparent or translucent liquids, sometimes you are not lighting the liquid directly at all. You are lighting something behind it and controlling the reflection that passes through it.
A simpler way to create liquid glows
Although the reflector-card method worked, there is another approach that I often prefer today.
Instead of trying to create every effect in a single exposure, photograph the glow separately.
Place a large light source behind the bottle or glass and make a separate exposure specifically for the liquid.
The glow image can then be combined with the main photograph in Photoshop using layers and a mask.
This approach gives you much more control.
You can decide afterwards:
- how strong the glow should be
- exactly where it appears
- which bottles receive it
- how much of the original image remains visible
- whether different areas need different levels of luminosity
There is nothing wrong with using multiple exposures when the purpose is to give the photographer greater control over the final image.
Composition matters as much as lighting
The lighting worked because it was supporting the composition.
The bottles were not arranged in a straight row. Instead, they formed an oblique line receding into the frame.
This created perspective and helped establish depth.
It also produced a leading line, directing the viewer towards the mug containing the glowing beer.
This is a useful lesson for product photographers.
When photographing several products together, don’t automatically arrange them all at the same distance from the camera.
Try:
- staggered positions
- different heights
- overlapping subjects
- diagonal arrangements
- converging lines
- foreground and background relationships
A collection of products can become a visual story rather than simply a catalogue of objects.
Use perspective deliberately
A wide-angle lens was used relatively close to the subjects.
This exaggerated the perspective, making the foreground elements appear larger while the objects further away became progressively smaller.
Combined with selective focus, this increased the apparent depth of the scene.
You don’t always need a long lens and a flat perspective for product photography.
If the concept allows it, moving closer with a wider lens can produce a much more dynamic result.
The important thing is to make the perspective work for the product rather than allowing it to distort the subject accidentally.
Sketch the lighting before building it
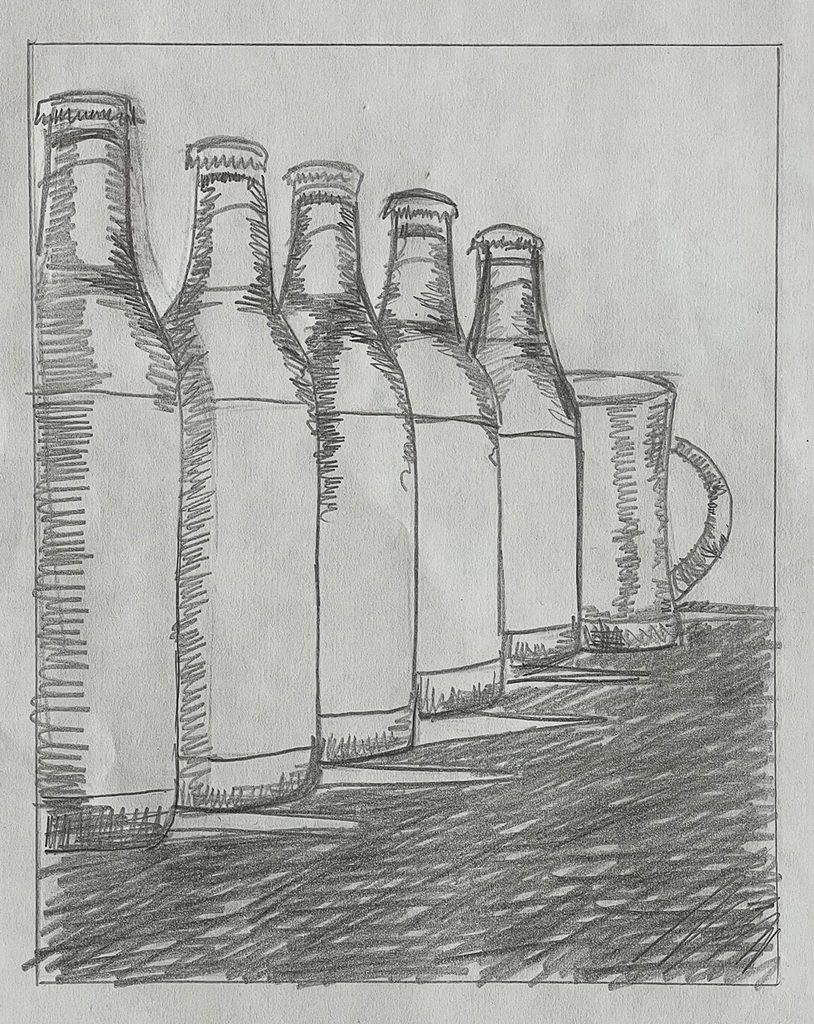
One of the most useful habits when creating complex still-life lighting is to visualise the result before assembling the entire set.
I often make a rough sketch showing:
- the camera position
- subject positions
- light sources
- reflectors
- background
- the direction of light
The sketch doesn’t need to be beautiful.
Its purpose is to answer a simple question:
Will the idea actually work?
A few minutes spent thinking about the reflections and composition can save a great deal of time once the lights, stands, flags and products are in position.
For reflective subjects, this is particularly valuable because small changes in angle can completely change what the camera sees.
Lighting reflective products: a practical workflow
If you’re photographing bottles, glasses, cosmetics, polished packaging or other reflective products, try this approach.
1. Decide what the photograph needs to say
Before switching on a light, establish the visual idea.
Is the image supposed to feel:
- luxurious?
- dramatic?
- clean?
- traditional?
- modern?
- energetic?
- atmospheric?
Your lighting should reinforce that idea.
2. Start with one large source
Use a large softbox or diffusion panel and look carefully at its reflection.
Don’t immediately add more lights.
First establish the main reflection and decide whether it is helping the photograph.
3. Change the source orientation
If you’re using a rectangular source, rotate it.
Compare vertical and horizontal orientations and watch how the reflection changes across the subject.
This simple adjustment can sometimes solve a problem that would otherwise lead to moving stands, changing power or adding flags.
4. Look at the label, not just the exposure
A bottle can be perfectly exposed while the reflection across the label is completely wrong.
Judge the photograph by what the viewer needs to see.
5. Add edge highlights
Use smaller sources or carefully positioned lights to reveal curves and separate the subject from the background.
6. Introduce backlighting
Backlighting can add depth, transparency and drama, particularly with glass and liquids.
Watch for unwanted spill, however. Light bouncing around the studio can unexpectedly change the exposure of other parts of the scene.
7. Look for opportunities to create glow
Reflectors behind transparent subjects can produce beautiful results.
If the physical setup becomes too difficult, consider making a separate glow exposure and combining it later.
8. Photograph extra products
When shooting commercial products, ask for more examples than you actually need.
Bottles can have tiny differences in labels, scratches, glass, fill levels and reflections.
Having several examples allows you to choose the best-looking products for the final image.
Think about reflections before you think about exposure
One of the biggest changes in approach that can improve reflective-product photography is to stop thinking purely in terms of exposure.
Instead, think about what the subject is reflecting.
A light can be correctly exposing the bottle while producing a terrible reflection.
Another light may produce a beautiful highlight but illuminate the label incorrectly.
The answer is often found not by changing the exposure, but by changing the position, size, shape or orientation of the light source.
That is the real lesson behind “Line ‘Em Up”.
Final thoughts
Photographing shiny surfaces is a combination of lighting, geometry, reflection and observation.
Glass bottles don’t simply absorb the light you point at them. They show you the environment around them.
That can make them difficult to photograph, but it also gives you enormous creative control.
Use large sources to create broad reflections. Change their distance and size. Rotate rectangular sources and watch what happens. Use backlighting to reveal glass and liquids. Add carefully controlled edge highlights for separation.
Most importantly, don’t be afraid to experiment.
When the reflection isn’t right, the answer isn’t necessarily more light.
Sometimes you just need to line ’em up.