How to Automate InDesign Workflows: Scripts, Styles and Time-Saving Tips
By Mike McNamee
Adobe InDesign is one of those applications that can appear deceptively simple.
You can create a page, place an image, add some text and start designing almost immediately. Yet underneath that accessible interface is an extremely sophisticated publishing system, with tools for styles, grids, tables, layers, linked text, master pages, scripting and automation.
For photographers and designers producing magazines, books, brochures or other publications, that sophistication can become particularly valuable when a job has to be repeated.
The important question is not simply “Can InDesign automate this?”
It is:
“Would automating this save me enough time to make it worthwhile?”
A couple of recent projects provided some useful answers.
Why automate an InDesign workflow?
Graphic design often involves repetitive tasks.
You might have to apply the same treatment to twenty photographs, make several language versions of the same document, adjust text to fit a fixed space or repeatedly create tables using the same formatting.
Doing something once manually may be quicker than setting up an automated solution.
Doing it twenty, fifty or a hundred times is a different matter.
This is where InDesign’s styles and scripting capabilities become useful.
An Object Style, for example, can store the formatting applied to an object such as an image or text frame. A script can go considerably further, performing a sequence of operations automatically.
The principle is similar to creating an action in Photoshop, but scripting can provide much greater control over the document and the decisions being made.
The result can be a workflow that is both faster and more consistent.
Case study 1: Making text fit an exact space
One of the recurring challenges in print design is getting text to fit the space available.
A web page can continue downwards almost indefinitely. A printed page cannot.
If a photograph, graphic or other element has to remain a particular size, there may be very little flexibility available.
The designer might therefore need to adjust:
- Font size
- Leading
- Tracking
- Font choice
- Font weight
- Text-frame dimensions
- The amount of surrounding space
The difficulty is that these aren’t purely technical decisions.
Reducing the font size might solve the problem but make the text harder to read. Reducing leading can make a paragraph look cramped. Increasing tracking can alter the appearance of the type.
Good design therefore requires judgement rather than simply making everything smaller until it fits.
The multilingual problem
The challenge becomes considerably more complicated when the same publication has to be produced in multiple languages.
Translation rarely produces text that occupies exactly the same amount of space as the original.
A translated passage may expand or contract depending on the language, sentence structure, word length and typography.
In one project, a full-colour leaflet had to accommodate 22 images and nine languages on a double-sided A3 layout.
Replacing the images for every language version would have created an unnecessarily complicated document.
Instead, the images and page furniture were placed once, while the different language versions of the text were separated onto their own layers.
Only the required language layer needed to be visible when producing each PDF.
This approach has several advantages.
The underlying design remains consistent, the images don’t have to be duplicated and changes to the artwork can be made centrally rather than repeated across multiple documents.
It also demonstrates a useful principle for InDesign users:
Build the document so that repetition happens in the structure, rather than in the manual work.
How much does translated text change?
The actual change varies considerably between languages and between individual documents, so it is dangerous to rely on a single universal percentage.
In one project, the English source contained 2,113 words. The translated versions produced noticeable differences in both word and character counts, with some languages requiring substantially more space and others less.
That means a layout designed around English cannot always simply be translated and expected to remain intact.
The solution is to plan for expansion and contraction from the beginning.
This is particularly important for brochures, leaflets and other fixed-format documents.
Using layers for multiple languages
Layers provide a particularly straightforward solution.
The shared elements of the design can sit on their own layers:
- Photographs
- Logos
- Background graphics
- Page furniture
- Decorative elements
Each language can then occupy its own text layer.
When the document is ready for output, the required language can be switched on while the others are hidden.
This approach also makes corrections easier.
If the photograph changes, there is only one photograph to replace.
If the layout changes, there is only one underlying design to maintain.
The trade-off is that each language may require slightly different typography to fit the available space.
Adjusting text without destroying the design
There are several ways to make text fit.
The preferred approach is generally to make the smallest possible change.
A slight reduction in font size may be enough.
If only a little space needs to be recovered, a small adjustment to tracking might solve the problem.
Leading can also be changed, although reducing it too far can make text uncomfortable to read.
Changing the font itself can have a surprisingly large effect because different typefaces occupy different amounts of horizontal space.
The important thing is not to make arbitrary changes simply because the software allows them.
Typography should remain readable and visually coherent.
Automating text fitting with InDesign scripts
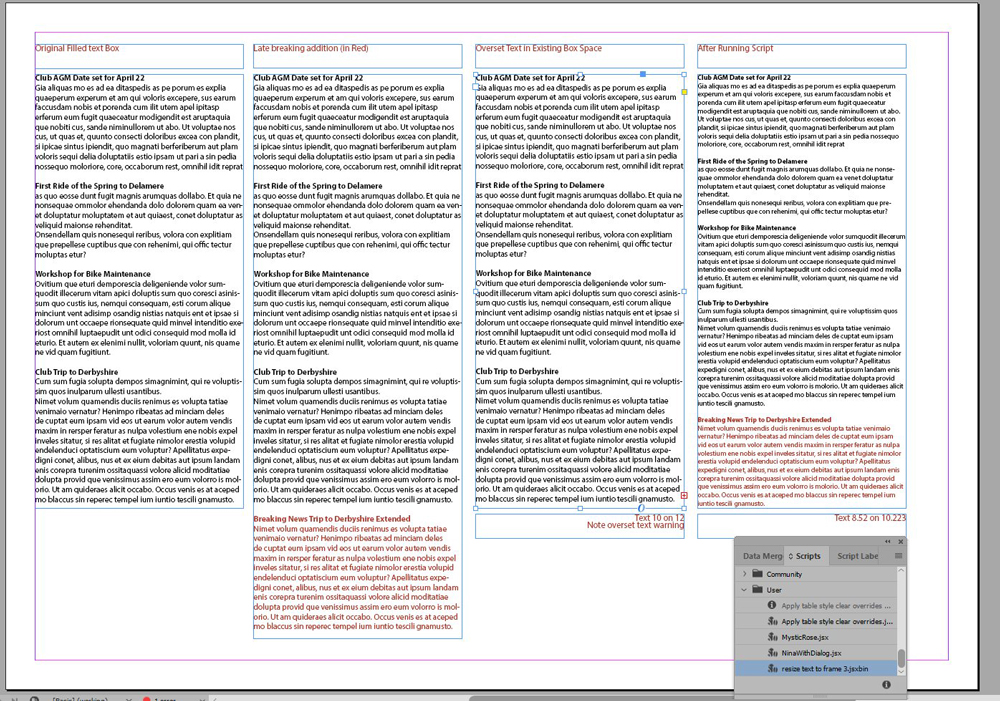
InDesign can automatically resize some objects, but getting a script to automatically reduce text until overset text disappears is a different problem.
This is where scripting becomes useful.
A suitable script can examine a text frame, detect overset text and progressively adjust the text until it fits the available space.
The first script tested in this particular workflow did not work correctly.
That is another important lesson about automation:
Finding a script is not the same thing as having a working solution.
Code found online may have been written for another version of the application, contain an error or make assumptions that don’t match your document.
It needs to be tested.
In this case, the script was corrected and subsequently proved useful for simple text-fitting jobs.
There was, however, a limitation.
The routine reduced the text to the same size throughout the affected area, meaning that headings and subheadings were also changed.
Fortunately, because the document had been built using text styles, restoring the headings was relatively straightforward.
That is a perfect example of why styles matter.
Use styles before you automate
One of the best things you can do before creating a complicated InDesign workflow is to make sure the document itself is structured properly.
Use:
- Paragraph Styles
- Character Styles
- Object Styles
- Table Styles
- Cell Styles
- Layers
- Master pages and other reusable layout structures where appropriate
Automation becomes much easier when the document already has a logical structure.
If every heading has been formatted manually, a script has little reliable information to work with.
If every heading uses a particular Paragraph Style, the script can identify and manipulate those elements much more intelligently.
In other words:
Good document structure is the foundation of good automation.
Case study 2: Applying borders to photographs
The second example is much simpler but perhaps even more useful.
A set of twenty photographs was being prepared for a magazine layout.
The images looked somewhat lost against the surrounding page, so a presentation treatment was required.
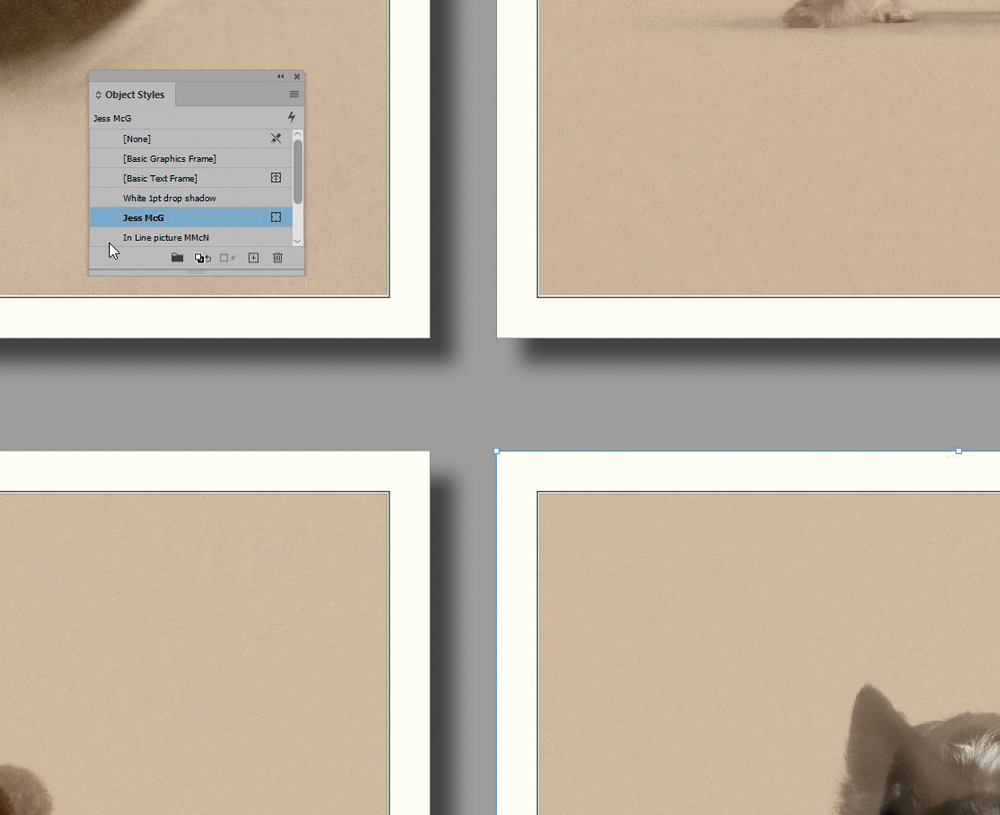
The original treatment involved a black keyline and a wider cream-coloured border.
Creating the effect manually in Photoshop took approximately a minute and a half per image.
For twenty photographs, that quickly becomes around half an hour of repetitive work.
There was a better solution.
Using an InDesign Object Style
In InDesign, each placed photograph is an object.
An Object Style can store a collection of attributes for that object, including things such as:
- Stroke
- Stroke width
- Fill or background
- Transparency
- Drop shadow
- Other object effects
Once the required appearance had been created as an Object Style, applying it became a one-click operation.
Instead of processing every photograph individually in Photoshop, the style could be applied to the images directly in the InDesign document.
The result?
Twenty photographs could be treated in seconds rather than tens of minutes.
And because the treatment existed as a reusable style, it wasn’t just a solution for that particular page.
The same principle could be reused for another panel with a different border or presentation.
Why Object Styles are so powerful
Object Styles are easy to overlook because they don’t have the glamour of a complex script.
But they can save enormous amounts of time.
Imagine a magazine where every photograph needs:
- A particular border
- A specific stroke
- A consistent shadow
- A defined transparency
- A standard frame treatment
Rather than remembering every setting, create an Object Style once.
Then apply it whenever required.
If the design changes later, you can also update the style rather than manually correcting every object.
This is automation without writing a single line of code.
Automation doesn’t always mean scripting
This is an important distinction.
There are several levels of workflow automation.
Level 1: Structure
Use styles, layers and reusable document elements.
Level 2: Presets
Save common settings and configurations so they can be applied consistently.
Level 3: Actions
Use recorded actions where an application supports them, particularly for repetitive image-editing tasks.
Level 4: Scripts
Use scripts when you need more sophisticated decision-making or document manipulation.
Level 5: External tools or AI
For some tasks, specialist software or AI-assisted tools may provide a better solution than building the workflow yourself.
The best solution is usually the simplest one that reliably solves the problem.
Don’t automate a task that isn’t worth automating
There is a temptation, particularly when discovering scripting, to automate everything.
That can be counterproductive.
Suppose you have one text frame that needs to be reduced slightly.
Writing and testing a script could take longer than selecting the text and changing the font size manually.
The same applies to a single photograph.
If one image needs a border, doing it manually may be faster.
If twenty images need exactly the same treatment, a style suddenly makes much more sense.
If you are going to perform the same operation hundreds of times, scripting becomes increasingly attractive.
This is the return on investment of automation.
The time saved has to justify the time spent creating, testing and maintaining the automated solution.
Build once, reuse many times
One of the biggest benefits of a good automated workflow is that its value increases with repetition.
A style that saves ten seconds on one image isn’t particularly exciting.
A style that saves ten seconds on every photograph in every issue of a magazine is a different proposition.
The same applies to scripts.
A small amount of work invested in a reusable tool can pay dividends for years.
This is particularly relevant to photographers and publishers who regularly produce:
- Magazines
- Photobooks
- Exhibition catalogues
- Brochures
- Marketing material
- Qualification panels
- Multilingual publications
- Repeated client documents
Lessons from multilingual publishing
Working on a document in multiple languages also highlights some less obvious issues.
Number your subheadings
Translation can make navigation more difficult, particularly when working with unfamiliar alphabets or languages.
Numbering sections provides a simple visual reference.
The numbers can subsequently be removed during the final preparation stage.
Choose fonts carefully
A typeface that works perfectly in English may not contain all the characters required for another language.
This is particularly important when working with languages that use different alphabets or require additional glyphs.
Before committing to a font, check that it supports all the languages required by the project.
Use native-language proofreading
Machine translation can be an excellent starting point, but it should not be regarded as the final authority.
A native speaker can identify mistranslations, awkward expressions and terminology that a software system may miss.
For an important publication, professional or native-language proofreading is a worthwhile investment.
Avoid unnecessary idioms
Idiomatic English can be difficult to translate accurately.
Expressions that seem perfectly normal to a native English speaker may be meaningless or confusing when translated literally.
Writing clearly and directly makes the translation process easier.
Watch the jargon
Specialist terminology presents another challenge.
A translator who understands the language but not the subject matter may struggle with technical photography, design or publishing terminology.
Where possible, provide terminology lists or explanations before translation begins.
Translation software as a first draft
Modern translation tools can remove a considerable amount of the initial workload.
Services such as DeepL can produce useful first drafts, but the result should still be checked.
The more specialised the subject matter, the more important human review becomes.
There is also a distinction between translating text and preparing a finished multilingual publication.
Translation software may produce the words, but the designer still has to deal with:
- Typography
- Text expansion
- Hyphenation
- Line breaks
- Font support
- Page balance
- Captions
- Tables
- Image relationships
- Final proofreading
Automation can reduce the workload.
It doesn’t eliminate the need for judgement.
Use AI carefully when scripting
AI tools can now help generate, explain and debug code, which can make scripting considerably more approachable for people who aren’t professional programmers.
That doesn’t mean generated code should simply be pasted into InDesign and trusted.
A sensible workflow is:
- Describe exactly what you want the script to do.
- Generate or locate a starting point.
- Test it on a copy of the document.
- Check the result carefully.
- Test unusual cases.
- Correct errors.
- Only then introduce it into a production workflow.
Always keep an untouched copy of important documents before testing automation.
A script that works beautifully on one document can fail when confronted with a different structure.
Audit your workflow
Perhaps the most valuable lesson from these projects has nothing to do with scripting.
It’s worth periodically asking:
“Why am I still doing this manually?”
When a deadline is approaching, the answer is often:
“Because this is how I’ve always done it.”
That is understandable.
When the clock is ticking, experimenting with a new workflow feels risky. It can seem safer to repeat the familiar manual process, even if it is inefficient.
The better time to investigate automation is before the deadline.
Set aside some time when there is no immediate pressure.
Explore the application.
Watch tutorials.
Read documentation.
Try the Styles panels.
Look at the scripting capabilities.
Search the Adobe community for people who have already solved similar problems.
You may discover that the task you have been performing manually for years can be reduced to a couple of clicks.
The bigger lesson
Sophisticated software doesn’t necessarily make work more complicated.
Used properly, it can make repetitive work simpler.
The key is to understand what the software is capable of and then build your workflow around those capabilities.
Start with document structure.
Use styles wherever possible.
Use layers intelligently.
Create reusable templates.
Automate repetitive tasks.
Use scripts when simpler tools aren’t enough.
And always test the result.
The goal isn’t to automate for the sake of automation.
The goal is to spend less time performing repetitive production work and more time doing the part that actually requires a designer’s judgement and creativity.
A simple InDesign automation checklist
Before starting a large InDesign project, ask yourself:
- Is this task likely to be repeated?
- Can an Object Style solve it?
- Can a Paragraph or Character Style solve it?
- Should the document be divided into layers?
- Could a template save time on future projects?
- Would a script genuinely save time?
- Have I tested the automation on a copy?
- What happens when the document contains an unusual case?
- Can the workflow be reused on the next project?
- Have I calculated whether the time saved justifies setting it up?
If you can answer those questions before the deadline arrives, you are already halfway towards a more efficient workflow.
The best automation is often the automation you build once and then barely notice because it has become part of the way you work.