How to Use Lightroom Masking for Portrait Photography
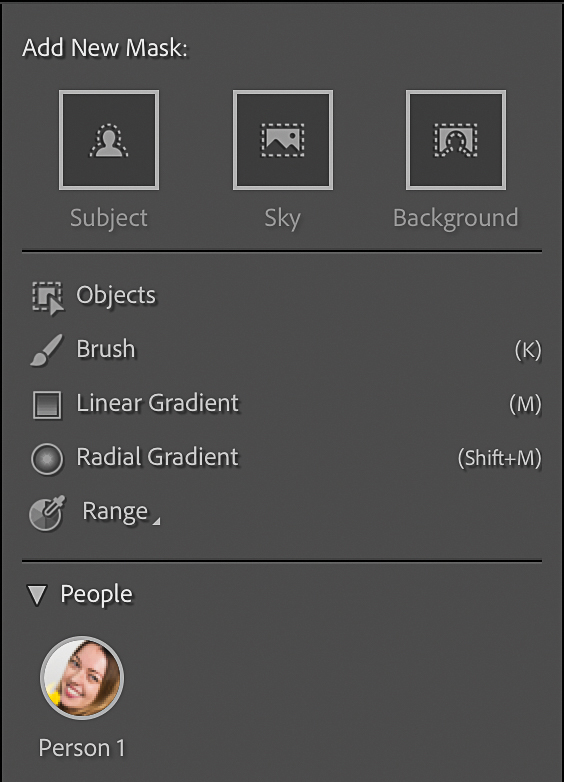
Lightroom has always been good at making adjustments to an entire photograph. But what if you want to brighten someone’s face without brightening the background, change the colour of their clothes without changing their skin, or improve the eyes without affecting the rest of the image?
That’s where masking comes in.
Modern versions of Lightroom Classic can use artificial intelligence to identify people and automatically create masks around them and specific parts of their bodies. You can then make adjustments to those areas without affecting the rest of the photograph.
For portrait photographers, this can save an enormous amount of time.
The basic process is simple:
- Create a mask – tell Lightroom which part of the photograph you want to edit.
- Refine the mask – add or remove areas if necessary.
- Make your adjustment – change the exposure, colour, detail or other settings for the selected area.
The clever part is that Lightroom can now do much of the selection work for you.
What is a Lightroom mask?
A mask is simply a way of telling Lightroom where you want an adjustment to be applied.
Without a mask, increasing exposure affects the whole photograph.
With a mask around your subject, you can increase the exposure of the subject while leaving the background unchanged.
This is particularly useful in portrait photography.
You might want to:
- brighten a face
- subtly lift the eyes
- reduce saturation in the whites of the eyes
- bring out detail in hair
- soften skin
- change the colour of clothing
- darken or desaturate a distracting background
- add contrast to the subject
- brighten a particular person in a group photograph
The advantage is that these adjustments remain non-destructive, just like other Lightroom Develop adjustments.
Where is masking in Lightroom Classic?

Open your photograph in the Develop module.
The Masking tool is in the tool strip below the histogram. You can also press Shift + W to open the Masking panel.
From here, Lightroom gives you a mixture of AI-powered selections and traditional manual masking tools.
The exact options have changed as Lightroom has developed, so rather than memorising a list of masks, it is more useful to understand what each type of selection is useful for.
Select a person automatically
For portrait photographers, People is one of the most useful AI masking tools.
Choose:
Masking > People
Lightroom analyses the photograph and identifies the people in it. You can then choose the person you want to edit and select particular areas of their body.
Depending on what Lightroom can identify in the photograph, this can include areas such as:
- facial skin
- body skin
- eyebrows
- eye sclera
- iris and pupil
- lips
- teeth
- hair
- facial hair
- clothes
Adobe’s current Lightroom Classic documentation confirms that People masking can automatically detect people and allows specific features such as facial hair and clothing to be selected.
This is where AI makes a genuine difference to everyday photographic editing.
Instead of spending several minutes carefully painting around someone’s hair, eyes and face, Lightroom can create the initial selection for you.
You can then refine it if necessary.
How to brighten a face
Suppose you have a portrait where the face is slightly too dark.
Select the person using People masking and choose the facial skin area.
You can then make a small adjustment to Exposure or Shadows.
The important word here is small.
Portrait retouching can quickly become unnatural if every face is made dramatically brighter than the surrounding scene.
A subtle increase may be all that is required.
The same principle applies to most Lightroom masking.
If you can immediately see the mask rather than the photograph, you’ve probably gone too far.
How to improve eyes without making them look artificial
Lightroom can separately identify parts of the eyes, including the iris and pupil and the eye sclera – the whites of the eyes.
This can be extremely useful, but it is also an area where restraint matters.
To make the whites of the eyes look cleaner, reducing saturation can be more natural than dramatically increasing their brightness.
Likewise, increasing the detail or contrast in the iris slightly can bring out the texture without making the eyes look unnaturally sharp or bright.
The goal isn’t to make the eyes look as bright as possible.
It’s to make them look healthy and engaging.
How to improve hair
Hair is another area where a precise mask can save a lot of time.
Select the person’s hair and make a subtle adjustment to Shadows, Texture or another appropriate control.
Dark hair can sometimes benefit from a small lift in the shadows to reveal texture.
But be careful with sharpening and Texture.
Too much can make hair look harsh, brittle or unnaturally detailed.
As with skin retouching, subtlety generally produces the more believable result.
How to whiten teeth naturally
Teeth are another feature Lightroom can identify automatically.
Select the person, choose Teeth, and make a small adjustment.
For natural-looking whitening, reducing saturation is often preferable to simply increasing exposure.
Over-bright teeth are one of the easiest signs of heavy portrait editing.
The best retouching is often the retouching nobody notices.
Changing the colour of clothing
AI masking isn’t limited to skin and facial features.
Lightroom can identify clothing, allowing you to make colour and tonal changes to particular garments.
This can be particularly useful when working with portrait sessions where the clothing is almost right but needs a small correction.
For example, you might want to:
- make a jacket slightly darker
- reduce the saturation of a brightly coloured top
- alter the hue of clothing
- make several images from a session look more consistent
This can be much quicker than manually painting around the clothing.
However, remember that AI selection is not infallible.
Hair, jewellery, hands and overlapping objects can create complicated edges.
Always check the mask before making a major adjustment.
Select the background

Lightroom can also automatically select the background.
This is particularly useful for portraits where you want to separate the subject from their surroundings.
You could, for example:
- darken the background slightly
- reduce its saturation
- lower its clarity
- cool or warm the background
- increase contrast behind the subject
- reduce distracting detail
Adobe’s current Lightroom Classic masking tools include automatic Background selection, alongside Subject and other AI-based selections.
An alternative is to select the subject and then invert the mask.
Both approaches can be useful, depending on the photograph.
Select the subject
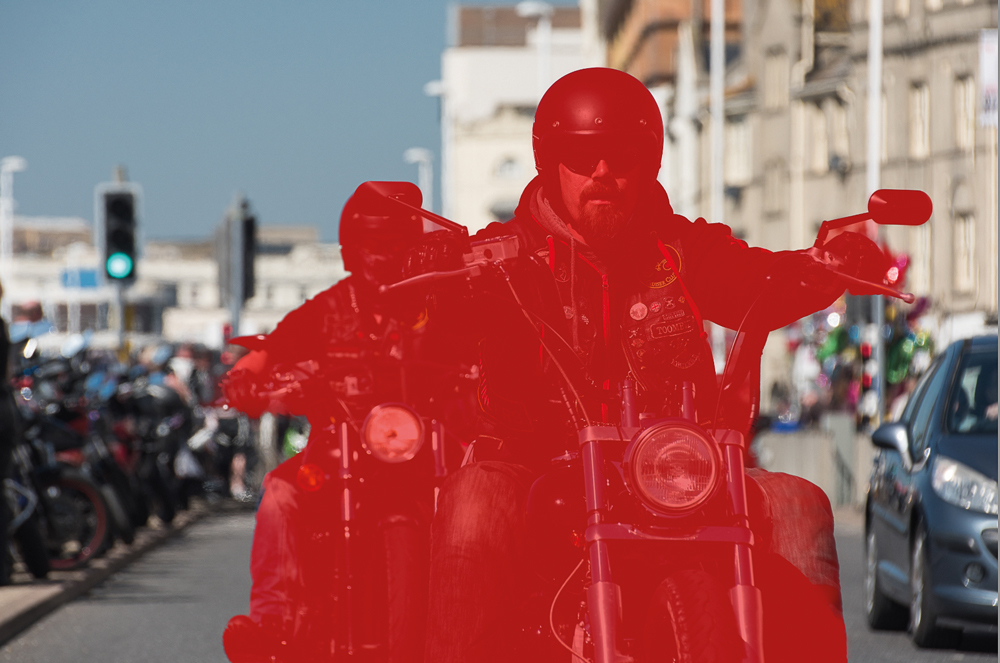
Select Subject is another useful starting point.
Lightroom analyses the photograph and attempts to identify the main subject automatically.
For a simple portrait, this can produce a very good initial mask with a single click.
It can also be useful when photographing people in environments where you want to make a global adjustment to the subject without affecting everything around them.
And it isn’t restricted to portraits.
The same technology can be useful for wildlife, sports, events and many other types of photography.
What about objects?
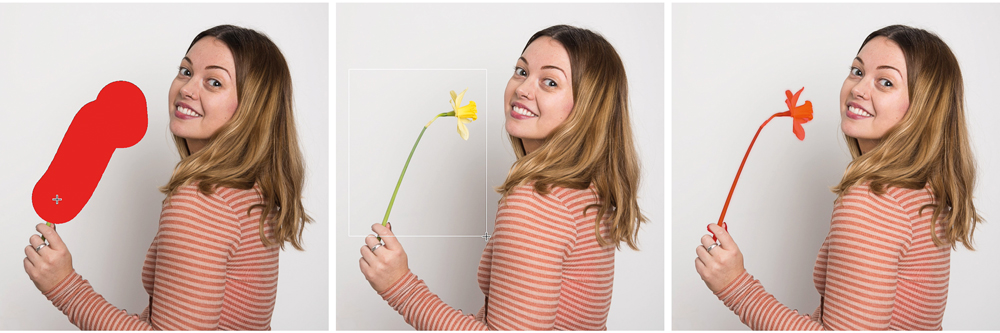
Lightroom’s Objects masking tool allows you to roughly brush over or draw a rectangle around an object, after which Lightroom analyses the area and attempts to identify the object for you.
This is useful when you don’t need to make a selection with pixel-perfect precision.
You essentially tell Lightroom, “It’s somewhere around here,” and let its object detection do the detailed work.
You can then refine the resulting mask.
Don’t forget the traditional masking tools
AI hasn’t made the traditional Lightroom masking tools obsolete.
Far from it.
You can still use:
- Brush
- Linear Gradient
- Radial Gradient
- Colour Range
- Luminance Range
- Depth Range
These can be particularly useful when Lightroom’s automatic selection doesn’t quite understand what you want.
For example, you might use an AI-generated Subject mask and then subtract part of it with a brush.
Or you could combine a subject mask with a radial gradient to create a more controlled lighting effect.
The real power comes from combining different types of mask rather than relying on one tool to do everything.
How to refine a Lightroom mask
AI-generated masks are a starting point, not a guarantee.
After creating a mask, look carefully around the edges.
Does it include everything you want?
Has it accidentally included something that shouldn’t be affected?
If necessary, use Add or Subtract to refine the mask.
You can use another AI selection, a brush, gradient or range mask to modify the original selection. Lightroom also allows masks to be intersected, duplicated and inverted.
Use the mask overlay
One of the most useful tools when refining a mask is the overlay.
Turn it on and Lightroom shows you exactly which part of the image is selected.
Don’t simply look at the photograph with the adjustment applied.
Look at the mask itself.
You may discover that Lightroom has included part of a background, missed some hair or selected an area that you didn’t intend to change.
The current Lightroom Classic masking panel also allows you to change the overlay appearance and view the affected area in different ways.
Use Intersect when you need more control
Intersecting masks is particularly useful when you want to make a selection that meets two conditions.
For example, imagine you want to brighten only part of your subject.
You could create a Subject mask and intersect it with a Radial Gradient.
The result is an adjustment restricted to the area where those two masks overlap.
This is a powerful technique because you are effectively telling Lightroom:
“Select this subject, but only in this particular area.”
It can be much quicker than manually drawing a complicated selection.
The Amount slider can save you from overdoing it
When you’ve made several adjustments to a mask, you don’t necessarily have to go back and change every slider individually.
The Amount control can be used to reduce or increase the overall strength of the masked adjustment.
This is particularly useful when you have created an effect that looks good but is just a little too strong.
Rather than changing five or six settings, reduce the overall amount.
And don’t be afraid to reduce it.
AI masking is particularly useful for batch editing
One of the biggest advantages of Lightroom’s AI masking isn’t necessarily what it can do to one photograph.
It’s what it can do across a whole shoot.
Adobe allows supported AI masks to be copied, pasted and synchronised across multiple photographs. Lightroom then recomputes the mask for each image rather than simply copying the original pixels.
For portrait photographers, this can be a huge time saver.
Imagine photographing a wedding, corporate portrait session or studio shoot and wanting to apply a consistent starting adjustment to the subjects.
Instead of creating every mask from scratch, you can use one image as the starting point and let Lightroom calculate the corresponding AI masks on the other photographs.
You should still check the results, particularly where poses, backgrounds or lighting change significantly.
But even when some refinement is required, the time saved can be considerable.
Lightroom’s AI goes beyond masking
It’s worth remembering that masking is only one part of Lightroom’s growing use of artificial intelligence.
Lightroom Classic now also includes AI-powered tools for other parts of the editing process.
For example, Generative Remove uses Adobe Firefly to remove unwanted objects and generate replacement content. Adobe also provides AI-powered tools for detecting and removing distracting people.
That’s quite different from masking.
Masking tells Lightroom where to make an adjustment.
Generative AI can actually create replacement image content.
For photographers, that distinction is important – particularly when considering authenticity, client expectations and competition rules.
AI doesn’t mean you should stop checking your images
The biggest mistake with AI masking is assuming that because Lightroom selected something automatically, the selection must be perfect.
It isn’t.
Hair against a complicated background, people overlapping each other, reflections, unusual lighting and similar colours can all make selections more difficult.
The AI gives you a head start.
You remain responsible for the finished photograph.
A good workflow is therefore:
Select → Check → Refine → Edit → Check again.
That last check is important.
Zoom out and look at the photograph as a whole.
Does the face still look natural?
Does the background transition look believable?
Have you created a halo around the subject?
Are the eyes too bright?
Is the skin too smooth?
Has changing the colour of the clothes affected nearby areas?
These are photographic decisions, not AI decisions.
Don’t let the technology become the photograph
The temptation with powerful editing tools is to keep adjusting things simply because you can.
Portrait photography is particularly vulnerable to this.
Perfect skin, brilliant eyes, impossibly white teeth and heavily blurred backgrounds may demonstrate what Lightroom can do, but they don’t necessarily make a better portrait.
The purpose of masking is to give you more control, not to make you use more processing.
A subtle adjustment to a face can make a portrait stronger.
A subtle reduction in background brightness can draw attention to the subject.
A small colour correction can make clothing look better.
Those changes may be almost invisible to the viewer – and that’s often a sign that you’ve used the tool well.
Lightroom masking: the big advantage
AI masking has changed the amount of time photographers need to spend making selections.
What once involved painstaking brushing around hair, faces and clothing can now often begin with a single click.
For portrait photographers, the People masking tools are particularly useful because Lightroom can identify individual people and specific features within their faces and bodies.
But the real benefit isn’t that Lightroom can do everything for you.
It’s that it can do the tedious part much faster.
That leaves you to concentrate on the part that still requires a photographer’s judgement: deciding what the photograph needs.
Use AI to make the work quicker.
Use your eye to decide when the work is finished.