What Does f/1.4 Really Do? Depth of Field Explained
Mike McNamee looks at the maths behind shooting at f/1.4 and explains why the depth of field can be surprisingly small.
Shooting at f/1.4 can produce beautiful images.
A wide aperture can throw the background dramatically out of focus, isolate a subject and create the soft, three-dimensional look that many portrait and wedding photographers love.
But exactly how much of the image is actually in focus?
The answer can be surprisingly little.
Following Stuart Wood’s exploration of his 85mm f/1.4 lens, I decided to look at the mathematics behind his photographs. Using the metadata recorded with his images — including aperture, focal length and working distance — it is possible to calculate the depth of field for each photograph.
The results demonstrate just how critical focusing can become when shooting at very wide apertures.
How much depth of field does f/1.4 give you?
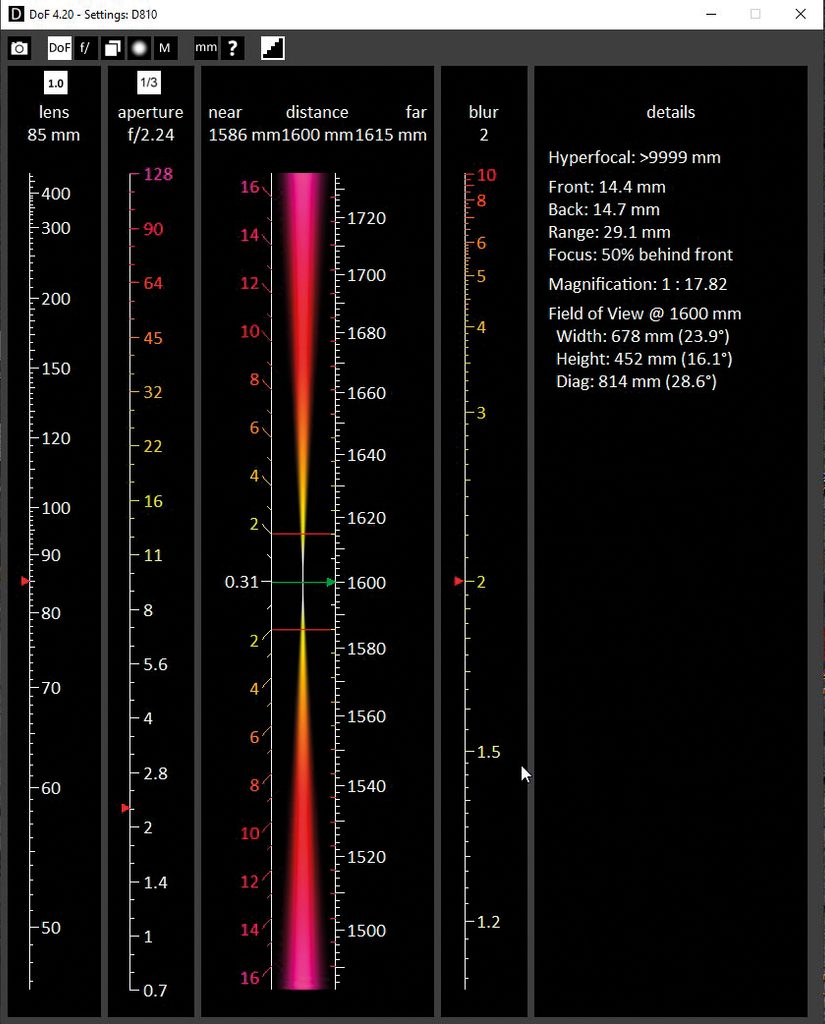
The table below shows the calculated depth of field for a selection of Stuart’s photographs.
All were taken with an 85mm focal length, but the working distances and apertures vary.
| Image | ISO | Shutter speed | Aperture | Working distance | Total depth of field |
|---|---|---|---|---|---|
| 9124 | 400 | 1/2000s | f/1.4 | 3.3m | 81mm / 3.2in |
| 680 | 2000 | 1/100s | f/2.2 | 1.6m | 29mm / 1.1in |
| 1631 | 1600 | 1/101s | f/2 | 2.7m | 76mm / 3.0in |
| 9714 | 100 | 1/2500s | f/1.4 | 6.0m | 270mm / 10.6in |
| 546 | 400 | 1/800s | f/1.4 | 2.1m | 32mm / 1.3in |
| 645 | 400 | 1/801s | f/1.4 | 2.7m | 54mm / 2.1in |
| 2343 | 400 | 1/500s | f/2.8 | 6.0m | 534mm / 21.0in |
The figures show something important.
Depth of field is not determined by aperture alone.
It is also strongly affected by the distance between the camera and subject, as well as the focal length and the assumptions used in calculating what constitutes an acceptably sharp image.
At close working distances, the amount of acceptable sharpness can become extremely small.
The f/1.4 focusing challenge
Take image 0546, which appeared on the cover of Professional Imagemaker.
It was photographed at:
- 85mm focal length
- f/1.4
- 1/800s
- ISO 400
- 2.1m working distance
The calculated total depth of field is only approximately 32mm — around 1.3 inches.
It is split almost equally around the focus plane, giving approximately 16mm in front and 16mm behind the point of focus.
That is very little room for error.
If you’re photographing a person’s face and focusing on the nearest eye, the other eye may already be noticeably softer. The nose and ears can also fall outside the zone of acceptable sharpness.
This is why shooting at f/1.4 can be so demanding.
A tiny movement by the subject, or by the photographer, can change which part of the image falls within the depth of field.
Why working distance matters
It is tempting to think that an 85mm lens at f/1.4 always produces the same amount of blur.
It doesn’t.
As the camera moves further away from the subject, the depth of field increases.
That can be seen clearly in Stuart’s images.
At a working distance of 2.1 metres, the calculated depth of field at f/1.4 was around 32mm.
At 6 metres, the calculated depth of field was approximately 270mm.
The aperture hasn’t changed.
The focal length hasn’t changed.
The working distance has.
This is one of the reasons photographers can get very different results from the same lens and aperture simply by changing their position.
What is the circle of confusion?
This is where depth-of-field calculations become more interesting.
The calculated depth of field depends on a value known as the circle of confusion, which represents the amount of blur that can be present before a point is perceived as unacceptably out of focus.
There isn’t one universal value that applies to every photographic situation.
The result depends on factors including the imaging format and the assumptions made about what constitutes acceptable sharpness.
For the calculations used here, a relatively stringent blur criterion was selected.
Change that criterion and the calculated depth of field changes too.
This is important when looking at online depth-of-field calculators: two calculators can sometimes produce different answers because they are working from different assumptions.
The mathematics isn’t necessarily wrong. The definition of “acceptably sharp” has changed.
Why does bokeh look different between lenses?
Depth of field and bokeh are related, but they aren’t the same thing.
Depth of field describes the range within an image that appears acceptably sharp.
Bokeh describes the visual character of areas rendered out of focus.
Lens design, optical construction, aperture shape and other factors can influence how out-of-focus areas appear.
This is why two lenses used at the same focal length and aperture can produce noticeably different-looking backgrounds.
One may produce smooth, creamy areas of blur while another may render highlights or background detail differently.
For photographers interested in portraits, weddings and fine-art imagery, this character can be just as important as the numerical depth of field.
What happens as you stop the lens down?
As you close the aperture — moving from f/1.4 towards f/2, f/2.8, f/4 and beyond — the depth of field increases.
That gives you more room for error and can make it easier to keep more of your subject acceptably sharp.
However, there is another optical effect to consider: diffraction.
As apertures become progressively smaller, diffraction can eventually reduce overall image sharpness.
There is therefore no single aperture that is automatically “best” for every photograph.
At one extreme, a photographer might deliberately choose f/1.4 because they want the shallowest possible depth of field.
At the other, a landscape photographer may need considerably more depth of field and choose a smaller aperture.
The ideal setting depends on the subject, composition, required depth of field and the characteristics of the particular camera and lens.
Why f/1.4 requires practice
This brings us back to Stuart’s original advice.
If you buy an f/1.4 lens, don’t immediately assume that shooting everything wide open will produce better photographs.
Practise first.
Photograph stationary subjects and experiment with different distances.
Then try photographing people who are moving.
Compare f/1.4 with f/2, f/2.8 and smaller apertures.
Look carefully at exactly where the focus falls.
On a portrait, examine the eyes, nose, ears and hair. Notice how quickly different parts of the face move outside the zone of acceptable sharpness.
You will soon develop an instinct for when f/1.4 is appropriate and when a slightly smaller aperture will give you a better result.
Wide aperture doesn’t mean better photograph
One of the most useful lessons from Stuart’s photographs is that he didn’t use f/1.4 for everything.
For one image he stopped down to f/2.8 because he wanted more detail in the foreground while retaining subject separation.
That’s an important distinction.
The purpose of a fast lens isn’t to force you to use its widest aperture.
It gives you more creative choices.
You can use f/1.4 when you want extremely shallow depth of field, f/2 when you need a little more tolerance, or f/2.8 when you want greater definition while still maintaining significant background separation.
The practical lesson
So, what does f/1.4 really do?
It allows an exceptionally wide aperture, which can produce very shallow depth of field and strong subject separation.
But the effect is influenced by much more than the aperture setting.
Your:
- focal length
- camera format
- working distance
- subject distance
- focusing accuracy
- lens design
- aperture
- and definition of acceptable sharpness
all contribute to the final result.
And that’s why an f/1.4 lens isn’t simply about producing blurry backgrounds.
It is about giving the photographer another level of control over what the viewer sees and where their attention is directed.
At close distances, the zone of acceptable focus can be measured in mere millimetres or centimetres.
That can make shooting at f/1.4 challenging.
But once you understand what is happening — and practise enough for it to become instinctive — that same narrow depth of field becomes a powerful creative tool.
The maths explains the effect. Practice teaches you how to use it.