How to Create Soft Light in Photography: Shadow Edges, Contrast and White-on-White
By Dave Montizambert

Creating soft light sounds simple. Put a large softbox close to your subject and you are done.
But there is considerably more to understanding soft light than simply making the shadows brighter.
One of the most useful distinctions to understand in studio photography is the difference between shadow softness and shadow brightness. A photograph can have very dark shadows while still being made with soft light.
Understanding that distinction gives you much greater control over your lighting.
It is particularly important when photographing a subject wearing white clothing against a white background, where maintaining separation between the subject and background can be surprisingly difficult.
What is soft light?
Soft light is characterised by a gradual transition between illuminated areas and shadow.
Look closely at the edge of a shadow cast by your subject. Does it transition gradually from light into dark, or is there a very obvious, sharp boundary?
A gradual transition indicates softer light.
A sharp transition indicates harder light.
This is controlled primarily by the apparent size of the light source relative to the subject.
A large light source close to the subject appears large from the subject’s position and can produce soft shadow transitions.
A small light source, or a large source placed much further away, appears relatively small and produces harder, more defined shadows.
Soft light does not necessarily mean bright shadows
This is one of the most useful concepts to understand.
Photographers sometimes describe a lighting setup as “soft” because the shadows are light and open.
But these are two different characteristics.
You can have:
- Soft-edged, dark shadows
- Soft-edged, bright shadows
- Hard-edged, dark shadows
- Hard-edged, bright shadows
The edge of the shadow tells you about the softness of the light.
The brightness of the shadow tells you about the amount of fill or additional illumination reaching that area.
Confusing the two can make it difficult to communicate what you actually want to change.
If someone tells you that a portrait looks “too hard”, for example, they might mean that the shadow edges are too sharp.
But they might instead mean that the shadows are simply too dark.
Those require two completely different lighting adjustments.
Shadow edge versus shadow contrast
Imagine a portrait illuminated from one side.
The side facing the light is bright. The opposite side falls into shadow.
Now consider two ways of changing the photograph.
Add fill light
If you introduce a reflector or second light to illuminate the shadow side, the shadows become brighter.
However, the edge of the shadow created by the main light may remain essentially the same.
You have changed shadow contrast, but not necessarily the softness of the shadow edge.
Make the main light larger
Now imagine replacing the small light source with a much larger one.
The larger source can illuminate parts of the subject that the smaller source could not reach.
The transition between the fully illuminated area and the darker area becomes more gradual.
You have changed the shadow edge transfer.
That is what creates the characteristic appearance of softer light.
This distinction is extremely useful when adjusting a studio lighting setup.
If the shadow edges are too sharp, consider changing the size or position of the main light.
If the shadow edges are fine but the shadows are too dark, consider adding fill.
Why does a larger light source create softer shadows?
The reason comes down to the geometry of light.
A small light source can illuminate the subject from a relatively narrow range of directions.
A large light source illuminates the subject from a much wider range of angles.
As a result, parts of the light source can reach into areas that would have remained completely dark with a smaller source.
Instead of an abrupt transition from light to shadow, you get a wider transition zone.
This is often referred to as the penumbra, or the partially illuminated region around a shadow.
The larger the apparent light source, the wider this transition can become.
That is why a large softbox positioned close to a portrait subject can create beautifully gradual transitions across the face.
Moving the light changes its apparent size
There is another important control that photographers sometimes overlook.
You can change the apparent size of a light source not only by changing the physical size of the modifier, but also by changing its distance from the subject.
Move a light closer and it appears larger to the subject.
Move it further away and it appears smaller.
Consequently, a large softbox close to the subject can produce very soft light, while the same softbox positioned much further away can produce noticeably harder-looking shadows.
This is why simply saying “I’m using a large softbox” does not completely describe the quality of the light.
You also need to know how far it is from the subject.
White clothing against a white background
This principle becomes particularly useful when photographing someone wearing white clothing against a white studio background.
At first glance, it might appear to be one of the easiest lighting setups imaginable.
White subject. White background. Add plenty of light.
In practice, it can be surprisingly difficult.
The problem is separation.
If the white shirt and the white background are both rendered at exactly the same brightness, the edges of the clothing can disappear into the background.
You therefore need to create enough tonal and visual separation for the shape and texture of the clothing to remain visible.
How to create separation in a white-on-white portrait
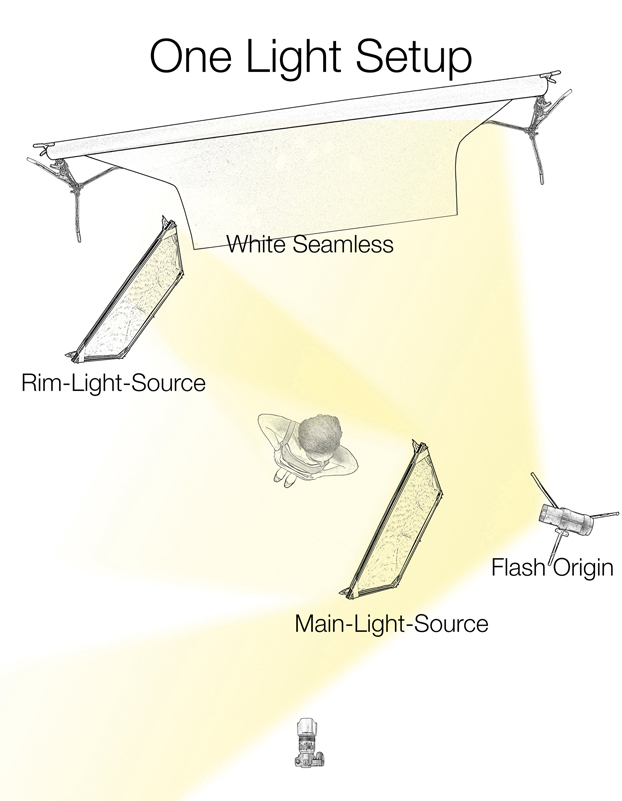
One effective approach is to position the main light to one side of the subject rather than directly in front.
Around 45 degrees from the centre line is a useful starting point.
Then turn the subject’s body slightly away from the light while allowing them to turn their head back towards it.
This creates a useful combination of illumination and shadow across the clothing.
The light skims across the surface of the white fabric rather than hitting it completely front-on.
That produces subtle shadows within the folds and texture of the clothing.
Those shadows help define the garment against the much brighter background.
The same principle can be applied to white shirts, dresses, jackets and other pale clothing.
Light direction reveals texture
This is an important general principle that goes well beyond white clothing.
When light strikes a completely flat surface directly, there may be very little visible variation across it.
Move the light to the side and the surface begins to reveal texture.
Small changes in the surface create small changes in illumination.
Fabric folds become more obvious. Texture becomes more visible. The shape of the garment becomes easier to read.
This is why side lighting can be so effective when photographing materials, products and clothing.
You are not necessarily making the object darker.
You are allowing the direction of the light to reveal its three-dimensional structure.
Controlling a pure white background
Creating a pure white background introduces another consideration.
The background needs to be considerably brighter than the subject if you want it to reproduce as pure white while retaining detail in the subject.
But simply turning the background lights up as far as possible is not always the best solution.
Excessive brightness can cause light to spill around the subject, reducing edge definition and potentially producing flare or unwanted illumination.
A controlled approach is usually preferable.
Light the subject first and establish the exposure you want.
Then adjust the background illumination independently until the background reaches the desired brightness.
This gives you much greater control over the relationship between subject and background.
In some workflows, the background can then be taken to pure white during post-production rather than attempting to push the studio lighting to its absolute limit.
Why the edges of the subject matter
When working against a pure white background, the boundary between the subject and background becomes particularly important.
If the background is substantially brighter than the subject, the subject can retain a clean, defined outline.
But excessive background brightness or spill can begin to affect the edges of hair, clothing and other fine details.
This is one reason it is often better to aim for a well-controlled background rather than simply trying to produce the brightest possible white in camera.
A small amount of adjustment in post-production can often take the final background to pure white while preserving cleaner subject edges.
Soft light can still look dramatic
Soft light is sometimes associated with flat, low-contrast portraits.
It doesn’t have to be.
You can create soft-edged shadows while maintaining substantial contrast between the illuminated and shadow areas.
For example, a large light source positioned close to the subject can produce beautifully gradual shadow transitions while leaving the shadow side relatively dark.
The result can feel soft because the shadow edges are gentle, while still retaining considerable depth and drama.
This is why judging light simply by looking at how bright the shadows are can be misleading.
Look at the transition.
Specular highlights are another part of the equation
Shadow edges are not the only characteristic that contributes to the appearance of soft light.
Specular highlights are bright reflections created by light striking reflective surfaces such as skin.
A softer lighting arrangement generally produces less aggressive specular contrast, giving highlights a more controlled appearance.
This is particularly important in portrait photography.
You want enough highlight to give the skin shape and vitality, but excessive specular brightness can become distracting and emphasise imperfections.
The quality of light therefore involves several interacting characteristics rather than one simple “soft or hard” setting.
How to make light softer
If your lighting looks too hard, there are several things you can try.
Increase the size of the light source
A larger modifier generally produces softer shadow transitions when positioned appropriately.
An umbrella, large softbox or other large diffusion source can be useful for this.
Move the light closer
Moving a suitably sized source closer makes it appear larger to the subject.
This can produce softer transitions.
Remember that moving the light also changes exposure and the way quickly the light falls off across the subject, so you may need to adjust its power and position accordingly.
Add diffusion
Diffusion can turn a more directional source into a larger, softer emitting surface.
The trade-off is reduced light output.
Change the angle
Sometimes the problem is not the modifier itself but where it is positioned.
Small changes in height and angle can alter how shadows fall across the face and body.
How to make shadows brighter
If you are happy with the softness of your shadows but they are too dark, changing the size of the main light may not be the answer.
Instead, consider adding fill.
A reflector can bounce some of the main light back towards the subject.
Alternatively, a second light can be used as controlled fill.
You can then adjust the brightness of the shadows without fundamentally changing the softness of the main light’s shadow edges.
This distinction gives you two independent controls:
Change the light source size or distance to influence shadow softness.
Change the amount of fill to influence shadow brightness.
Once you start thinking about those as separate controls, lighting becomes much easier to predict.
A simple lighting exercise
You can demonstrate all of these principles with a single portrait subject.
Set up a small light source to one side of the subject and photograph them.
Then replace it with a much larger source while keeping the direction broadly similar.
Look closely at the shadow beneath the nose, the jawline and the neck.
Don’t simply ask whether the second photograph is lighter or darker.
Ask:
- How sharp is the edge of each shadow?
- How wide is the transition from light into shadow?
- How dark is the shadow itself?
- How much detail remains in the shadow?
- How bright are the specular highlights?
- How does the background change?
Now repeat the experiment while adding a reflector.
You should see that the reflector can brighten the shadow areas without necessarily changing the fundamental softness of the shadows created by the main light.
This is an excellent way to develop an instinct for lighting rather than relying on rules.
Don’t be afraid of dark shadows
There is a tendency to assume that good soft lighting means eliminating dark shadows.
It doesn’t.
Shadows are essential for giving a three-dimensional subject shape.
The goal is not necessarily to make every part of the photograph equally bright.
Instead, consider what the shadows are doing.
Are they defining the face?
Are they helping separate the clothing from the background?
Are they creating depth?
Are the transitions distracting or pleasing?
A portrait can have deep, dark shadows and still have a beautifully soft quality of light.
Learn the vocabulary and the lighting becomes easier
Good lighting starts with understanding what you are actually trying to change.
If a portrait looks “too hard”, ask yourself what you mean.
Are the shadow edges too sharp?
Are the shadows simply too dark?
Are the specular highlights too strong?
Is the light source too small?
Is it too far away?
Is there insufficient fill?
Those questions lead to specific solutions.
Rather than randomly moving lights around until something looks better, you can make a deliberate change and understand why it produces the result you see.
That is the real value of understanding the principles behind studio lighting.
Soft light isn’t simply about bright shadows. Hard light isn’t simply about dark shadows.
Look at the edges, the transitions, the contrast and the highlights.
Once you can see those individual components, you have much more control over the light — whether you are creating a classic business headshot, photographing white clothing against a white background or building a dramatic studio portrait.