How to Manage Large Photoshop Files and Lots of Layers
Practical Photoshop workflow tips for photographers working with complex composites by Mike McNamee
Large Photoshop projects can quickly become difficult to manage.
A composite might begin with just a handful of layers, but before long you’re dealing with dozens — or even hundreds — of photographs, masks, adjustment layers, Smart Objects and effects.
The file becomes enormous.
Photoshop slows down.
The Layers panel becomes difficult to navigate.
And when you return to the project six months later, you may have absolutely no idea what half of the layers are supposed to do.
A little organisation from the beginning can make a huge difference.
Here’s how to manage large Photoshop files and complex layered projects more effectively.
Why do Photoshop files become so large?
Every layer in a Photoshop document can add to the amount of data Photoshop needs to store and process.
A simple photograph might be relatively small, but a complex composite containing multiple high-resolution images, Smart Objects, masks and adjustment layers can quickly become several gigabytes in size.
The working requirements can be considerably larger than the size of the saved file.
Photoshop may need additional temporary storage while performing calculations, particularly when working with large documents and complex operations.
This is where your computer’s RAM and scratch disk become important.
PSD or PSB: which should you use?
For large Photoshop projects, you’ll generally encounter two important file formats:
PSD — Photoshop Document
and
PSB — Photoshop Large Document Format
PSD is suitable for most Photoshop projects.
When your document becomes too large for PSD’s limits, PSB is designed specifically for large documents.
If you’re working on enormous composites, very high-resolution images or documents containing hundreds of layers, PSB can therefore be the appropriate choice.
The important thing is to keep a layered master file while the project is still being developed.
Don’t flatten your only copy simply because the file has become difficult to manage.
Keep your master file layered
Complex creative projects tend to evolve.
You might move an object.
Change the background.
Replace a person.
Adjust the lighting.
Try a different crop.
Add another element.
If you’ve flattened the document, making those changes becomes considerably more difficult.
For that reason, keep your original PSD or PSB as the editable master file.
Once the project is finished, you can create flattened versions for specific purposes.
Think of the layered file as your digital negative.
The flattened file is the finished print.
Smart Objects: useful, but not free
Smart Objects are extremely useful when working on complex Photoshop projects.
They allow you to transform and edit source material non-destructively and can be particularly valuable when you’re resizing, transforming or applying filters to imported elements.
However, Smart Objects also require additional processing and storage.
A complex document containing numerous large Smart Objects can therefore require considerably more working space than the saved file size suggests.
This is one reason a large Photoshop document can suddenly consume a huge amount of scratch-disk space.
Use Smart Objects where they provide a genuine advantage, but don’t automatically convert every element simply because you can.
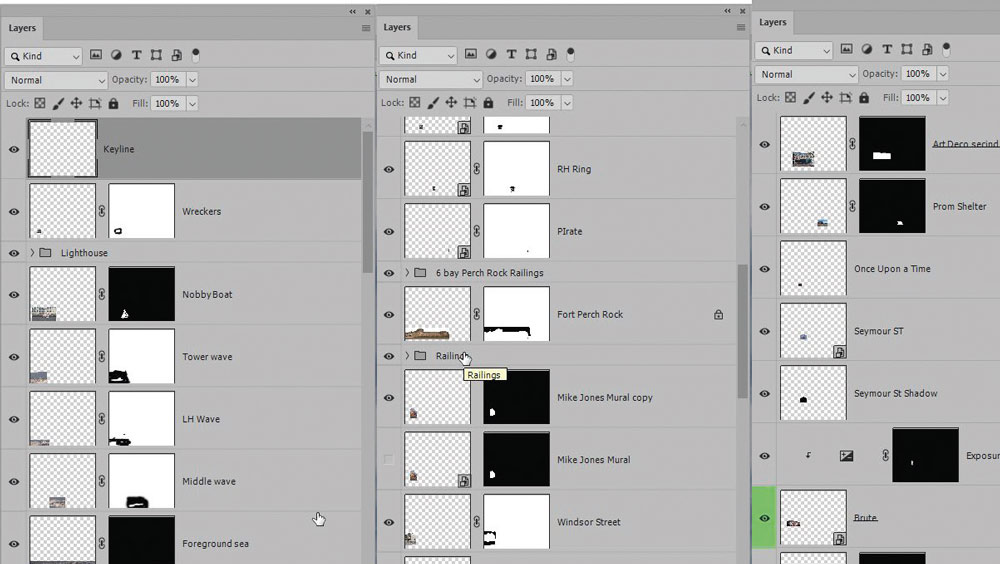
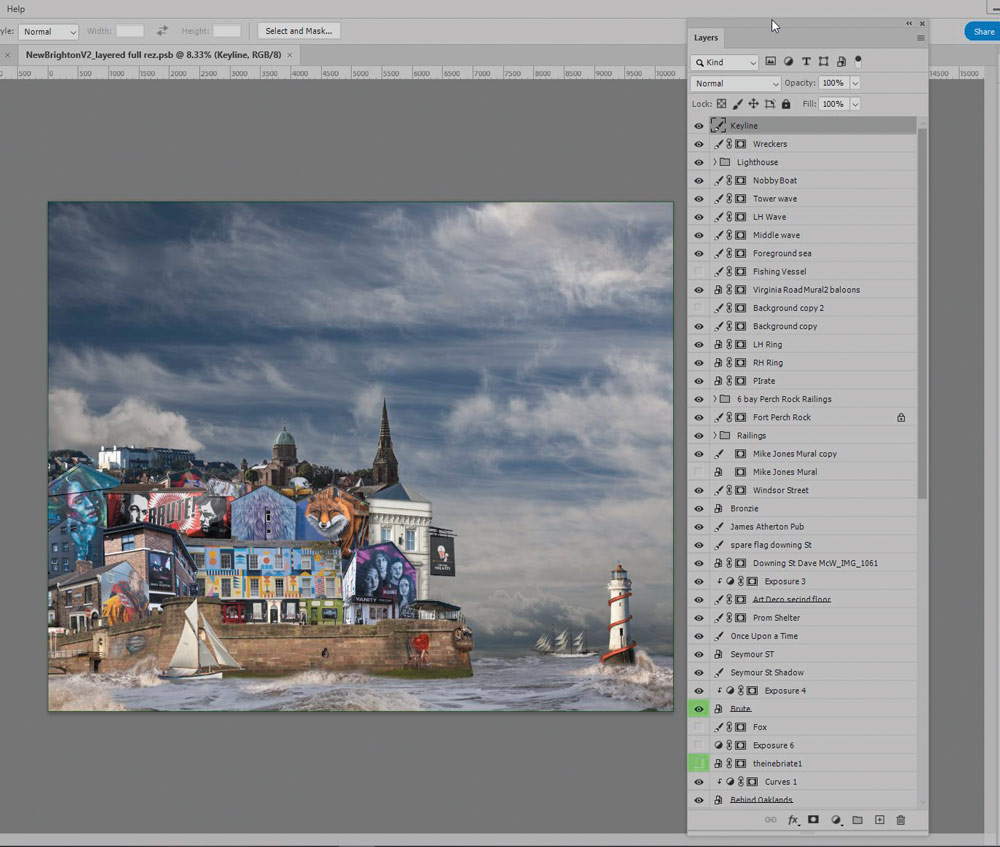
Give your layers meaningful names
This sounds obvious.
It is also one of the easiest things to neglect.
When you’re concentrating on creating an image, names such as:
- Layer 34
- Layer 35 copy
- Layer 35 copy 2
- Layer 47
can seem perfectly acceptable.
Six months later, they are almost useless.
Instead, give layers names that tell you what they contain.
For example:
- Background sky
- Left building
- Model – original
- Model – hair
- Shadow – foreground
- Window reflection
- Colour grade
- Skin retouch
- Final contrast
You don’t need a complicated naming system.
You just need one that makes sense when you return to the file later.
Use layer groups
Once your project contains more than a few dozen layers, groups become extremely useful.
For example, a composite might contain groups for:
Background
Main subject
Foreground
Lighting
Colour correction
Retouching
Effects
Instead of scrolling through an enormous list of individual layers, you can collapse the groups and see the overall structure of the document.
If a component of your image contains multiple layers, group them together and give the group a meaningful name.
The more complex the project, the more valuable this becomes.
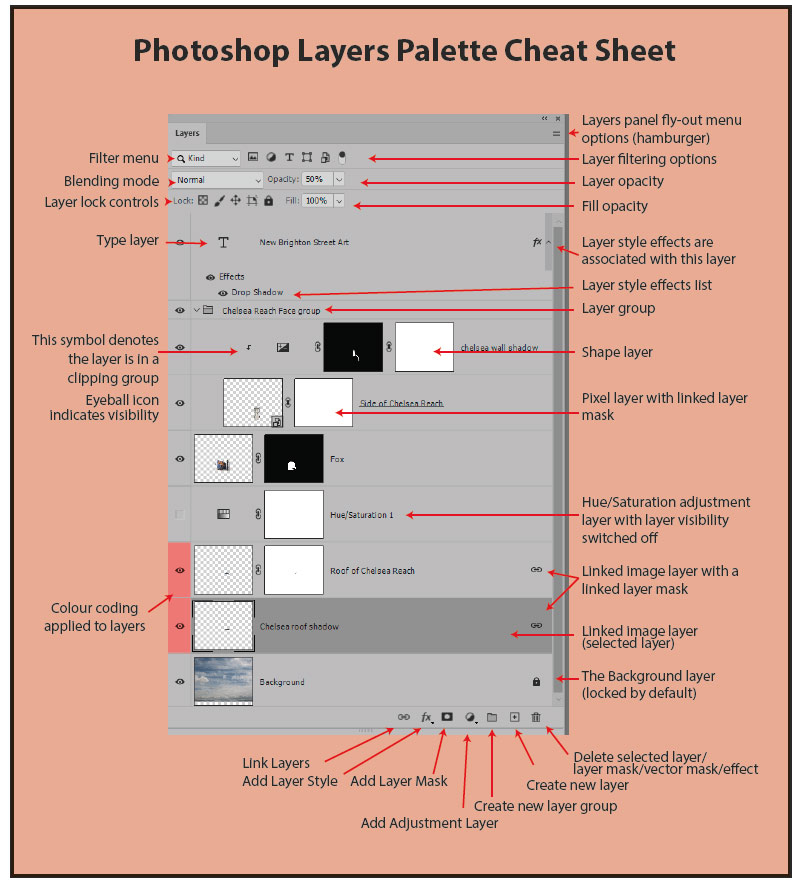
Colour-code important layers and groups
Photoshop also allows layers and groups to be colour-coded.
This can provide another visual way of navigating a complicated document.
You might use one colour for:
- Background elements
- Subjects
- Masks
- Effects
- Adjustment layers
- Finished elements
There isn’t a correct colour system.
The important thing is consistency.
If you use colour coding, establish a system and stick to it.
Use the Layers panel filters
When you have a large number of layers, scrolling through the entire Layers panel isn’t always the quickest way to find what you’re looking for.
Photoshop provides filtering options that allow you to narrow down the layers displayed in the panel.
Depending on the version of Photoshop you’re using, you can filter layers by characteristics such as:
- Type
- Name
- Effect
- Mode
- Attribute
- Colour
- Smart Object
- Selection
If you’re looking for a particular layer and you’ve named it properly, searching by name can be considerably quicker than manually scrolling through a huge layer stack.
Use Auto-Select carefully
The Move Tool’s Auto-Select function can be extremely useful.
It allows you to click an element in the image and have Photoshop select the corresponding layer or group.
However, it can also cause problems in complicated composites.
If you accidentally move an element while Auto-Select is active, you can disrupt carefully aligned components.
This is particularly problematic when several layers need to remain perfectly aligned.
Know when Auto-Select is helping you and when it is safer to select the required layer manually.
Link layers that belong together
If several layers form a single component, linking them can prevent accidental movement.
Imagine you’ve created a person from several layers and then added a hat as a separate layer.
If the hat needs to remain aligned with the person’s head, linking the relevant layers can help prevent the components becoming separated accidentally.
This is particularly useful in complex composites containing many independently positioned elements.
Use layer masks instead of erasing
One of the most important principles when working on complex Photoshop projects is to work non-destructively wherever practical.
If you need to hide part of a layer, a layer mask is usually preferable to permanently deleting the pixels.
With a mask, you can change your mind later.
This is particularly important when working on composites because you may need to refine an edge repeatedly as the project develops.
A destructive edit can leave you with far fewer options.
Check your masks carefully
Masks can also create problems that aren’t immediately obvious.
Fine edges, particularly around subjects, can sometimes produce unwanted lines or halos.
If you’re struggling to identify where an unexpected edge has come from, temporarily viewing the mask itself can help reveal the problem.
Photoshop provides several options for working with masks, including disabling, applying and refining them.
Learning to inspect your masks directly can save considerable time when troubleshooting a composite.
Copy versus Copy Merged
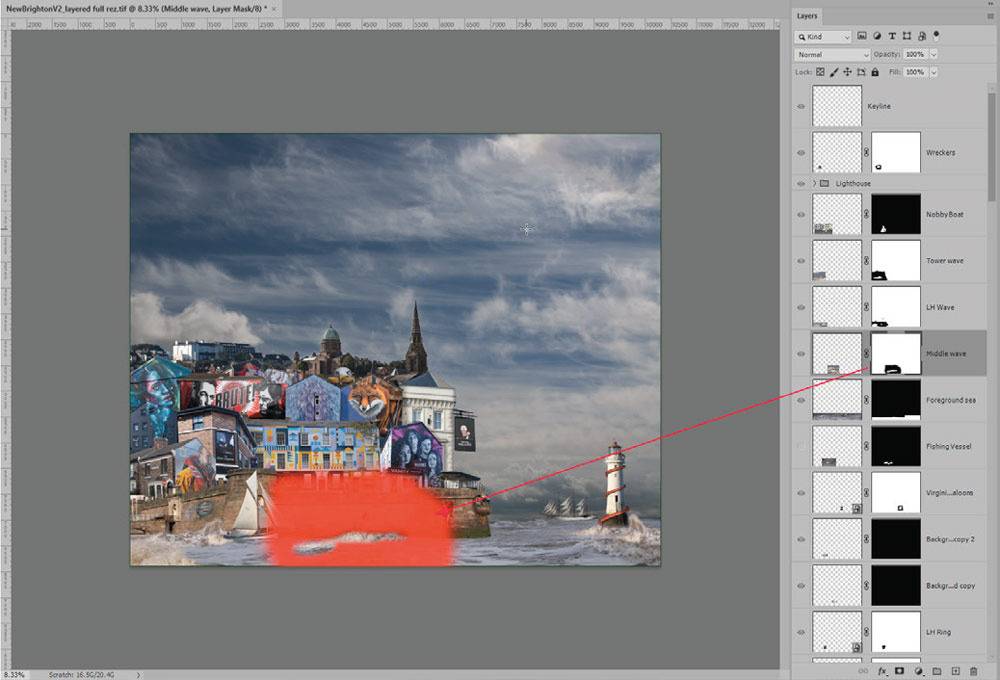
There is an important distinction between copying from an individual layer and copying the visible result of multiple layers.
A normal Copy command works with the active layer or selection.
Copy Merged copies the visible result from the composite.
This can be particularly useful when creating a new element from everything currently visible in the document.
It’s another small Photoshop feature that becomes increasingly useful as your projects become more complex.
Don’t flatten your master file too early
Once you’re confident that an element is complete and won’t need further editing, you may decide to merge layers.
That can reduce complexity, but it also removes some of your ability to make changes later.
Before merging or flattening anything important:
Save a separate copy.
For example:
Project_Master.psb
could remain your fully editable master.
You could then create:
Project_Flattened.tif
for a particular output requirement.
That gives you a safety net if you later discover that something needs changing.
Create a final reproduction master
For important projects, it can be useful to create a final master specifically for reproduction.
Once you’ve checked the complete image carefully, create the appropriate flattened version and record any important production information alongside it.
For fine-art or limited-edition printing, maintaining accurate records becomes particularly important.
Record things such as:
- File version
- Colour space
- Output resolution
- Printer or printing process
- Paper
- Print settings
- Edition information
- Date produced
Don’t rely on a scrap of paper that can disappear.
A simple digital project record is much easier to maintain.
Photoshop scratch disks and large files
If Photoshop reports that the scratch disks are full, the problem isn’t necessarily that your saved image is too large.
Photoshop uses scratch disk space as temporary working storage when it needs more memory than is immediately available.
Large documents, filters, Smart Objects and complex operations can all increase this requirement.
For photographers working regularly with very large files, having sufficient RAM and fast SSD storage can make a significant difference.
A dedicated fast SSD can also be useful as a scratch disk.
The exact hardware requirements will depend on the size and complexity of your work, so don’t assume that one specification is ideal for every photographer.
Don’t forget your storage strategy
Large Photoshop files also create an important backup problem.
If your master file is several gigabytes in size, copying it between drives takes longer and maintaining multiple versions consumes significant storage.
That makes a sensible backup strategy particularly important.
For valuable projects, consider keeping:
A working copy
A local backup
A separate or off-site backup
The exact system you use will depend on your workflow, but the principle is simple:
Don’t let a single Photoshop file be the only copy of work you cannot recreate.
Keep your source material organised
Complex composites often involve photographs, textures, skies, backgrounds, graphics and other resources from multiple locations.
Don’t allow those assets to become scattered across your computer.
Create a project folder containing the resources used for that particular job.
For example:
Project Name
→ Master Files
→ Source Images
→ Graphics
→ Textures
→ Exports
→ Documentation
When you bring an asset into the project, keeping a copy of the original source material with the project can make it much easier to reconstruct the image later.
It’s particularly useful when you have manipulated the original file.
A sensible file name can also help you trace the asset back to the original camera file or source.
Save often — but don’t save mistakes
Saving regularly is essential when working on a large Photoshop document.
But there is an important distinction between saving frequently and saving blindly.
Imagine you’ve accidentally painted directly onto an image layer when you intended to paint on a mask.
If you save the document before noticing the mistake, you’ve made the problem much harder to undo.
Develop the habit of checking what is selected before making significant edits.
Are you painting on the image?
The mask?
An adjustment layer?
A temporary layer?
A quick check can save hours later.
Build a Photoshop layer system that works for you
There is no single correct way to organise a Photoshop document.
The important thing is to establish a system.
Name your layers.
Group related elements.
Use masks.
Keep important components editable.
Use colour coding where helpful.
Save separate versions before destructive operations.
And make sure you can understand the document when you return to it months later.
That last point is perhaps the most important.
When you’re deeply involved in a creative project, your layer structure can seem completely logical.
Six months later, it may look like chaos.
Your future self will thank you for doing the boring organisational work today.
The final lesson
Photoshop gives photographers enormous freedom to build complex images, but that freedom comes with a cost.
The more layers, Smart Objects, masks and effects you add, the more important organisation becomes.
A well-structured Photoshop document isn’t just easier to navigate.
It is easier to edit, easier to reproduce, easier to back up and much easier to understand when you return to it.
So before your next major composite becomes a hundred-layer monster, spend a few minutes establishing some order.
Name the layers. Group them. Save intelligently. Keep your master file.
It might feel like slowing down while you’re creating.
In the long run, it will probably save you considerably more time.