Food Photography Lighting: When to Shoot In-Camera and When to Use Photoshop
By Dave Montizambert
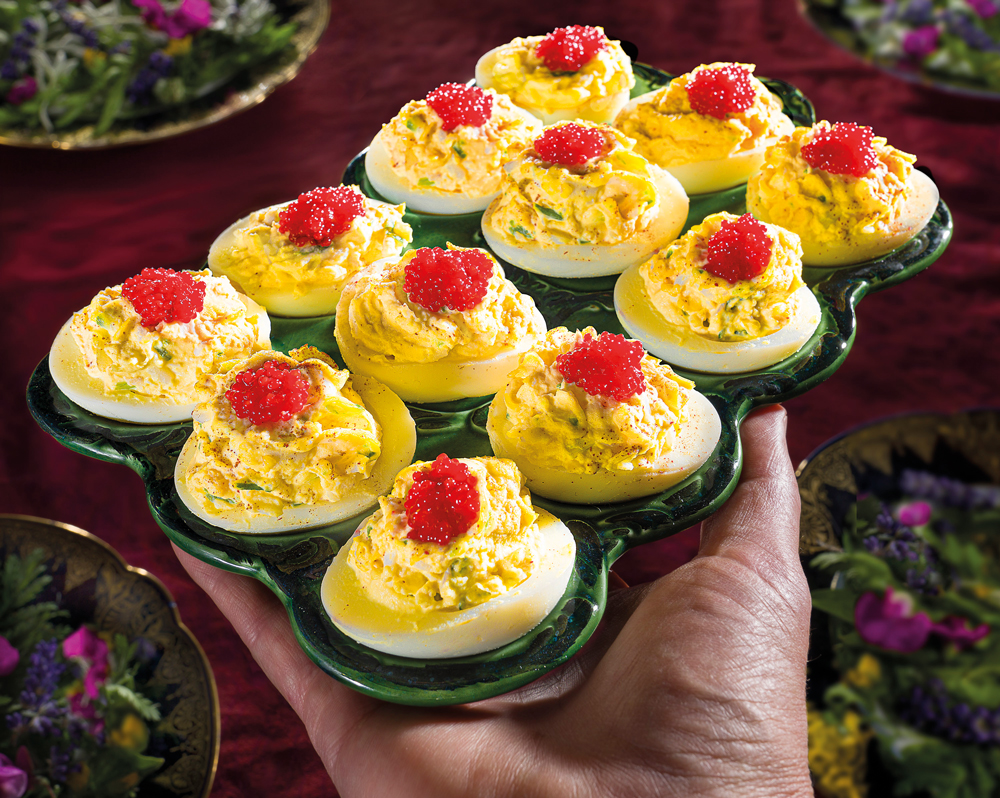
When creating a photograph, should everything be done in-camera, or is it sometimes better to solve part of the problem in Photoshop?
There is no universal answer.
In some situations, creating an effect physically on set gives you greater control and a better-quality result. In others, a little carefully planned post-production can save considerable time and make a difficult photograph much easier to produce.
Food photography provides a particularly good example.
For one retro-inspired cookbook photograph, I wanted to create an image of deviled eggs topped with caviar. I needed a dozen good-looking eggs arranged in a dish, but creating twelve perfect examples proved considerably more difficult than expected.
Rather than spending even more time trying to produce the perfect food styling, I decided to photograph the set in stages and create the final arrangement using Photoshop.
The result was faster to produce and, because the process was planned carefully, looked completely natural.
In-camera or Photoshop?
There is sometimes a tendency to assume that everything should be created in-camera.
There is certainly a good argument for this.
When you manipulate light and physical objects on a real set, you have far more control over the three-dimensional environment. You can alter the position, height, distance and direction of your lights and subjects.
Photoshop, by comparison, is working with a two-dimensional representation of that scene.
However, photography is not a competition to see how little post-production you can use.
The better question is:
Which approach produces the required result most efficiently without compromising quality?
Sometimes the answer is in-camera.
Sometimes the answer is Photoshop.
And quite often the best solution is a combination of the two.
Consider time as well as quality
When deciding how to create an image, I consider two important factors: time and quality.
If something can be achieved quickly and convincingly in Photoshop, there may be little reason to spend hours trying to achieve it physically on set.
However, this can change when you need multiple versions of an image.
If you have to repeat the same Photoshop manipulation for dozens of photographs, creating the effect physically may become much more efficient.
The decision should therefore be made before becoming too committed to one particular workflow.
Ask yourself:
- Is it quicker to create this in-camera?
- Will Photoshop produce a better result?
- Will I need multiple versions?
- Can I repeat the effect consistently?
- Will the post-production require significant masking or retouching?
- Can I make the composite easier by carefully controlling the original photographs?
Planning these questions before shooting can save a surprising amount of time.
Creating more food in Photoshop
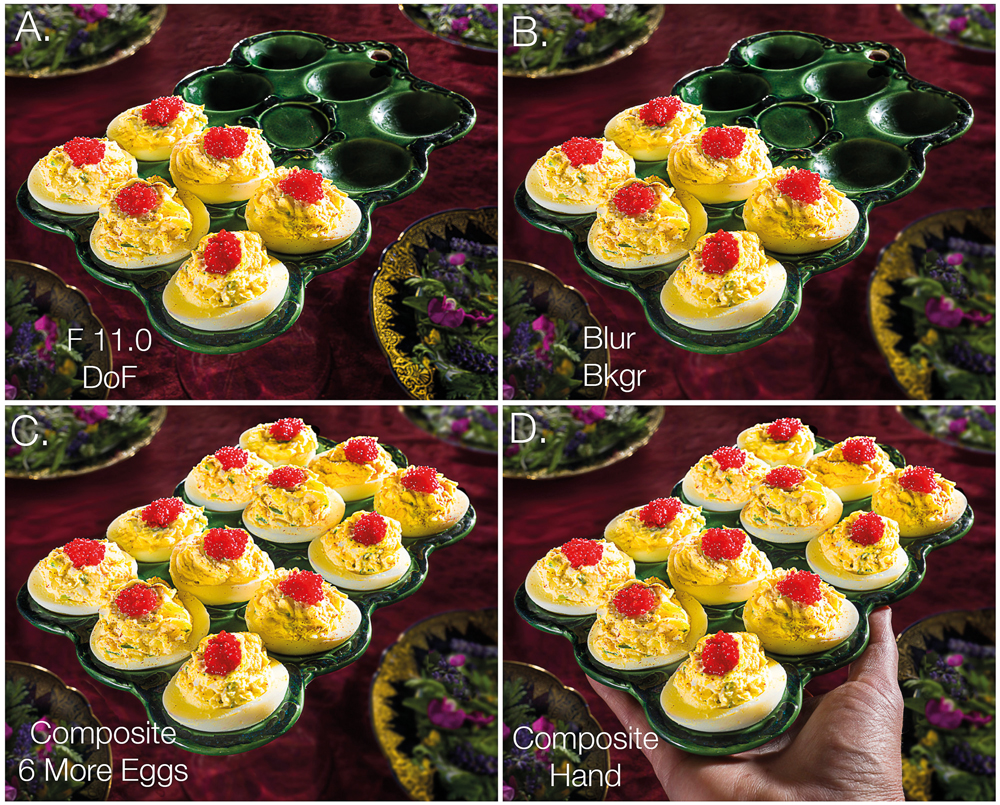
For my deviled egg photograph, only six of the eggs I created were suitable for the final image.
Rather than making another six, I photographed the first arrangement and then moved those same eggs into the other half of the dish for a second exposure.
The two photographs could then be combined in Photoshop to create the appearance of twelve eggs.
The important point is that this wasn’t simply a matter of taking two photographs and hoping they would line up.
The camera had to remain completely stationary.
I tethered the camera to the computer, which meant there was no need to touch the camera between exposures.
The eggs were also moved carefully so that the two photographs would register correctly.
Why camera stability matters
When creating a composite, even a small movement of the camera can make the final images much more difficult to align.
A tripod is therefore extremely useful.
Tethering the camera can provide another advantage because it allows you to trigger and review the camera without physically disturbing it.
The more carefully the original photographs are captured, the less work there will be later.
Photoshop does have tools that can help if there is some movement.
For example, photographs can be loaded into a stack and Photoshop can attempt to automatically align the source images.
However, this should be regarded as a useful safety net rather than a substitute for careful shooting.
Getting the registration right in-camera is usually the simpler solution.
Using depth of field creatively
Depth of field was another challenge with this photograph.
The camera wasn’t directly above the food. Instead, it was positioned at an angle of approximately 42 degrees.
This made the depth of field problem considerably more difficult.
At a relatively wide aperture, the foreground and background could be rendered beautifully soft, but not enough of the eggs would remain sharp.
Stopping the lens down provided enough depth of field to keep the eggs sharp, but it also made the tabletop and surrounding props too sharp.
This created a dilemma.
I needed:
Sharp food + soft background.
The traditional solution would be to try to solve the entire problem optically.
Instead, I photographed the scene at an aperture that provided sufficient depth of field for the eggs and then used Photoshop to soften the background.
Combining optical and digital techniques
The final solution demonstrates an important principle of modern photography:
You don’t always have to solve every problem with the camera.
I captured the photograph at approximately f/11, which gave me the depth of field needed for the eggs.
I then selected the background elements in Photoshop and applied Gaussian Blur.
The result simulated the softer appearance I would have achieved with a wider aperture, while retaining the necessary sharpness on the food.
Because the background was relatively simple, Photoshop’s automated subject-selection tools made the process particularly quick.
This is an example of where post-production wasn’t being used to rescue a bad photograph.
It was being used deliberately as part of the photographic process.
Creating separation in tabletop photography
When photographing food from above or at an angle, separating the subject from the tabletop can be difficult.
One solution is to introduce different heights into the composition.
For this photograph, I used an upside-down martini glass as a simple pedestal beneath the egg dish.
This raised the dish approximately eight inches above the tabletop.
The result was greater physical separation between the food and the background, which helped the background fall outside the sharp zone of the depth of field.
This also provided another benefit: the dish had a stable support.
That stability was particularly important because several exposures were being combined.
A small amount of movement between exposures could have created significant problems during compositing.
Think about your background
The background was designed specifically for the retro cookbook appearance I wanted.
A dark red backdrop contrasted with the mid-tone green egg dish, helping the light-coloured food stand out.
Additional plates containing colourful materials were introduced into the background to provide texture, colour and visual interest.
They didn’t need to be the main subjects.
In fact, they were deliberately placed so that they would become softer elements within the composition.
This is a useful approach to food photography.
Background props don’t necessarily need to be sharp or even immediately recognisable.
Their purpose can simply be to introduce:
- Colour
- Texture
- Shape
- Depth
- Context
- Visual balance
Selective lighting for food photography
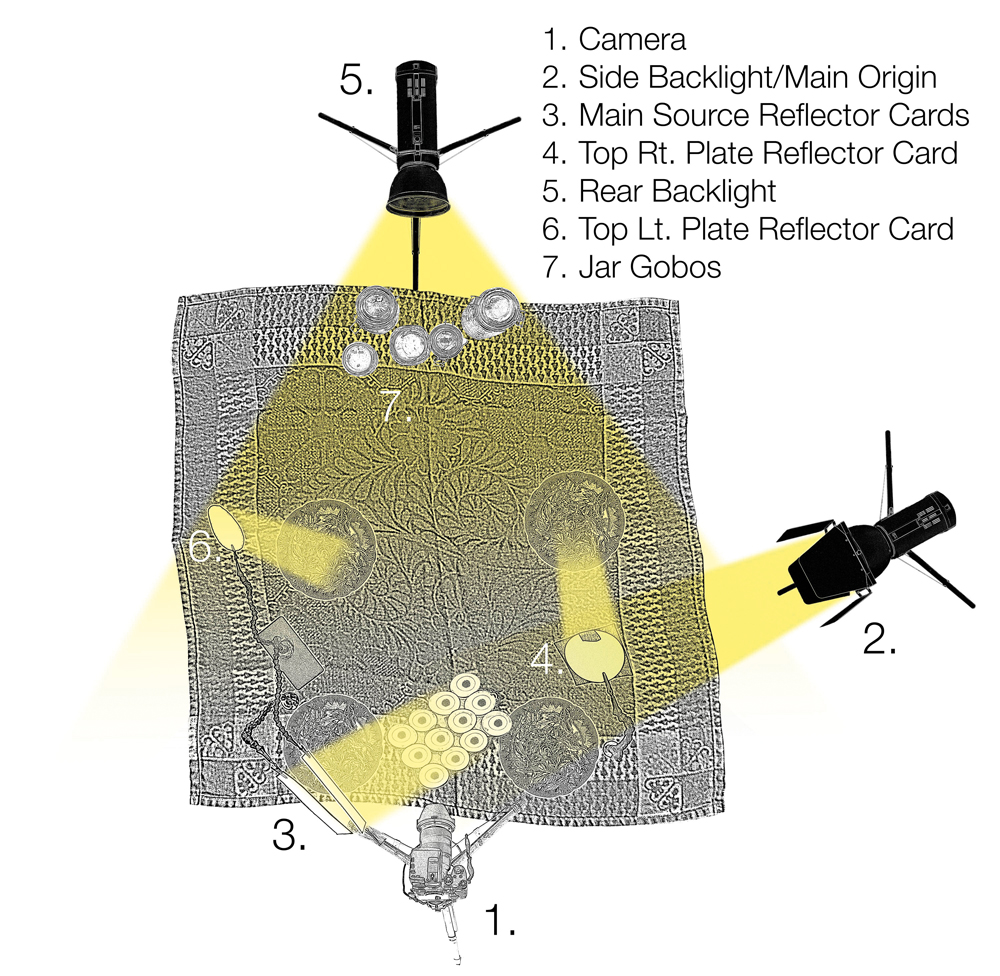
Rather than illuminating the entire scene evenly, I used selective lighting to illuminate relatively small areas of the composition.
This approach can create considerably more drama than simply flooding the entire set with light.
Selective lighting can help direct the viewer’s attention towards the important parts of the photograph while allowing less important areas to fall away.
Reflectors can also be extremely useful.
Rather than adding another light source, a reflector can redirect existing light back towards the subject.
This can provide much more control over the balance of light without making the setup unnecessarily complicated.
Plan composites before you press the shutter
If you know that several photographs will eventually become one image, think about the final composite before you begin shooting.
Consider:
Camera position
Keep it absolutely fixed.
Subject position
Know which objects are going to move between exposures.
Lighting
Make sure the light doesn’t change between captures.
Focus
Avoid changing focus between exposures unless the composite requires it.
Exposure
Keep the exposure consistent.
Background
Don’t move props that need to remain registered with the original frame.
Support
Use stable supports wherever possible.
The more consistent the captures are, the easier the Photoshop work becomes.
When should you use Photoshop?
Photoshop is particularly useful when the physical solution would be disproportionately time-consuming or difficult.
Examples include:
- Creating additional objects in a scene
- Removing unwanted distractions
- Combining different exposures
- Controlling background sharpness
- Creating multiple variations
- Retouching food
- Adjusting colour and tone
- Combining different lighting treatments
But the fact that Photoshop can do something doesn’t necessarily mean it should.
A good photographer considers the entire workflow rather than automatically reaching for post-production.
When should you keep it in-camera?
There are plenty of situations where creating the effect physically is the better solution.
If you’re producing a large number of images, repeating a Photoshop process for every photograph can quickly become inefficient.
Physical changes can also produce more natural interaction between light, objects and the environment.
The key is to understand both options.
A photographer who can control light on set and use Photoshop intelligently afterwards has considerably more creative flexibility.
The bigger lesson
The deviled egg photograph was ultimately less about eggs and more about photographic decision-making.
There were several problems to solve:
- Producing enough suitable food
- Creating separation from the background
- Maintaining sufficient depth of field
- Keeping the background soft
- Lighting the scene selectively
- Creating a convincing final composition
Some of those problems were solved physically.
Others were solved digitally.
The important thing was not whether the solution happened in-camera or in Photoshop. It was whether the chosen method produced the desired result efficiently and to the required standard.
Good photography isn’t necessarily about doing everything in-camera. It’s about knowing what should be done in-camera, what can be done in post-production and how to combine the two.
That decision-making process is often just as important as the camera, lens or lighting equipment you use.