How to Reduce Noise in Photos: ISO, Denoising and Image Quality
Noise is one of the most common technical problems photographers encounter, particularly when shooting at high ISO settings, in low light or when working with small or heavily cropped subjects.
Modern cameras and editing software have become remarkably good at dealing with noise. AI-powered noise reduction can now rescue photographs that would have been extremely difficult to use a few years ago.
But there is a catch.
Noise reduction always involves a compromise.
Reduce too little and the photograph can look noisy and distracting. Reduce too much and genuine detail can disappear along with the noise.
For nature photographers, this is particularly important. A bird’s feathers, the texture of an insect’s wings or fine details in a distant subject can easily be mistaken for noise by an aggressive denoising algorithm.
The aim isn’t therefore to produce the smoothest possible photograph. It is to produce the cleanest image that still contains believable detail.
What is image noise?
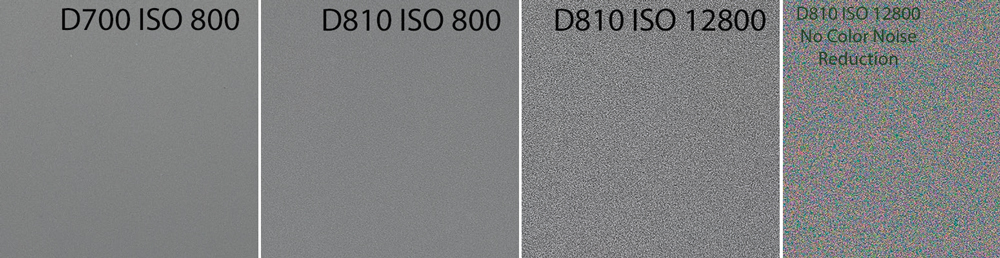
Image noise is unwanted variation in the brightness and colour of individual pixels.
Ideally, an area of a photograph that should contain a relatively uniform tone would contain pixels with very similar values. Noise introduces random variations, making some pixels brighter, darker, redder, bluer or otherwise different from their neighbours.
The result can look like grain, coloured speckles or a general loss of clarity.
Noise becomes particularly noticeable when the genuine image signal is weak.
This is why photographers tend to encounter more noise when working with:
- high ISO settings
- low light
- long exposures
- underexposed photographs
- heavily cropped images
- small sensors or small pixels
- photographs that have been aggressively brightened
The relationship between the genuine image information and unwanted noise is commonly described using the signal-to-noise ratio.
The stronger the useful signal is relative to the noise, the cleaner the image will appear.
The two main types of image noise
Most noise-reduction software separates noise into two broad categories: luminance noise and colour noise.
Luminance noise
Luminance, or luma, noise appears as variations in brightness.
A photograph affected by luminance noise may have a grain-like appearance, with individual pixels appearing lighter or darker than they should.
It can be relatively unobtrusive, particularly when viewed at normal size. In some photographs, a small amount can even resemble the grain of traditional monochrome film.
The problem becomes more serious when luminance noise starts to obscure fine detail.
Colour noise
Colour noise, also called chroma or chrominance noise, appears as unwanted variations in colour.
Instead of simply seeing brighter and darker pixels, you may see tiny red, green, blue, purple or yellow speckles.
Colour noise is often particularly distracting and is usually worth addressing even when you decide to retain a little luminance noise for texture.
Many RAW-processing applications have separate controls for luminance and colour noise reduction.
Why does high ISO create more noise?
ISO doesn’t simply “create” noise in isolation. Raising ISO increases the amplification applied to the camera’s signal, and the visibility of unwanted signal variations increases as you work in conditions where the useful light is limited.
At low ISO, a well-exposed photograph can contain a strong signal with relatively little visible noise.
At very high ISO, the available light signal is weaker and the resulting image has less clean information to work with.
The practical result is familiar to every photographer: the higher the ISO, the greater the likelihood of visible noise.
This doesn’t mean you should always use the lowest possible ISO.
A sharp photograph at ISO 6400 is generally much more useful than a blurred photograph at ISO 100.
The objective is to choose the lowest ISO that allows you to achieve the shutter speed, aperture and depth of field you actually need.
Exposure matters more than many photographers realise
Underexposure can make noise considerably more obvious.
If you photograph a dark subject and subsequently have to lift the exposure dramatically in software, you are amplifying both the useful image signal and the unwanted variations within it.
Getting the exposure right at the time of capture is therefore one of the simplest forms of noise reduction.
This is especially important with subjects containing large areas of shadow.
A technically sharp photograph that requires several stops of exposure recovery may contain considerably more visible noise than an image exposed correctly in camera.
Don’t automatically blame the camera
Noise isn’t simply a measure of how good or bad a camera is.
The final result depends on a combination of:
- sensor design
- pixel size
- exposure
- ISO
- shutter speed
- aperture
- available light
- lens quality
- image stabilisation
- subject movement
- cropping
- processing
- output size
A photograph containing some noise can look excellent when viewed at normal size.
The same photograph may look terrible when a small section is enlarged to fill the screen.
This is particularly relevant to wildlife and nature photography, where heavy cropping is common.
Why nature photographers are particularly vulnerable
Nature photography can be a perfect recipe for noise.
A distant subject often requires a long lens and significant cropping. You may also need a fast shutter speed to freeze movement, while the available light may be poor.
The photographer therefore faces a difficult balancing act:
Long lens + fast shutter speed + limited light = high ISO.
Increasing ISO may be the correct decision because it allows you to capture a sharp photograph that would otherwise be impossible.
But the resulting image may need careful noise reduction.
There is another problem: nature photographs contain enormous amounts of fine detail.
Bird feathers are a perfect example.
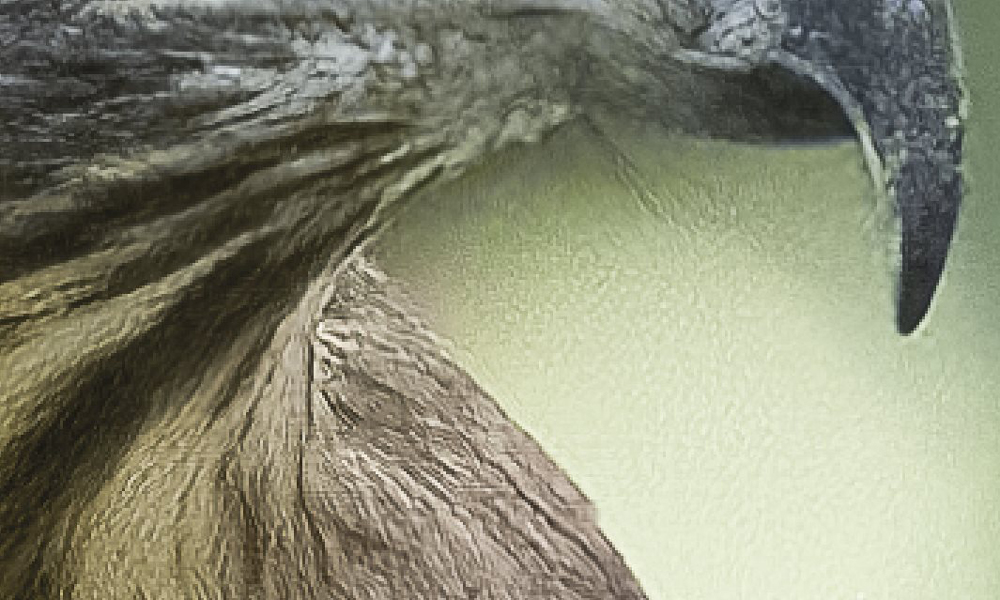
The soft, fine feathers around a bird’s breast contain a completely different texture from the larger flight feathers in the wings. An aggressive denoising algorithm may treat some of those details as unwanted noise and smooth them away.
The result can be a technically clean image that simply doesn’t look like a real bird.
Noise reduction versus detail
This is the fundamental problem with denoising.
Noise and detail can occupy similar spatial frequencies.
In simple terms, software has to decide which variations are unwanted noise and which variations are genuine subject detail.
Modern AI systems are extremely sophisticated at making that decision, but they are still making a prediction.
They don’t have perfect knowledge of what the original subject looked like.
This is why you can sometimes see:
- feathers becoming mushy
- hair becoming unnaturally smooth
- foliage losing texture
- fine fabric disappearing
- repeated patterns becoming artificial
- skin becoming plastic-looking
- invented-looking textures appearing in heavily processed areas
A photograph isn’t necessarily better because it contains less pixel variation.
Sometimes the variation is the photograph.
AI noise reduction
Modern AI-powered noise reduction has transformed what photographers can achieve with high-ISO images.
Instead of simply smoothing neighbouring pixels, AI systems can analyse image structures and attempt to distinguish genuine detail from noise.
This can produce impressive results, particularly with RAW files shot at very high ISO.
However, impressive does not mean infallible.
The stronger the processing, the more carefully the result should be inspected.
AI can remove genuine detail, exaggerate existing patterns or generate texture that looks convincing at first glance but isn’t actually present in the original photograph.
This is especially important when processing:
- wildlife
- birds
- insects
- hair
- architectural detail
- textiles
- landscapes with fine foliage
- astrophotography
The more important the fine detail is to the photograph, the more carefully the denoised result needs to be checked.
Noise reduction should usually come before sharpening
A useful general workflow is:
Noise reduction first, sharpening second.
If you sharpen a noisy image before reducing the noise, the sharpening process can make the unwanted variations more obvious.
Once noise has been reduced, sharpening can be applied more selectively to restore or emphasise important edges.
This doesn’t mean that every workflow has to follow exactly the same sequence, but it is a sensible starting point.
Think of it as:
Clean the image → protect the important detail → sharpen the result.
Don’t apply the same denoising to every photograph
One of the easiest mistakes is bulk-processing an entire folder using the same noise-reduction settings.
Imagine a wildlife shoot containing photographs captured at ISO 400, ISO 1600, ISO 6400 and ISO 12,800.
Applying the same settings to every photograph makes little sense.
Even photographs taken at the same ISO may require different treatment because they contain different amounts of shadow, detail and texture.
An image with a clean background and a detailed subject might benefit from selective noise reduction.
Another image may require considerably less processing because the noise is almost invisible at its intended output size.
Noise reduction should be image-specific whenever practical.
Selective noise reduction can be better than global processing
You don’t necessarily need to denoise the entire photograph equally.
A noisy background may benefit from substantial noise reduction while the subject needs to retain as much natural detail as possible.
This is particularly useful in wildlife photography.
For example, you might apply stronger noise reduction to:
- sky
- out-of-focus backgrounds
- shadows
- smooth studio backgrounds
while applying less processing to:
- feathers
- eyes
- hair
- fur
- scales
- foliage
- architectural details
Masks and local adjustments make this possible in most modern editing applications.
How much noise should you remove?
There is no universal correct setting.
The answer depends on the photograph and its intended use.
A photograph intended for a large exhibition print needs to be assessed differently from a photograph that will appear as a small image on social media.
A file viewed at 100% on a monitor can also look considerably noisier than the same image viewed at its final size.
This leads to an important principle:
Judge noise at the size at which the photograph will actually be seen.
Don’t destroy detail simply to make a 400% enlargement look perfectly smooth.
How to check whether you’ve over-denoised an image
After applying noise reduction, stop looking only at the background.
Examine the subject carefully.
Look for:
- lost feather detail
- smeared hair
- plastic-looking skin
- unnatural fur
- missing fine textures
- strange repeated patterns
- artificial-looking edges
- halos
- invented detail
Then zoom out.
Does the photograph actually look better?
If the only improvement is that the 100% view contains fewer speckles, but the subject has lost its character, you’ve probably gone too far.
The danger of combining heavy denoising and sharpening
Noise reduction and sharpening are natural partners, but they can also create a destructive cycle.
You reduce the noise heavily.
The photograph becomes soft.
You then apply aggressive sharpening to recover the lost detail.
The sharpening brings back some apparent texture — but it can also emphasise artefacts and halos.
The result may look processed rather than photographic.
A better approach is to use moderate noise reduction and preserve genuine detail from the beginning.
What about sharpening AI-generated detail?
Modern software can sometimes make an image appear dramatically more detailed after denoising.
That can be useful, but photographers should distinguish between recovering information and creating a convincing approximation of information.
If an algorithm produces a plausible feather pattern that wasn’t present in the original capture, it may look impressive while still being an interpretation rather than recovered photographic detail.
This distinction matters particularly in documentary, competition and nature photography.
The closer an image needs to remain to what was actually captured, the more conservative the processing should be.
Measuring noise
Noise can be measured statistically.
If you photograph a completely uniform grey target, every pixel should theoretically have the same value. In a real photograph, the pixels will vary.
The wider that distribution of pixel values becomes, the greater the noise.
One common statistical measure is standard deviation.
You don’t need to calculate standard deviation every time you edit a photograph, but the concept explains why laboratory noise tests can compare different cameras and processing methods.
A useful test target contains areas of known, consistent tone so that genuine image variation doesn’t get confused with noise.
In practical photography, however, the important question isn’t simply:
“How many units of noise are present?”
It is:
“Can I see the noise, and is it damaging the photograph?”
Those aren’t always the same thing.
Why pixel count isn’t everything
More pixels don’t automatically mean a cleaner high-ISO image.
Pixel size, sensor technology and the amount of light captured all contribute to image quality.
A high-resolution camera can produce enormous files and excellent detail, but if the image is heavily cropped or shot in poor light, the additional resolution may not provide the expected benefit.
For some types of photography, a camera with fewer but larger pixels can perform extremely well in difficult lighting.
The important thing is to consider the whole imaging system rather than judging a camera purely by its megapixel count.
How to avoid noise before you need noise reduction
The best noise reduction is often good exposure and good technique.
Use the lowest practical ISO
Don’t automatically select ISO 100 if doing so forces you into an unusably slow shutter speed.
Instead, choose the lowest ISO that allows you to make the photograph you actually want.
Get the exposure right
Avoid creating a severely underexposed file that needs several stops of brightening later.
Use image stabilisation
If your subject is stationary, image stabilisation can allow you to use a slower shutter speed and therefore a lower ISO.
It won’t help freeze a moving bird, person or car, but it can be extremely useful with static subjects.
Use a tripod or other support
A tripod can make lower ISO settings practical when subject movement isn’t an issue.
The old photographic maxim that “the best denoiser is a tripod” contains more than a little truth.
Use a wider aperture when appropriate
If your subject and depth of field allow it, opening the aperture lets more light reach the sensor.
That can allow a lower ISO or faster shutter speed.
However, don’t open the aperture simply to avoid noise if doing so means the important parts of your subject fall outside the depth of field.
Improve the light
Sometimes the answer is not more processing but more light.
Fill-in flash, reflectors, continuous lighting or simply moving to a better-lit position can all improve the signal captured by the camera.
Avoid unnecessary cropping
Cropping heavily magnifies everything in the original capture, including noise.
Getting closer or using a more suitable focal length can therefore improve the final result.
Take several frames when possible
If the subject and camera are sufficiently stable, multiple exposures can sometimes be combined to reduce random noise.
Techniques such as image averaging and median stacking can be particularly effective for suitable static subjects.
They aren’t practical for everything, but when they work they can produce remarkably clean results.
Choosing noise-reduction software
You don’t necessarily need specialist software.
Most modern RAW processors and photo-editing applications include perfectly capable noise-reduction tools.
For occasional high-ISO photography, the noise-reduction controls already available in applications such as Lightroom, Photoshop, Capture One or Affinity Photo may be all you need.
Specialist AI applications can become worthwhile when you regularly work with very high ISO settings or need to process difficult files.
The important question isn’t simply which application removes the most noise.
Instead ask:
Which software gives me the best balance between noise reduction, genuine detail, processing time and control?
A program that removes every visible speck but destroys feather detail isn’t necessarily producing the best result.
Test before committing to a large batch
If you’re considering a new denoising application, don’t judge it using just one photograph.
Try several different types of image.
Include:
- a portrait
- a high-ISO wildlife photograph
- a landscape
- a photograph containing fine foliage
- an image with a smooth background
- an image containing fine repetitive detail
Then compare the results at both 100% and the intended final viewing size.
This will tell you much more about how the software behaves than a single impressive demonstration image.
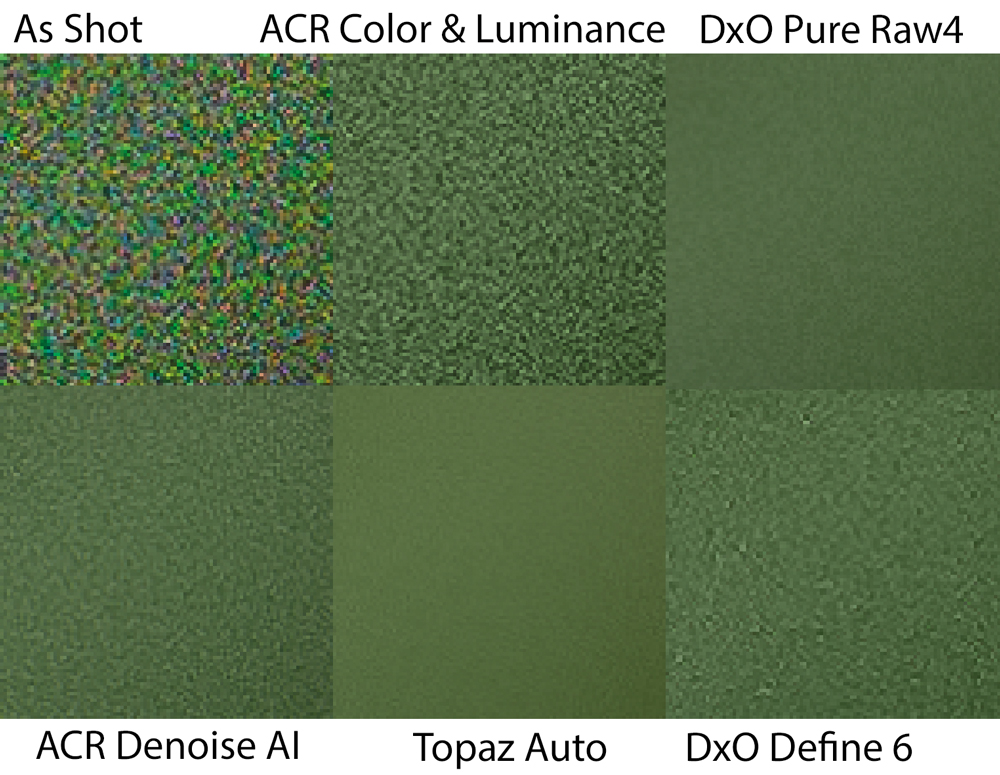
Create your own ringaround
A ringaround is particularly useful when deciding how much noise reduction to apply.
Create several versions of the same photograph with progressively stronger settings.
For example:
None → Light → Moderate → Strong → Very strong
Place them together and compare them.
Look at both the background and the important subject detail.
The strongest version may initially appear the cleanest, but the moderate version may retain far more natural texture.
This turns a subjective slider adjustment into a much easier visual comparison.
Noise isn’t always a problem
Photographers can become obsessed with eliminating every trace of noise.
That isn’t necessarily desirable.
A small amount of luminance noise can add texture and may be completely invisible at normal viewing distance.
In some images, attempting to create an absolutely smooth result makes the photograph look less natural.
The goal should be appropriate image quality, not mathematical perfection.
A practical noise-reduction workflow
For a typical high-ISO photograph, try this approach:
1. Start with the RAW file
Give yourself as much original image information as possible.
2. Correct the exposure
Avoid unnecessary shadow lifting and extreme exposure recovery.
3. Apply colour-noise reduction
Remove distracting coloured speckles first.
4. Apply moderate luminance-noise reduction
Use enough to control the noise without destroying texture.
5. Inspect the important details
Check eyes, feathers, hair, fur, foliage and other fine structures.
6. Use masks if appropriate
Apply stronger noise reduction to smooth backgrounds and less to important subject detail.
7. Compare before and after
Don’t judge the processed version in isolation.
8. Sharpen after denoising
Use appropriate sharpening to restore important edges.
9. Check at final output size
A 100% inspection is useful, but it isn’t the final judgement.
10. Make a proof if the photograph is being printed
Noise and sharpening can behave differently in print from what you see on screen.
The biggest mistakes to avoid
If you want cleaner high-ISO photographs without destroying image quality, avoid these common mistakes:
Mistake 1: Always using the lowest ISO
ISO 100 is not automatically better if it forces you into an unusably slow shutter speed.
Mistake 2: Underexposing and fixing it later
Severe exposure recovery can make noise far more visible.
Mistake 3: Denoising everything automatically
Different photographs require different treatment.
Mistake 4: Removing every trace of noise
Some texture is harmless and may even contribute to a natural appearance.
Mistake 5: Sharpening aggressively after heavy denoising
This can produce halos and artificial detail.
Mistake 6: Judging only at 100%
Always consider the intended final viewing size.
Mistake 7: Trusting AI blindly
AI denoising can produce extraordinary results, but it can also remove genuine detail or create convincing-looking artefacts.
Mistake 8: Ignoring the original capture
No software can completely compensate for a photograph that is severely underexposed, badly blurred or excessively cropped.
Noise reduction for competition photography
Technical quality matters particularly when entering photography competitions.
A photograph may look excellent as a small JPEG on a phone but reveal serious processing problems when examined at higher resolution or reproduced as a large print.
Nature competitions can be especially demanding because judges often expect believable detail in feathers, fur, scales, wings and other fine structures.
An image that has been aggressively denoised may look smooth and clean but lose the very detail that makes the subject convincing.
Before submitting an image, therefore, check:
- the original capture
- the noise level
- the amount of cropping
- the denoising strength
- fine subject detail
- sharpening
- halos and artefacts
- the exported JPEG
- the final viewing size
And remember that a technically perfect file isn’t automatically a better photograph.
Final thoughts
Noise is an unavoidable part of digital photography.
The photographer’s job isn’t to eliminate it at all costs. It is to manage it.
Good exposure, appropriate ISO selection, stable camera technique and sufficient light can reduce the problem before the photograph ever reaches your computer.
When noise reduction is necessary, use it carefully.
Modern AI-powered software can achieve extraordinary results, but it should be treated as a tool rather than an automatic solution. Let it clean up genuine noise, but don’t allow it to turn feathers into plastic, hair into paint or fine textures into invented detail.
The best denoised photograph is rarely the smoothest one.
It is the one where the noise has stopped being distracting while the subject still looks real.