Black on Black Photography: How to Light Dark Objects
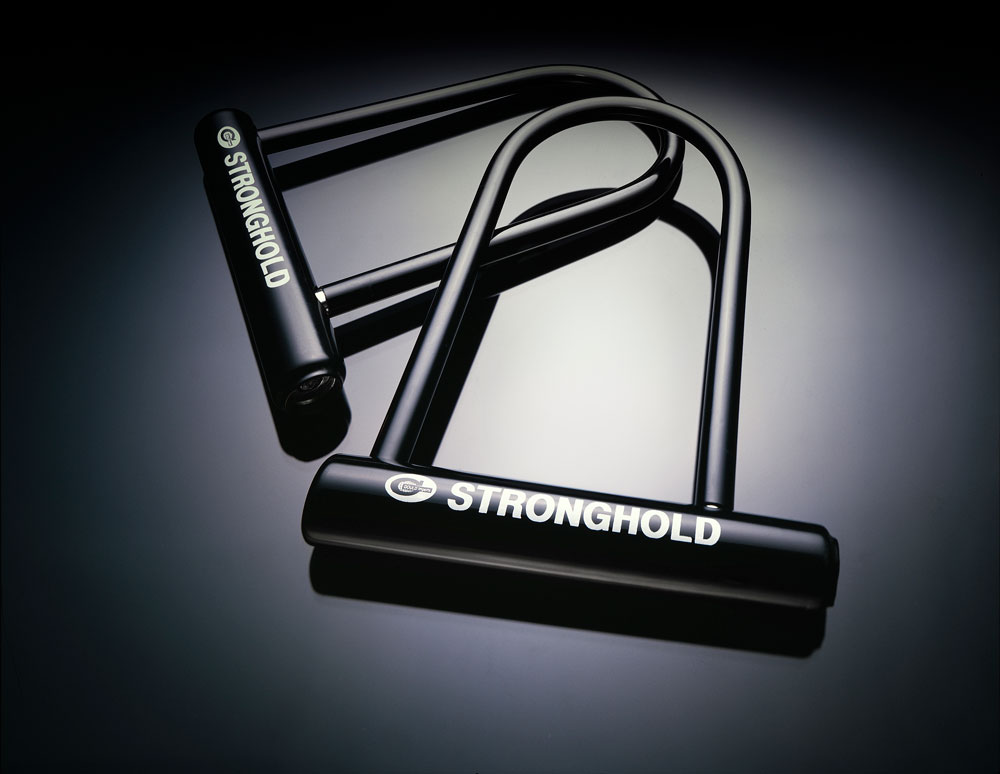
Photographing a black object against a black background sounds simple, but it presents a surprisingly difficult lighting challenge. Without careful control of the light, the subject can disappear into the background, while direct illumination can produce harsh, distracting hotspots.
The key to successful black-on-black photography is not simply increasing the exposure. Instead, you need to control the quality, size and direction of the light so that the shape, texture and reflective qualities of the subject become visible while the blacks remain black.
Dave Montizambert explains how to approach this challenging lighting situation, using a shiny black object photographed against a reflective black surface as an example.
Why is black-on-black photography difficult?
When photographing a dark subject, there can be a temptation to increase the exposure to reveal more detail in the shadows.
That can work when the entire subject is supposed to be black. However, if your subject contains other tones, increasing the exposure can quickly cause those lighter areas to become too bright.
There is another problem with shiny black objects.
When you increase exposure, you are often not revealing useful surface detail. Instead, you are simply making faint reflections and specular highlights brighter.
The result can be a photograph containing small, bright hotspots surrounded by large areas of black.
Rather than solving the lighting problem through exposure, the better approach is to modify the light itself.
Start with a correct exposure
When you’re creating the lighting yourself, don’t begin by exposing specifically for the darkest or lightest part of the subject.
Instead, establish a correct exposure using your normal metering approach and then adjust the lighting to make the subject look right.
This distinction is important.
Exposure determines how the scene is recorded; lighting determines how the subject looks.
If a black object isn’t showing enough detail, that doesn’t necessarily mean you need more exposure. You may simply need to change the size, position or quality of the light falling on it.
This becomes particularly important when your subject contains both black and lighter tones.
Why direct flash often doesn’t work
A small flash or studio strobe pointed directly at a shiny black object is rarely the most attractive solution.
The surface can produce numerous small specular highlights. These bright spots may technically tell you that the object is reflective, but they don’t necessarily describe its shape.
Instead of trying to eliminate reflections completely, a better solution is often to make the reflections larger and softer.
This is one of the most useful principles when photographing shiny black objects:
Control the reflection rather than simply trying to remove it.
Use a large light source
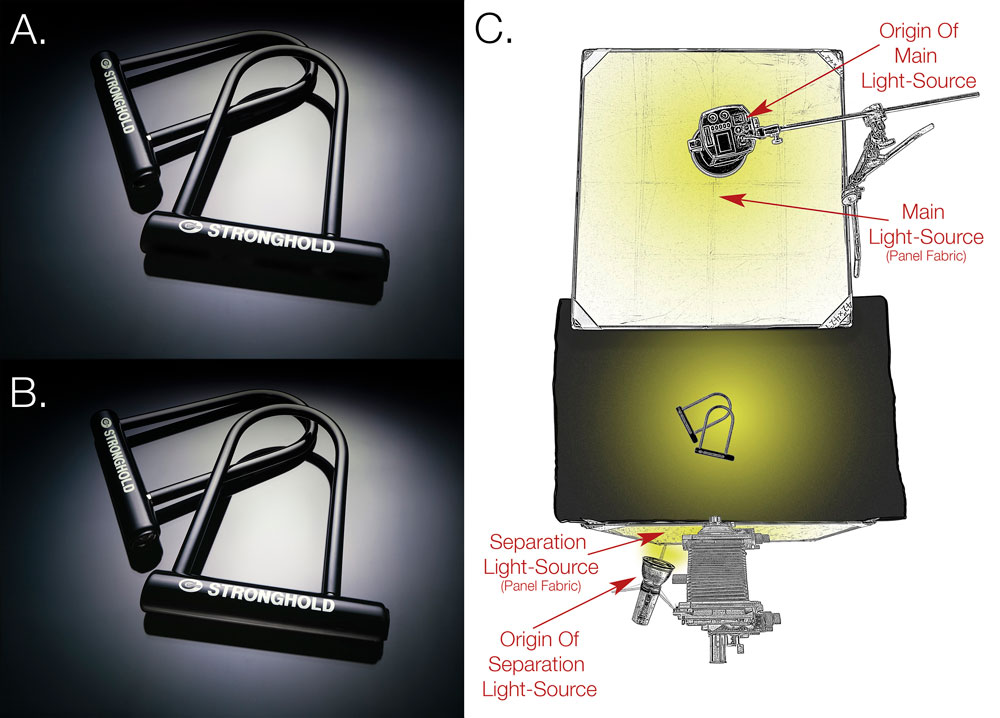
For his black-on-black setup, Dave used a large panel frame covered with two layers of white nylon.
A studio strobe was positioned above the panel, producing a large, soft area of illumination.
The reflective surface of the black object then picked up the shape of this much larger light source.
The difference is dramatic.
Instead of seeing lots of tiny, harsh hotspots, you get a much larger highlight with a gradual transition from brighter to darker areas.
This creates a sense of form and depth.
The size and position of the light source determine the appearance of the reflection. Moving the panel closer or further away changes both its apparent size and the way it is reflected by the subject.
This is particularly important with shiny product photography, where the photographer is effectively photographing the light reflected from the object’s surface.
Think about what the subject is reflecting
When photographing reflective objects, you’re not simply lighting the object.
You’re also lighting what the object sees.
A glossy black surface behaves almost like a mirror. Its appearance depends heavily on the environment surrounding it and the objects placed around it.
This is why large panels, diffusion material and carefully positioned flags can be so useful.
Rather than illuminating the subject directly, you can position large surfaces so that the subject reflects them.
The resulting reflection becomes part of the design of the photograph.
Creating separation between a black object and a black background
This becomes even more challenging when the black object is sitting directly on a black reflective surface.
If the subject and surface are both black, where does the object end and its reflection begin?
Normally, you might solve this by placing a light behind or underneath the subject to create an edge or rim light.
But when the object is sitting directly on the surface, you can’t simply place a light between the two.
This requires a different approach.
Use a reflective surface to create separation
One solution is to introduce a controlled reflection underneath the subject.
In Dave’s setup, the black objects were positioned on a dark-tinted glass surface.
Because the glass was transparent rather than opaque, light could be introduced from underneath.
This allowed the lower edges of the objects to pick up a reflection from the light source.
The result was a subtle highlight along the bottom of the objects that separated them from their black reflections.
It is a clever alternative to conventional backlighting.
Why dark-tinted glass can be useful
Ordinary black Plexiglass is opaque, so you can’t easily shine light through it.
Dark-tinted glass provides a similar visual appearance while still allowing some light to pass through.
This makes it possible to illuminate the subject from underneath while maintaining the appearance of a dark, reflective tabletop.
The principle is particularly useful for product photographers working with glossy black products.
A carefully controlled amount of light passing through the surface can create just enough reflected light to define the edges of the product without destroying the black-on-black appearance.
Remember that reflections are usually darker than the light source
An interesting characteristic of reflective surfaces is that the reflection of a light source can appear considerably darker than the source itself.
This gives you another useful control.
You can use a relatively bright light source while allowing its reflection in a dark glass or glossy surface to appear much more subdued.
This is one reason reflected light can be so effective in black-on-black photography.
The photograph isn’t simply recording the brightness of the light source. It is recording the light source as reflected by the subject and the surface.
Control specular highlights
Specular highlights are the bright reflections produced when light reflects from a shiny surface.
They are not necessarily a problem.
In fact, they can be extremely useful for describing the shape and material of an object.
The problem occurs when they become:
- too small
- too bright
- too numerous
- badly positioned
- distracting from the shape of the subject
The solution is often to make the light source larger.
A large light produces a larger reflection, which can create smoother transitions across a curved or glossy surface.
You can then adjust the position of the light until the reflection follows the contours of the subject in an attractive way.
Move the light rather than simply changing exposure
One of the most useful lessons from this type of photography is that exposure and lighting are two separate controls.
If the reflection is too bright, don’t automatically reduce the camera exposure.
Instead, consider:
- moving the light source
- changing its size
- changing its angle
- reducing the light’s power
- adding diffusion
- changing the reflective surface
- using flags to control unwanted reflections
You can then maintain an appropriate exposure while improving the appearance of the subject through lighting.
This is particularly important when the subject contains both very dark and lighter tones.
Photographing black products is about revealing shape
A black object doesn’t need to be brightly illuminated to be recognisable.
Often, what tells us what the object is are the edges, curves, highlights and reflections.
This means you can allow large areas of the subject to remain almost completely black while using carefully positioned highlights to describe its three-dimensional form.
This is one of the reasons black-on-black photography can look so dramatic.
You are allowing the viewer’s eye to construct the shape from relatively small amounts of carefully controlled information.
Don’t forget the background surface
When the subject sits on a reflective black surface, that surface becomes part of the lighting design.
The appearance of the reflection can change dramatically depending on:
- the angle of the camera
- the angle of the light
- the distance between the subject and light source
- the type of surface
- the brightness of the environment
- the position of surrounding objects
Don’t treat the tabletop as simply a place to put the product.
It is another reflective element in your lighting setup.
Using camera movements for maximum depth of field
Dave’s original black-on-black photograph was created using a 5×4 large-format view camera.
One advantage of a view camera is the ability to tilt and swing the lens and film planes independently.
This can be used to change the plane of focus.
In the original setup, the camera was positioned looking down at the objects and the rear standard was tilted to place the plane of sharpness through the row of subjects.
This allowed the objects to remain sharp from foreground to background without relying solely on a very small aperture.
Modern photographers have different options.
Focus stacking can be used to combine multiple photographs taken at different focus distances, while some modern cameras and lenses provide tilt/shift movements that can offer additional control.
The important lesson isn’t that you need a large-format camera.
It’s that camera position, focus technique and depth of field are all part of the lighting and composition problem.
A practical black-on-black lighting workflow
If you’re photographing a black product against a black background, try this approach:
1. Start with the composition
Position the subject and camera before fine-tuning the lighting.
With reflective objects, even a small change in camera position can completely alter the reflections.
2. Establish your exposure
Set an appropriate exposure rather than simply overexposing the black subject.
Keep an eye on any lighter areas of the subject that could become overexposed.
3. Start with a large light source
Use a large softbox, diffusion panel or other broad light source.
Position it so that the subject reflects the light in a way that reveals its shape.
4. Watch the reflections
Look closely at the subject rather than just looking at the light falling on it.
Move the light until the reflected shape is attractive.
5. Control unwanted highlights
Use flags or black cards to prevent unwanted reflections and stray light from reaching the subject.
6. Create separation
If the subject disappears into the background, look for a way to introduce a controlled edge reflection.
If the object is sitting on a reflective surface, consider whether you can illuminate that surface from underneath.
7. Refine the exposure
Once the lighting looks right, make your final exposure adjustment.
The aim is to maintain rich blacks while retaining enough highlight information to describe the subject.
The key to successful black-on-black photography
The secret to photographing black objects against black backgrounds isn’t simply adding more light.
It’s about controlling what the object reflects.
Use large light sources to create broad, attractive specular highlights. Position them carefully to reveal the shape of the subject, and use controlled reflections to create separation from the background.
Most importantly, resist the temptation to solve every problem with exposure.
If a black object doesn’t look right, ask yourself:
“What does the subject need to reflect?”
That question can lead to much more effective lighting than simply making the photograph brighter.