How to Avoid Camera Shake and Take Sharper Photos

Camera shake is one of the most common causes of soft or blurry photographs. You can have a perfectly focused subject, an excellent lens and a high-resolution camera, yet still end up with an image that lacks sharpness because the camera moved during the exposure.
The good news is that camera shake is usually easy to reduce or eliminate once you understand what causes it.
From choosing an appropriate shutter speed to using image stabilisation, improving your handholding technique and setting up your tripod correctly, there are plenty of ways to get sharper photographs.
What causes camera shake?
Camera shake occurs when the camera moves while the shutter is open.
There are several possible causes:
- Movement from the photographer’s hands and body
- Vibrations from the camera’s mechanical components
- Movement or vibration affecting a tripod
- Wind or unstable surfaces
- An unnecessarily slow shutter speed
- Movement introduced when pressing the shutter button
It is useful to distinguish between camera shake, which is generally caused by the photographer’s movement, and camera vibration, which can be caused by the camera itself or its surroundings.
Both can reduce image sharpness.
How does handholding cause camera shake?
Even when you think you are holding a camera completely still, your body is constantly making tiny adjustments.
Our muscles work in opposing pairs to keep us balanced and upright. Even when apparently standing still, these muscles are continually making small corrections. Some of this movement is transferred to the camera.
The result can be tiny movements during the exposure that become visible as blur.
Everybody is different. Some photographers are naturally much steadier when handholding than others, which means there isn’t one shutter speed that guarantees sharp photographs for everyone.
Your own ability to hold a camera steady is something worth testing.
Shutter speed is one of your most important controls
The easiest way to reduce camera shake is usually to use a faster shutter speed.
A shutter speed that is perfectly adequate for one photographer may be too slow for another. Lens focal length also matters: longer lenses magnify the effects of small movements.
As a general starting point, many photographers use a shutter speed around 1/focal length when handholding. For example, a 50mm lens might suggest around 1/50s as a starting point.
However, this is only a guideline rather than a rule.
Modern high-resolution cameras can reveal small amounts of movement very clearly, while image stabilisation can allow photographers to shoot at considerably slower shutter speeds.
The best approach is to test your own camera and lenses and find the limits at which you can consistently produce sharp images.
Don’t be afraid to increase ISO
One of the most useful practical rules in photography is:
Noise is often easier to fix than blur.
If your shutter speed is too slow to hold the camera steady, increasing the ISO can allow you to use a faster shutter speed.
You may introduce additional image noise, but modern cameras and noise-reduction software are extremely effective at dealing with it.
A slightly noisy but sharp photograph is usually much more useful than a clean but blurred photograph.
Use image stabilisation
If your camera or lens has image stabilisation, it can significantly reduce the effects of camera movement.
Depending on the camera and lens, stabilisation may be described as:
- IS – Image Stabilisation
- VR – Vibration Reduction
- OSS – Optical SteadyShot
- OIS – Optical Image Stabilisation
- IBIS – In-Body Image Stabilisation
The technology varies between manufacturers, but the principle is similar: sensors detect camera movement and the system compensates for it.
Some modern systems can provide several stops of additional handheld shooting capability.
However, don’t treat the manufacturer’s maximum claimed number of stops as a guarantee. Your subject, focal length, technique and individual ability all make a difference.
How to hold your camera more steadily
Good technique still matters, even with image stabilisation.
When handholding:
- Hold the camera securely with both hands.
- Keep your elbows in a comfortable, stable position.
- Avoid unnecessary tension in your arms and shoulders.
- Support the lens with your non-shooting hand.
- Stand with your feet comfortably apart.
- Take a breath and gently squeeze the shutter rather than stabbing at it.
- If possible, brace yourself against a solid object.
Try not to grip the camera so tightly that you introduce additional tension and movement.
With practice, you’ll develop a feel for the slowest shutter speed you can reliably use.
Find something solid to support the camera
A tripod isn’t always available or permitted.
Museums, historic buildings and some private locations may prohibit tripods, while photographers working outdoors may simply not want to carry one.
In these situations, look for a solid support.
A wall, railing, bench, post or other sturdy surface can provide useful additional stability. You can also brace part of your body against a solid object.
If the camera can safely be placed on a completely stable surface, using the camera’s self-timer or a remote shutter release can prevent you from disturbing it when taking the photograph.
Why tripods don’t always guarantee sharp photographs
A tripod is one of the best ways to stabilise a camera, but simply putting a camera on a tripod doesn’t automatically eliminate every source of movement.
The tripod itself can vibrate.
Wind can move the tripod or camera. An unstable floor can transmit vibration. Touching the camera during the exposure can also introduce movement.
For maximum stability:
- Extend the tripod legs before raising the centre column.
- Avoid extending the centre column unless necessary.
- Use appropriate tripod feet for the surface.
- Make sure the tripod is standing securely.
- Shield the setup from strong wind where possible.
- Use a remote release or self-timer.
- Avoid touching the camera during a long exposure.
In situations where a tripod is particularly vulnerable to vibration, adding weight to the setup can sometimes improve stability.
Mirror slap and shutter shock
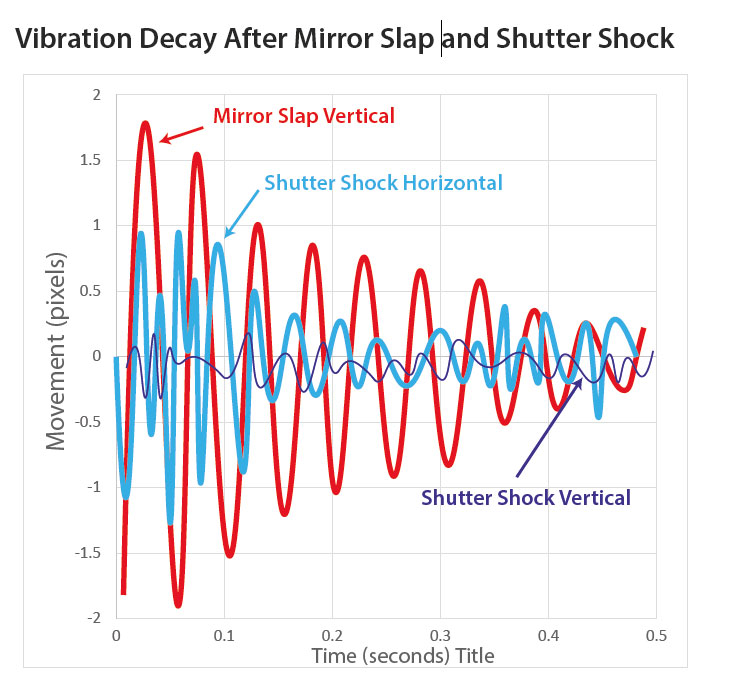
Mechanical cameras can introduce their own vibrations.
With a DSLR, the reflex mirror has to move out of the way before the photograph is taken. The rapid movement and sudden stop of the mirror can create a small vibration known as mirror slap.
The mechanical shutter can also introduce vibration as its components accelerate and stop. This is often referred to as shutter shock.
These effects are generally most important when photographing with relatively slow shutter speeds, particularly when working at high magnification or using a long lens.
For everyday photography they may be insignificant, but when you’re trying to extract the maximum possible detail from a high-resolution image, they can become important.
Use electronic shutter options when appropriate
Modern cameras offer a range of electronic shutter technologies designed to reduce or eliminate mechanical movement.
Depending on the camera, you may find options such as:
- Electronic front-curtain shutter
- Electronic shutter
- Silent shooting
- Exposure delay
- Mirror lock-up on DSLRs
Electronic front-curtain shutter can be particularly useful on compatible cameras because it reduces mechanical movement at the beginning of the exposure.
A fully electronic shutter can eliminate mechanical shutter vibration altogether.
However, electronic shutters have their own limitations. The sensor is often read progressively rather than all at once, which can produce rolling shutter distortion when photographing fast-moving subjects.
For static subjects, however, electronic shutter modes can be extremely useful for minimising camera vibration.
Mirror lock-up and exposure delay
If you’re using a DSLR and need the highest possible level of sharpness from a tripod, mirror lock-up can prevent the mirror movement from affecting the exposure.
Some cameras also provide an exposure delay mode. This introduces a short delay between pressing the shutter button and taking the photograph, allowing vibrations caused by the initial operation to settle.
These features are particularly useful for subjects that don’t move, such as:
- Landscapes
- Architecture
- Reproduction work
- Product photography
- Macro photography
- Technical photography
Don’t forget the shutter button
Even with a rock-solid tripod, pressing the shutter button with your finger can move the camera.
For longer exposures, use one of the following:
- A remote or electronic shutter release
- A cable release
- The camera’s self-timer
- A smartphone or remote-control function, if supported
- Exposure delay or equivalent camera functions
The less physical contact you have with the camera during the exposure, the better.
Can flash help reduce camera shake?
Flash can produce remarkably sharp-looking photographs because the duration of a flash burst can be extremely short.
This means that even if the ambient exposure would normally require a relatively slow shutter speed, the brief burst of flash illumination can effectively freeze some of the subject’s movement.
This is particularly useful for portraits and other situations where flash contributes a significant amount of the light on the subject.
However, flash doesn’t automatically eliminate camera shake. If ambient light contributes substantially to the exposure and the shutter speed remains slow, movement can still appear in parts of the photograph.
Used carefully, though, a little fill flash can add both apparent sharpness and attractive catchlights.
Why longer lenses make camera shake more obvious
Camera movement becomes increasingly noticeable as focal length increases.
A tiny angular movement of a wide-angle lens may have very little visible effect, whereas the same movement with a long telephoto lens can shift the image significantly across the sensor.
This is why photographers using long lenses often need to pay particular attention to shutter speed, support and image stabilisation.
The greater the magnification, the more obvious small movements can become.
Camera movement when panning
Not all camera movement is accidental.
When photographing a moving subject, photographers sometimes deliberately move the camera to follow it. This is known as panning.
The aim is to keep the subject moving across the frame at the same rate as the camera so that the subject remains relatively sharp while the background becomes blurred.
The problem occurs when the camera moves vertically or rotates unexpectedly during the pan.
For example, when following a fast-moving vehicle, an accidental upward or downward movement can introduce blur or distort the clean lines of the subject.
Good panning therefore requires controlled movement rather than simply moving the camera as quickly as possible.
A useful way to think about camera shake
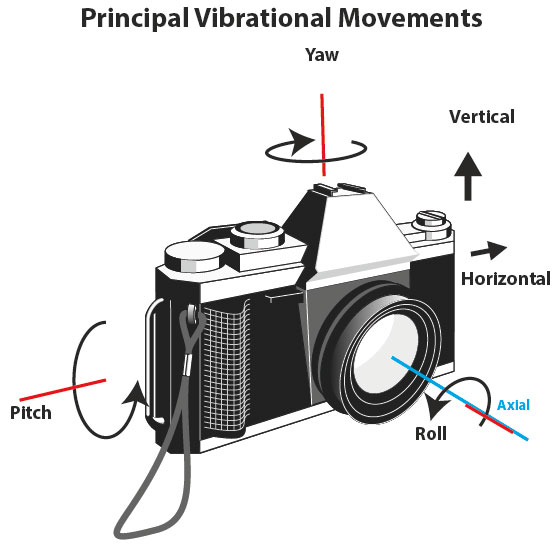
Camera movement can occur in several directions.
These include:
- Pitch – the camera rotates upwards or downwards.
- Yaw – the camera rotates from side to side.
- Roll – the camera rotates around the lens axis.
- Vertical movement – the camera moves up or down without rotating.
- Horizontal movement – the camera moves from side to side.
In reality, several types of movement can happen simultaneously.
The effect on the photograph depends on the amount of movement, the direction of movement, the focal length and the magnification of the image.
What about very long exposures?
Interestingly, a longer exposure isn’t necessarily more vulnerable to tripod vibration in the way you might expect.
Mechanical vibrations such as mirror movement or shutter shock may occur immediately after the exposure begins and then gradually die away.
If the vibration lasts a fraction of a second, its influence can be much greater on a short exposure than on a very long one.
For example, a vibration lasting 0.3 seconds represents almost the entire duration of a 0.5-second exposure but only a small fraction of an eight-second exposure.
This is one reason why the relationship between shutter speed and camera vibration can sometimes produce surprising results.
The practical checklist for sharper photographs
When sharpness is critical, work through this checklist:
1. Use a fast enough shutter speed.
Know the limits of your own handholding technique.
2. Use image stabilisation when handholding.
It can give you considerably more flexibility.
3. Increase ISO when necessary.
Don’t sacrifice sharpness simply to keep ISO low.
4. Use a solid support.
A tripod is ideal, but walls, railings and other stable objects can help.
5. Use a remote release or self-timer.
Avoid physically disturbing the camera during the exposure.
6. Consider electronic front-curtain or electronic shutter modes.
These can reduce mechanical vibration on suitable cameras.
7. Use mirror lock-up where appropriate.
Particularly useful with DSLRs and static subjects.
8. Protect your tripod from vibration.
Wind, unstable floors and lightweight supports can all introduce movement.
9. Don’t automatically blame focus.
If the whole image appears slightly smeared in a consistent direction, camera movement may be responsible.
10. Check your images at 100% magnification.
Small amounts of movement that aren’t obvious at normal viewing size can become very noticeable when examining fine detail.
The key to eliminating camera shake
There is no single solution to camera shake.
The best results come from combining several techniques: choosing an appropriate shutter speed, using good handholding technique, taking advantage of image stabilisation and increasing ISO when necessary.
When absolute sharpness is required, a solid tripod, remote release and vibration-reduction features can take you another step further.
Modern cameras have made enormous advances in image stabilisation and electronic shutter technology, but understanding the fundamentals remains just as important.
Ultimately, the goal is simple: keep the camera still for as much of the exposure as possible.
Once you understand where unwanted movement comes from, you can choose the right combination of shutter speed, support and camera technology to control it — and produce sharper photographs more consistently.