How to Light Black Objects: A Guide to Black-on-Black Photography
By Dave Montizambert
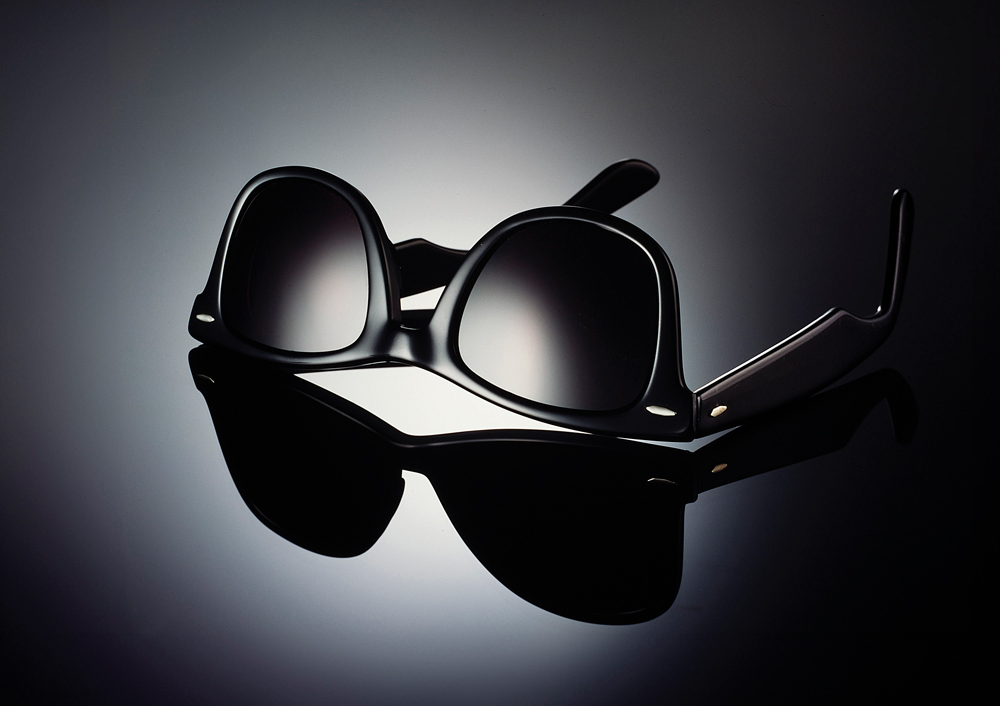
Photographing a black object against a black background can be surprisingly difficult. If everything is black, how do you create enough contrast to show the subject’s shape, form and texture?
The answer isn’t simply to add more light.
When photographing a light-coloured subject, photographers often use shadows to create shape and definition. With a black subject, however, shadows don’t provide much help. You cannot make an already black surface look significantly darker.
Instead, the key is to use specular highlights – carefully controlled reflections of light that appear on the surface of the subject.
This technique is particularly useful in product photography, tabletop photography and studio still life, and it provides an excellent lesson in how light behaves on reflective surfaces.
Why is photographing black objects so difficult?
A black object absorbs much of the light falling onto it and reflects relatively little back towards the camera.
If you simply increase the exposure to reveal more detail, the black object can start to look grey rather than black. You may also end up overexposing other parts of the scene.
The solution is to keep the underlying tone of the subject black while introducing carefully positioned areas of brighter light.
These brighter areas are specular highlights.
A specular highlight is essentially a reflection of a light source or illuminated surface appearing on the subject. Depending on the material and the size and position of the light source, the highlight can appear as a small bright point, a broad strip, a soft gradient or another controlled shape.
These highlights provide the contrast needed to reveal the form of a black object.
Don’t expose for black – light for black
One of the most useful principles when working with dark subjects is:
Don’t simply expose for the black subject. Light it.
A correctly exposed black object should still appear black in the photograph. Trying to brighten the entire subject to reveal its shape can defeat the purpose.
Instead, keep the object’s natural black tone and use controlled highlights to describe its three-dimensional form.
This creates a useful distinction between two different approaches:
- Light-toned subjects: shadows can be used extensively to create shape and depth.
- Dark or black subjects: specular highlights can be used to create shape, separation and texture.
The brighter reflections don’t need to cover the entire object. In many cases, a relatively small highlight is enough to tell the viewer about the shape of the surface.
What is a specular highlight?
A specular highlight is a reflection of a light source or illuminated surface.
The important point is that the “light source” doesn’t necessarily have to be a flash or studio strobe.
It could be:
- A studio flash or strobe
- A continuous light
- A softbox
- A white reflector
- A scrim
- A wall or ceiling
- A piece of fabric
- A mirror
- The sky
- Another illuminated surface
This is particularly important when photographing glossy black subjects. Rather than thinking only about where the light is hitting the object, you need to think about what the object is seeing and reflecting towards the camera.
The angle of reflection is crucial
One of the fundamental principles behind lighting reflective subjects is:
The angle of reflection equals the angle of incidence.
It sounds complicated, but it becomes much easier to understand when viewed through the camera.
Imagine the surface of your subject as being at zero degrees. The angle at which you view that surface determines where a reflection can appear. To work out where a light source needs to be positioned to create a particular reflection, consider the corresponding angle on the opposite side of the surface.
In practical photography, you don’t necessarily need to calculate the angles mathematically.
Instead, look through the camera and move the light.
As you change the position of the light, the reflection moves across the subject. Once you understand this behaviour, positioning specular highlights becomes much more predictable.
Why camera position matters
There is another important consideration when photographing reflective objects: the camera position changes the reflection.
This is one of the reasons reflective subjects can be frustrating.
You may spend considerable time positioning your lights perfectly, only to move the camera slightly and discover that the highlight has moved.
The light hasn’t changed.
The subject hasn’t changed.
But your viewpoint has changed – and therefore the reflection has changed.
This is particularly noticeable when working with glossy surfaces such as black glass, polished plastics, lacquered products or reflective metal.
For this reason, a tripod can be extremely useful when photographing reflective subjects. It allows you to establish a precise camera position and make small, deliberate changes without constantly altering your viewpoint.
Using black Plexiglas for black-on-black photography
Black Plexiglas was a popular surface for tabletop photography, and it remains an interesting material for creating black-on-black images.
Its reflective surface can provide two useful effects at the same time:
- It creates a dark reflection of the subject beneath it.
- It provides a surface onto which controlled reflections of lights and illuminated objects can be introduced.
This means that the photographer can create light patterns not only on the subject but also across the surface underneath it.
The result can be a dramatic, almost surreal appearance.
The same principle can be applied to other glossy black surfaces and reflective materials.
Creating a soft highlight with a scrim
One effective way of producing a large, controlled reflection is to use a scrim or large diffusion surface.
Rather than pointing a small light directly at the subject, a large white surface can be illuminated and used as the thing the subject reflects.
This produces a much larger reflection with a softer transition.
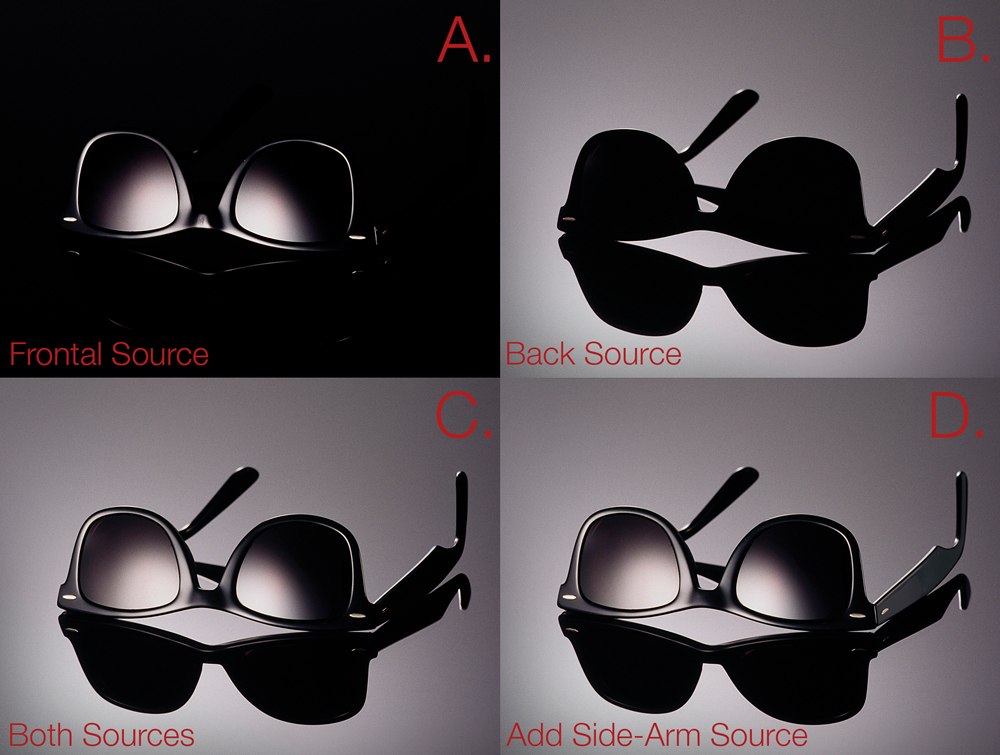
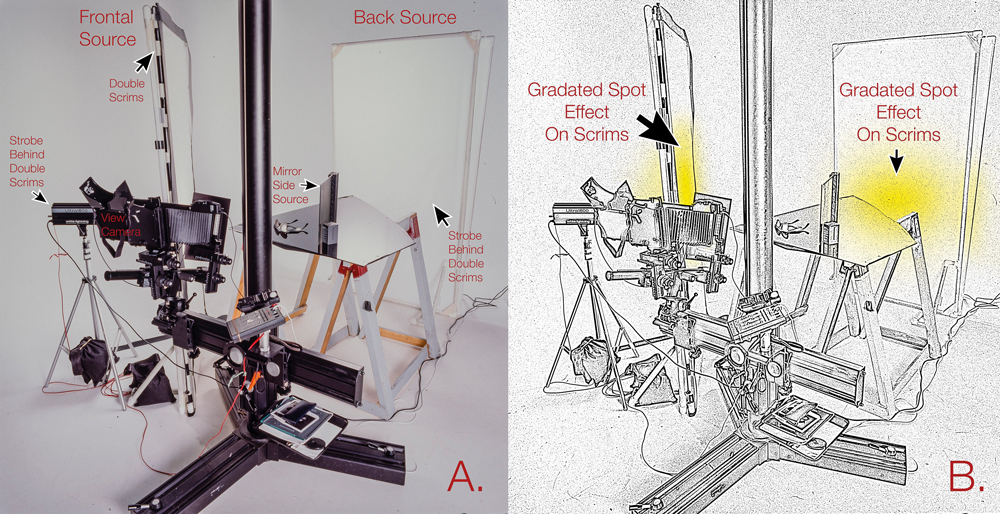
In Dave Montizambert’s original black-on-black setup, large PVC-framed scrims covered with white nylon were positioned behind the subject. A powerful studio strobe was placed behind them, producing an illuminated surface that could be reflected in the black Plexiglas and the sunglasses.
The scrim effectively becomes a large, soft light source.
A second similar setup positioned towards the front and camera-left side was used to create the highlight across the lenses.
This illustrates an important principle:
When photographing a reflective object, sometimes the best light source is actually a large illuminated surface rather than the lamp itself.
Creating a graduated reflection
An evenly illuminated softbox or scrim can produce an even reflection, but sometimes a graduated reflection is more interesting.
A light source positioned close to the back of a scrim can create a brighter area towards the centre with the illumination gradually reducing towards the edges.
When that gradient is reflected by a glossy black subject, the result is a soft transition from highlight into black.
This can create what is known as a soft specular edge transfer.
Instead of the reflection stopping abruptly, it gradually fades into the darker tone of the subject.
This can produce a much more sophisticated result than simply placing a bright rectangular softbox in the reflection.
Using mirrors to control small highlights
Sometimes you need a very specific highlight in an area that your main lights cannot easily reach.
A mirror can be extremely useful for this.
A mirror can redirect the reflection of another light source onto a particular part of the subject. This makes it possible to create subtle highlights along edges, sides or other small areas.
In the original sunglasses setup, a mirror was positioned to create a controlled highlight along the arm of the glasses.
The process is effectively a reflection of a reflection: the glossy surface of the sunglasses reflects the illuminated scrim, while the mirror is used to position that reflected light where it is required.
This gives the photographer another level of control over the shape and position of the highlight.
Controlling the brightness of a reflection
A mirror doesn’t have a power control like a flash does, so how do you alter the brightness of the reflection?
One solution is to change which part of the illuminated surface the mirror is reflecting.
For example, if a scrim is brighter in the centre and darker towards the edges, changing the angle of the mirror can determine which portion of that gradient is reflected onto the subject.
This effectively allows you to “dial in” the brightness of the highlight without changing the power of the main light.
It is a good example of why lighting reflective subjects is often less about simply adjusting flash power and more about controlling what the subject sees.
How do you know if a black object is correctly exposed?
This is where black-on-black photography becomes particularly interesting.
A black object should remain black in areas where there is no specular highlight.
If you take a meter reading directly from a black surface, the reading will naturally place that tone below middle grey. The precise appearance of deep black will depend on the camera, exposure and subsequent raw processing, but the important principle remains:
The black areas should remain black.
The highlights are what provide the visual information that allows the viewer to understand the shape.
In other words, don’t be tempted to make the whole object brighter simply because you want to see more detail.
Instead, ask yourself:
Where does the subject need a highlight to reveal its form?
Then create that highlight deliberately.
A practical approach to lighting black objects
If you’re trying black-on-black photography for the first time, don’t start with a complicated multi-light setup.
Begin with one light and a small reflective subject.
Step 1 – Choose your subject
Start with something glossy and black, such as sunglasses, a black bottle, polished plastic or another reflective product.
Step 2 – Establish your black background
Keep the background dark and check that the subject and background are separated where necessary.
Step 3 – Add a large white surface
Place a white reflector, scrim or large piece of white card where the subject can see it.
Step 4 – Illuminate the surface
Place your light so that it illuminates the white surface rather than simply firing directly at the subject.
Step 5 – Watch the reflection
Look through the camera and move the illuminated surface or light until the reflection appears where you want it.
Step 6 – Move the camera carefully
Make small changes to your camera position and observe how the reflection changes.
Step 7 – Add another highlight if required
Once the main highlight is working, introduce a second light or reflector to describe another part of the subject.
Step 8 – Keep checking the black areas
Don’t allow the highlights to take over the image. The contrast between the black surface and the controlled reflection is what creates the effect.
The key lesson: light what the subject can see
The biggest change in thinking when moving from ordinary subjects to reflective black objects is that you need to stop thinking exclusively about where the light is hitting the subject.
Instead, think about:
What does the subject see?
A glossy black object is effectively looking at its surroundings and reflecting them.
Move a white card and the reflection changes.
Move a black card and the reflection changes.
Move a light source and the reflection changes.
Move the camera and the reflection changes.
Once you understand this, lighting black objects becomes much less mysterious.
You are not simply illuminating a black surface.
You are deliberately designing the reflections that appear on it.
Black-on-black photography: the final principle
Black objects don’t need to be made grey to reveal their shape.
They need contrast.
And when the subject itself is already black, one of the most effective ways of creating that contrast is with carefully controlled specular highlights.
So, when photographing black objects against a black background, remember:
Don’t expose for black. Light for it.
Control the reflections, consider the position of the camera, use large illuminated surfaces when appropriate, and build your image one highlight at a time.
With practice, what initially seems like an unpredictable problem becomes a highly controllable lighting technique.