How to Create Dramatic Food Photography with One Light
You don’t need a studio full of expensive lights to create sophisticated lighting.
In fact, some of the most effective food photography I’ve produced for major commercial clients was created using one studio light and a collection of inexpensive silver reflectors.
That might sound surprisingly simple for a big advertising campaign. It wasn’t.
The trick wasn’t the number of lights. It was controlling exactly where the light went.
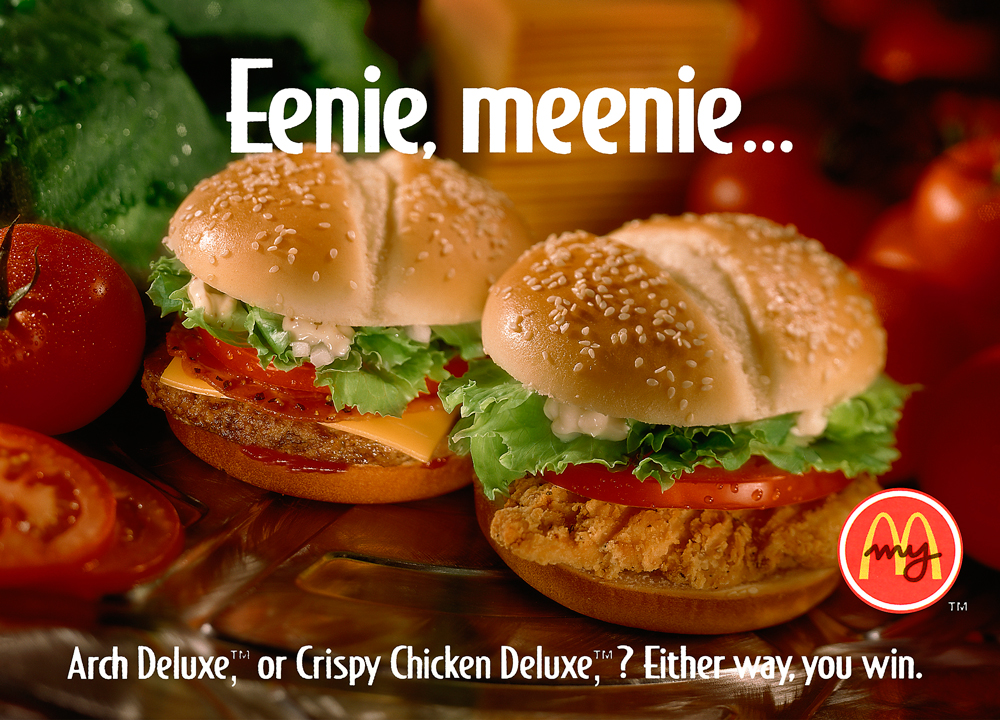
The McDonald’s burger challenge
Many years ago, my brother and business partner Mark and I won a major advertising client through an agency: McDonald’s.
They had been attracted by our dramatic lighting style, and we went on to create images for both local and national advertising campaigns.
The photography was very carefully planned, particularly when we were photographing hamburgers.
We weren’t simply putting a burger on a table and pointing a camera at it. The food was the product being sold, so the shoots involved agency staff, McDonald’s representatives, marketing people, a food stylist and our own production team.
Before the shoot, large quantities of ingredients would arrive at the studio.
And when I say large quantities, I mean large quantities.
On one occasion, around 200 hamburger buns were laid out so we could choose the best candidates.
We looked at their shape, colour and the distribution of the sesame seeds. The food stylist would then make small adjustments to the selected buns to make them look their best.
The same process happened with the other ingredients.
This was commercial photography, so there was a lot more involved than simply making a nice photograph.
But once the food had been selected, the next challenge was ours:
How do you make a small burger look spectacular?
Start with one light
The basic lighting arrangement was remarkably simple.
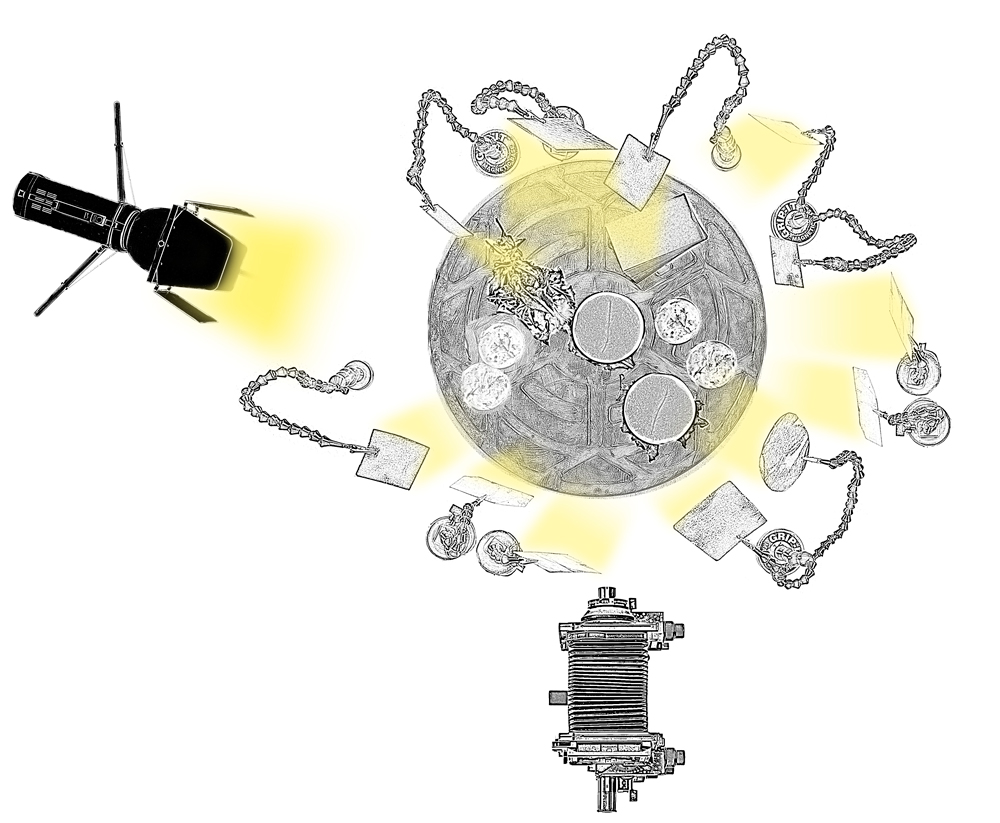
We normally positioned a single studio strobe behind and slightly to one side of the food.
This created a strong backlight and gave the food shape, highlights and separation from the background.
At this point you might expect us to start adding another five or six lights.
We didn’t.
Instead, we used small silver reflectors.
Lots of them.
The light from the main strobe would spill over the top and around the food. The silver cards were positioned to catch some of that light and redirect it precisely where we wanted it.
That gave us something that would have been much harder to achieve simply by adding more lights.
We could put light exactly where we wanted it – and nowhere else.
Why reflectors work so well
A reflector doesn’t create new light.
It takes light that already exists and changes its direction.
That sounds obvious, but it is one of the most useful principles in studio photography.
If you have a single light source, the light is relatively easy to understand. Add a reflector and you can introduce illumination into a shadow without introducing another set of shadows, highlights and reflections from a second light source.
With food, this can be particularly useful.
You might want a highlight along the edge of a burger bun, some texture in the meat, detail in the lettuce and just enough illumination on the side of the food facing away from the main light.
You don’t necessarily need four lights to achieve that.
You can redirect the existing light.
Keep the shadows dark
One of the biggest mistakes with food photography is assuming that everything needs to be brightly illuminated.
It doesn’t.
In fact, dramatic shadows can be a very important part of the photograph.
Our aim was often to retain the dark areas while making sure there was still enough texture and detail within them.
A white reflector could be used to gently lift the overall shadow areas.
But where that wasn’t enough, we could introduce a small silver card from the side.
The silver surface would catch the light and sweep it across the darker area.
The result wasn’t a fully illuminated shadow.
Instead, we got texture within the shadow.
That distinction is important.
The shadow could remain dark and dramatic while still revealing the surface of the food.
Silver cards give you precision
One reason I particularly liked this technique was the amount of control it gave us.
The reflectors could be made in almost any shape or size.
A small card could illuminate a tiny area. A longer strip could create a highlight along an edge. Moving the card closer or further away changed both the amount and character of the reflected light.
And because these were simply pieces of silver card, we could make exactly what we needed.
For a high-end commercial shoot, this was remarkably inexpensive.
We could buy a large sheet of silver board and cut it into whatever shapes were required.
Compare that with buying a collection of specialist optical spotlights capable of producing similarly small areas of illumination.
The latter could become very expensive very quickly.
Think of the reflector as a second light
This is a useful way to approach one-light photography.
Don’t think:
“I’ve only got one light.”
Think:
“I’ve got one light source and a whole range of ways of redirecting it.”
Once you start looking at it that way, a single light becomes much more versatile.
You can use:
- white card for softer fill
- silver card for stronger reflected light
- black card to remove unwanted light
- flags or gobos to block or shape light
- different reflector sizes to control where the light falls
- distance and angle to change the intensity and direction of the reflected light
The important thing is that every piece has a job.
The lighting forest
Of course, there was a slight problem with using lots of reflectors.
Although the setup technically used only one light, the tabletop could end up looking like a forest.
Light stands, boom arms, articulated or “magic” arms, silver cards, flags and sandbags could occupy almost every available space around the food.
The sandbags were particularly important.
Once you have carefully positioned a reflector to produce a tiny highlight in exactly the right place, you really don’t want somebody accidentally knocking the stand.
And that was easier said than done.
Food stylists quite reasonably concentrate on the food. If a piece of lettuce needs adjusting, they need to adjust it.
The problem was that the lettuce might be surrounded by several carefully positioned reflectors.
One enthusiastic adjustment could knock two or three cards out of position.
Then you start again.
Use a stand-in before bringing in the final food
Another useful lesson from commercial food photography is to separate the lighting process from the final product as much as possible.
During the shoot, the food stylist would initially create stand-in burgers.
These didn’t have to be perfect.
Their job was to give us something with approximately the same size and shape as the final food so we could establish the composition and lighting.
We could then work out where the light needed to go, position the reflectors and mark the positions of the food.
Only once everything was working would the hero burgers be brought onto the set.
The final food could then be positioned in the same places.
There would still be some fine adjustment, of course, because real food has a habit of refusing to behave exactly as expected.
But it was far better than trying to construct the entire lighting setup around the finished hero product.
Dramatic lighting doesn’t mean complicated lighting
This is perhaps the biggest lesson from those commercial shoots.
The lighting looked complicated.
The lighting was complicated.
But it wasn’t complicated because we had lots of lights.
It was complicated because we were being very precise about where the light was allowed to go.
That is an important distinction.
A photographer can create a very flat photograph using six lights.
Another photographer can create a dramatic, three-dimensional image using one.
The number of lights doesn’t determine the quality of the lighting.
Control does.
Try this yourself
You don’t need a commercial studio or a McDonald’s-sized production team to experiment with this technique.
Start with one light positioned behind and slightly to one side of your subject.
Then place a white reflector opposite the light.
Take a photograph.
Now replace the white reflector with silver.
Move it closer.
Then further away.
Change its angle.
Try a smaller piece of silver card.
Try a strip of card rather than a large panel.
Watch what happens to the highlights and shadows.
Then introduce black card and see what happens when you deliberately remove reflected light from an area.
The experiment is much more useful than simply copying somebody else’s lighting diagram.
You’re learning to see where the light is going.
Look for texture in the shadows
When you’re experimenting, pay particular attention to dark areas.
Don’t automatically try to make them brighter.
Ask yourself whether the photograph is better when the shadow remains dark but contains just enough texture to describe the subject.
With food, this can make a huge difference.
The texture of a burger, the edge of a bun, the folds in lettuce or the surface of a sauce can all respond beautifully to a small amount of carefully directed light.
Sometimes the best lighting is the light you almost don’t notice.
One light can be more than enough
The McDonald’s work taught me that sophisticated lighting doesn’t necessarily require sophisticated equipment.
A single light, combined with carefully positioned reflectors, flags and cards, can give you an enormous amount of control.
It is also a useful reminder that expensive equipment doesn’t automatically produce better photographs.
We were working for a major international client, producing images for advertising campaigns, yet some of the most useful pieces of equipment on the set were sheets of inexpensive silver card.
The secret was knowing what to do with them.
So, before adding another flash or studio light to your kit, try getting more from the one you already have.
One light is often enough. The real skill is learning where to put the light you have.