How to Create Dramatic Portraits with Backlighting
Backlighting is usually thought of as a way of creating a rim of light around a subject. But it can do much more than that.
With careful positioning, a backlight can actually become the main light in a portrait, producing strong shapes, deep shadows and a dramatic sense of depth.
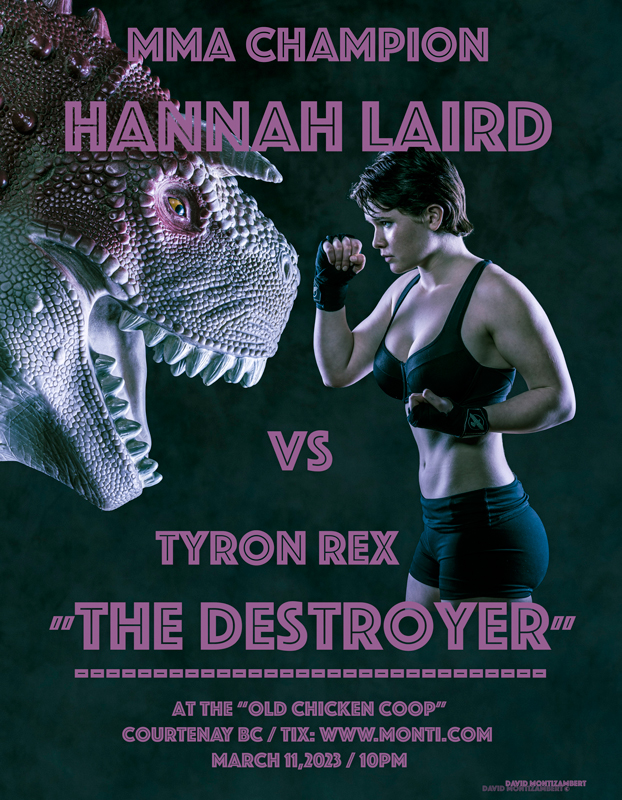
Commercial photographer Dave Montizambert demonstrated the technique on a particularly unusual assignment: creating promotional images for an MMA fight featuring Hannah Laird and the rather intimidating Tyron Rex.
The two fighters couldn’t be photographed together, so Dave created the two portraits separately using essentially the same lighting setup. The result was a pair of images that looked dramatic, aggressive and visually connected.
The lighting itself was surprisingly simple.
Start with two backlights
Dave used two large strip-shaped light sources positioned behind the subject, one on either side.
Normally, we might expect the main light to be somewhere in front of the subject. Here, there wasn’t one.
Instead, the camera-side of the subject was allowed to fall largely into shadow while the lights behind created strong illumination along the edges and sides of the face and body.
This immediately gives the photograph a very different character.
Rather than light travelling towards the subject and then being reflected back towards the camera, the light is travelling across and around the subject.
The result can feel much more dramatic and three-dimensional.
A backlight can become the main light
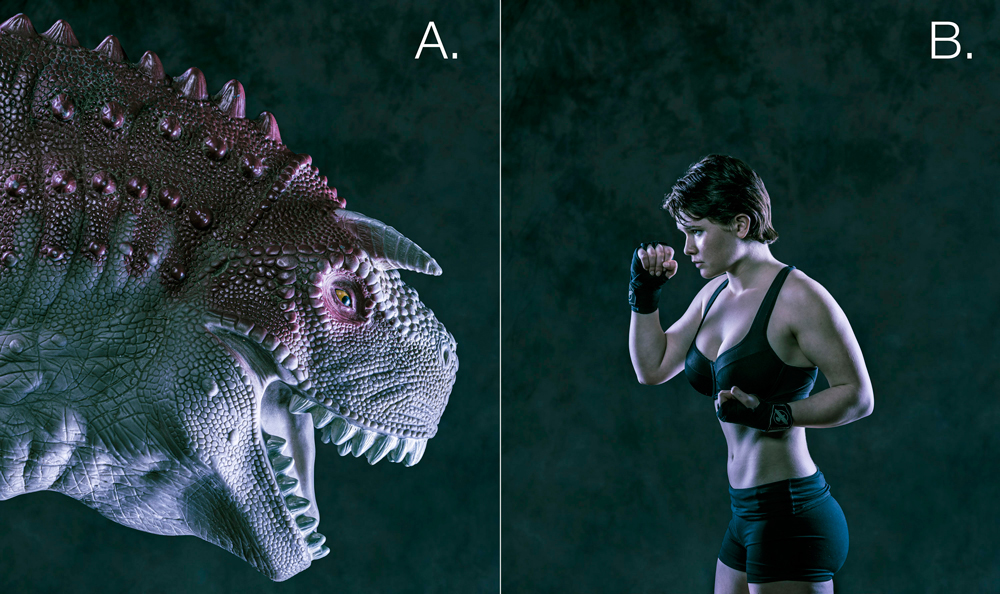
One of the most useful ideas in this setup is that a backlight doesn’t necessarily have to remain a backlight.
When photographing Hannah in profile, the light positioned behind and to the camera-left effectively became the main light on her face.
For Rex, the opposite light performed the same job.
That is particularly effective when photographing someone in profile because the light can skim across the face, picking out the outline of the forehead, nose, lips and chin while leaving much of the camera-facing side of the body in darkness.
It is a very different approach from conventional portrait lighting.
And that’s precisely why it works.
Move the light around the 90-degree position
The exact position of a backlight makes a huge difference.
Rather than simply placing the light directly behind the subject and leaving it there, move it around the subject and watch what happens to the illuminated area.
As the light moves closer to the camera/subject 90-degree position, more light begins to wrap around the face.
Move it further behind and the illuminated area becomes narrower.
This gives you an enormous amount of control without changing the light itself.
With a profile portrait, you can literally move the light backwards and forwards until the shape of light on the face looks right.
The important point is that small changes in position can produce large changes in the photograph.
Light height matters too
The height of the backlight is another important consideration.
Dave raised his large strip lights so that the light came slightly downwards onto the subjects.
This helped prevent distracting shadows from running horizontally across the neck.
That might sound like a minor technical detail, but it is one of those things that can make the difference between a lighting setup that looks deliberate and one that looks accidental.
Look carefully at collars, clothing, hair and other objects close to the subject.
Anything that gets between the light and the subject can cast a shadow.
Sometimes that shadow is useful.
Sometimes it ruins the photograph.
Watch what clothing does to the light
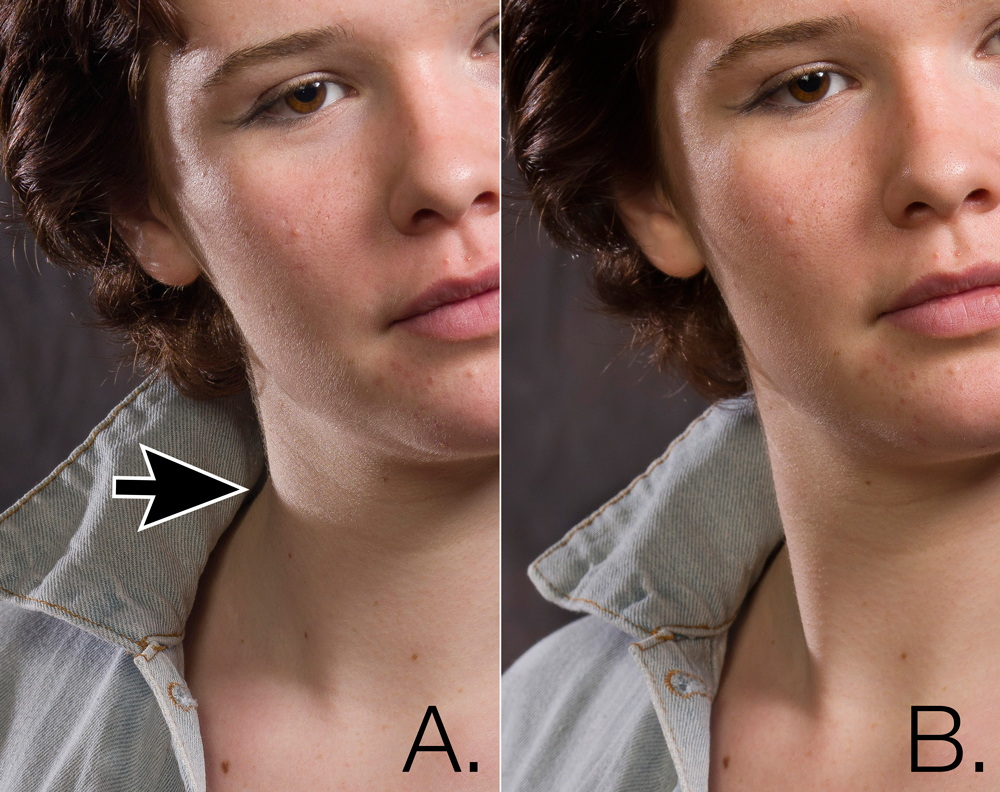
A simple example is a shirt or jacket collar.
If the light is coming from a low position, the collar can cast a strong shadow across the neck.
Raise the light and the shadow may fall downwards instead, making it far less noticeable.
This is a good reminder that portrait lighting isn’t just about the face.
Clothing, hair, jewellery and body shape can all interact with the light.
When you’re working with a strongly directional source, you need to look at the whole subject.
Bigger light sources can give softer shadows
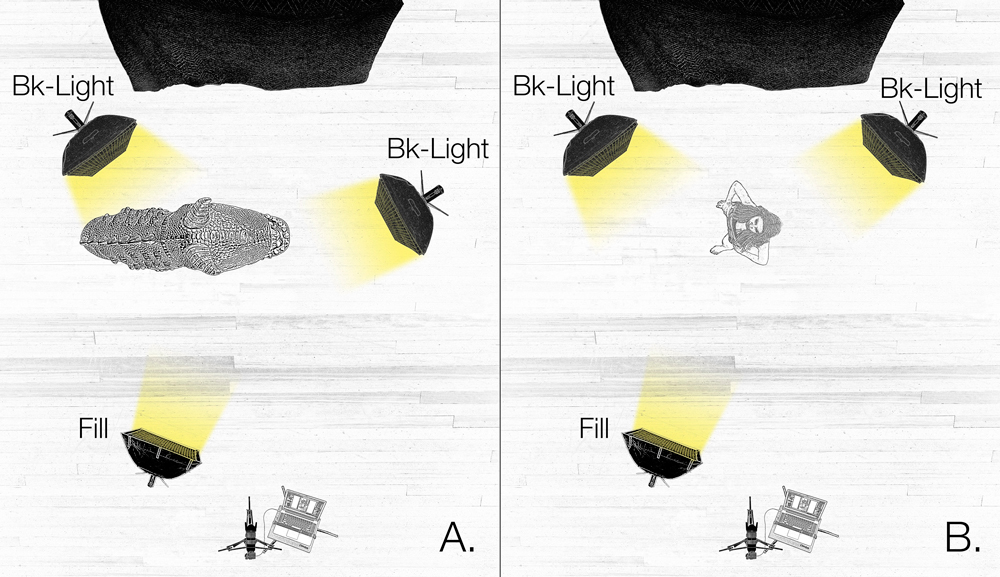
Dave also prefers relatively large sources for this type of backlighting.
There is a useful reason for that.
A larger light source can illuminate areas that would otherwise remain completely hidden in the shadows it creates. It also tends to produce softer-edged shadows.
That can make unwanted shadows less obvious.
This doesn’t mean that bigger is always better. A small source can produce exactly the hard, graphic effect you want.
But if you’re trying to create dramatic light while keeping distracting shadows under control, a larger source is often easier to work with.
Grids help control spill
When lights are positioned behind a subject, controlling where the light goes becomes particularly important.
Dave used grids on his strip lights to narrow the spread of light.
Without some form of control, light can spill onto the background, studio walls or other reflective surfaces and destroy the contrast you’re trying to create.
A grid doesn’t change the basic character of the light. It simply gives you greater control over its direction.
That can be especially useful when you want a dark background.
Keep the background dark
For the MMA portraits, Dave wanted the background to be dark but not completely featureless.
The subjects were positioned well forward of the background, which helped with this.
Distance is an important tool in lighting.
If your subject is close to the background, light falling on the subject is more likely to illuminate the background too.
Move the subject further away and it becomes easier to keep the background darker.
The background also becomes more out of focus, which can help separate the subject from it.
You don’t always need a black background to create a dark background.
You simply need to control how much light reaches it.
A little fill can make a big difference
Although there was no conventional frontal main light in Dave’s setup, he did use a relatively weak fill light from the camera side.
Its job wasn’t to flatten the lighting.
It was simply there to lift the deepest shadows enough to retain some detail.
This is an important distinction.
Fill light doesn’t have to compete with the main light.
A small amount can be enough.
If you want a dramatic portrait, the temptation can be to eliminate all shadow. But shadow is often what creates the drama in the first place.
The trick is deciding how much shadow you actually want.
Think about the direction of the shadows
One of the reasons backlighting can look so different from conventional portrait lighting is the direction of the shadows.
With frontal lighting, shadows generally fall behind the subject.
With strong backlighting, shadows can be pushed towards the camera.
That immediately gives the image a different visual character.
It can suggest darkness, night-time lighting, stage lighting or a more threatening atmosphere.
For the MMA portraits, this suited the subject perfectly.
The lighting and the posing were working together to communicate tension.
Hard shadows aren’t always bad
There is often a tendency to think that shadows should always be soft.
That’s not necessarily true.
A hard shadow can be exactly what you need if you’re deliberately trying to create a graphic or dramatic photograph.
The important thing is whether the shadow is intentional.
The hardness of a shadow is affected by several factors, including the size and position of the light source and the distance between the object creating the shadow and the surface receiving it.
An object close to the subject can produce a sharper, more defined shadow.
Move it further away and the shadow becomes softer.
So if a collar is producing an ugly shadow on someone’s neck, don’t immediately blame the light.
Look at the relationship between the collar, the subject and the light.
Try the technique with one subject
You don’t need an MMA fighter — and certainly don’t need a dinosaur — to experiment with this technique.
Try photographing someone in profile against a dark background.
Start with a light positioned behind and slightly to one side of the subject.
Move it around the subject until you find the position that creates an attractive strip of light across the face.
Then experiment with the height.
Raise the light and see how the shadows change.
Lower it and look at what happens around the neck and jaw.
Once you have the basic effect working, add a small amount of frontal fill.
Increase it gradually.
You’ll quickly see the point at which the shadows start to lose their drama.
Then take the fill away again.
This is a useful exercise because it teaches you to see what each light is actually doing.
You don’t always need more lights
One of the biggest lessons from this setup is that dramatic lighting doesn’t necessarily require a complicated lighting rig.
Dave used three lights, but the two backlights were doing most of the creative work.
The third light was simply controlling the shadows.
The effectiveness came from where the lights were placed, rather than from having a large number of them.
That is a useful principle for any photographer working in the studio.
Before adding another light, ask whether you could achieve what you want by moving one of the existing lights.
Changing its height, distance or angle can completely transform the result.
Backlighting is about control
Backlighting can initially seem difficult because it is less forgiving than placing a large softbox in front of your subject.
But once you understand the principles, it becomes a very powerful technique.
Think about:
- Position – move the light around the subject to control how much of the face it illuminates.
- Height – change where shadows fall by raising or lowering the source.
- Size – larger sources generally produce softer shadow edges.
- Distance – use distance to control both the subject and background.
- Grids – control spill and keep unwanted areas dark.
- Fill – use just enough to retain detail without destroying contrast.
- Background – don’t simply light it because it is there; decide how much light it actually needs.
- Pose – profile and three-quarter poses can make directional backlighting particularly effective.
The result can be dramatic without being complicated.
And perhaps that is the most useful lesson from Dave’s rather unusual MMA shoot: good lighting isn’t necessarily about adding more equipment. It’s about understanding what the equipment you already have is doing.