How to Organise Photos in Lightroom Classic: Catalogues, Folders and Importing
By Jane Allan
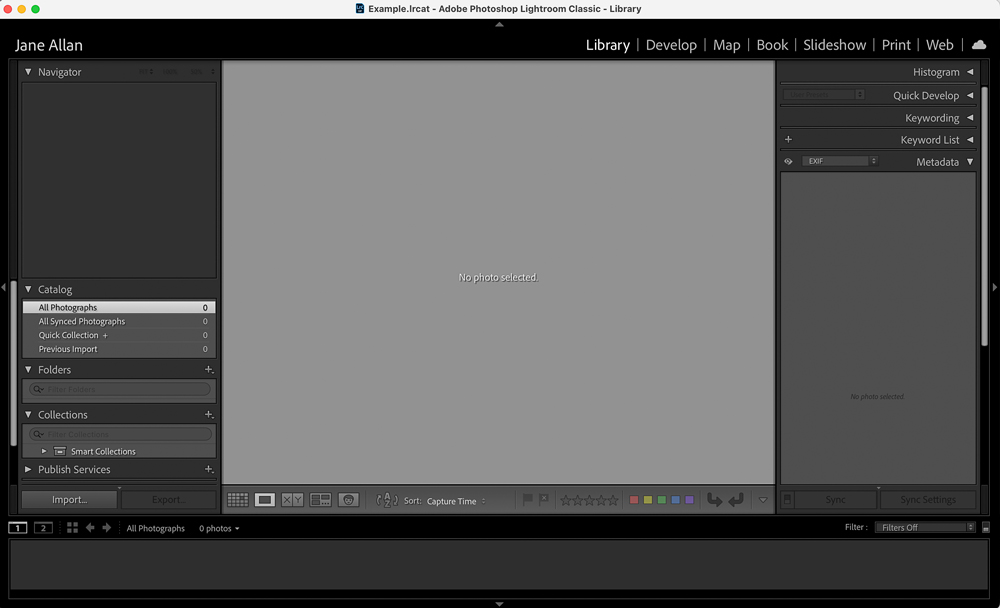
Organising photographs probably isn’t the most exciting part of photography. Then again, neither is discovering that you can’t find a photograph you took three years ago.
One of the biggest strengths of Lightroom Classic is that it can become much more than a photo-editing application. Used properly, it can give you a searchable database of your photographs, while keeping the original files safely stored on your computer or external drives.
The important thing is to establish a sensible system from the beginning.
What is a Lightroom Classic catalogue?
The first thing to understand is that a Lightroom Classic catalogue isn’t your photograph library in the conventional sense.
The catalogue is a database containing information about your photographs. It records where the original files are stored, along with information such as ratings, keywords, metadata and your editing instructions. Your original photographs remain wherever you have chosen to store them.
This is why Lightroom Classic can work with photographs stored on internal drives, external drives or other supported storage locations without putting the original files inside the catalogue itself.
It also means that backing up your Lightroom catalogue is not the same as backing up your photographs. You need to protect both.
Should you use one Lightroom catalogue or several?
For most photographers, a single catalogue is the simplest approach.
Adobe says Lightroom Classic is designed to handle very large numbers of photographs, and a single catalogue makes it much easier to search across your entire library using folders, collections, keywords, ratings and other information.
There are situations where multiple catalogues can make sense. A photographer might, for example, deliberately keep completely separate client or personal archives.
For most people, however, creating a new catalogue every time they start a new shoot is more likely to cause problems than solve them.
A single, well-organised catalogue is generally easier to search and maintain.
Plan your folder structure before importing
This is one of the most important decisions you can make.
Lightroom gives you powerful tools for finding photographs, but that doesn’t mean your underlying folder structure should be chaotic.
Think about how you naturally work. You might organise photographs by:
- Year
- Year and month
- Client
- Shoot
- Location
- Project
There isn’t one perfect folder structure for everybody. The best system is one that makes sense to you and that you will actually continue using.
For example:
Photos > 2026 > 2026-09-11 Client Name
or:
Photos > 2026 > Client Name > Shoot Name
The exact arrangement matters less than consistency.
And once you’ve established your system, stick with it.
Lightroom folders and collections aren’t the same thing
This distinction causes considerable confusion for new Lightroom users.
Folders represent the physical location of your photographs on your storage drive.
Collections are virtual groupings inside Lightroom.
A photograph can therefore live in one physical folder but appear in several collections without being duplicated.
For example, a wedding photograph might physically live in:
2026 > Smith Wedding
but could also appear in collections such as:
- Smith Wedding – Highlights
- Portfolio
- Wedding Competition
- Favourite Portraits
This is one of the reasons Lightroom’s catalogue system is so useful. You don’t need to create multiple copies of a photograph simply because you want to organise it in different ways.
Importing photographs into Lightroom Classic
When you import photographs, Lightroom Classic creates the connection between the original files and the records in your catalogue.
Open the Library module and select Import, or use File > Import Photos And Video.
The Import window is essentially divided into three areas:
- Source – where the photographs currently are
- Import method and selection – what Lightroom should do with them
- Destination and import settings – where the files should go and what information should be applied
Understanding these three areas makes the Import window much less intimidating.
Choose where the photographs are coming from
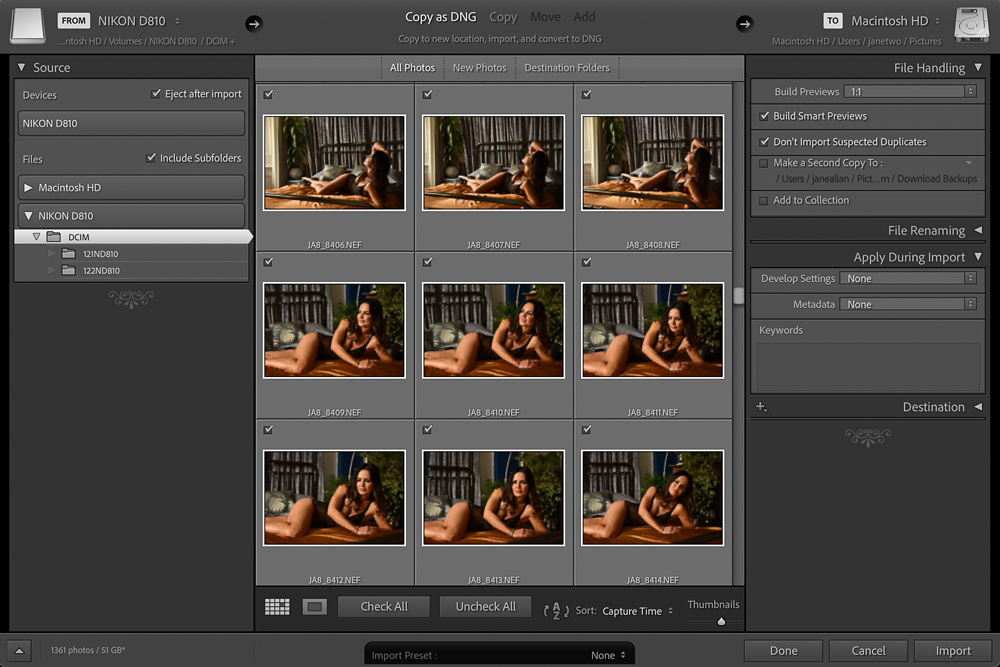
The Source panel lets you select the location containing the photographs.
This could be:
- A camera memory card
- A folder on your computer
- An external hard drive
- Another supported storage location
If you’re importing from a memory card, Lightroom can copy the photographs to your chosen storage location as part of the import process. Adobe recommends using a card reader rather than connecting the camera directly for this sort of workflow.
If you’re importing from a folder already on your computer or an external drive, you have more choices about what happens to the files.
The four main Lightroom import methods
When importing existing photographs, Lightroom Classic gives you four principal choices.
Copy as DNG
Lightroom copies the photographs to the destination you specify and converts supported camera raw files to Adobe’s DNG format.
DNG can be useful for photographers who have deliberately chosen it as part of their workflow, but there’s no need to convert every RAW file simply because Lightroom gives you the option.
If you have a well-established RAW workflow that works for you, there’s a good argument for leaving your original camera RAW files in their native format.
Copy
The original files are copied to a new location and added to the catalogue.
This is the normal choice when importing photographs from a memory card and storing them on your computer or an external drive.
Move
The files are moved from their existing location to a new destination and added to the catalogue.
This can be useful when reorganising photographs that are already on your computer, but you should understand exactly what Lightroom is doing before using it on an established archive.
Add
The files remain where they are and Lightroom simply adds them to the catalogue.
This is useful if your photographs are already stored in the correct location and you don’t want Lightroom to move or copy them.
Adobe’s current Import window still uses these four methods, although Add and Move aren’t available when importing directly from a camera or camera card.
Choose the destination carefully
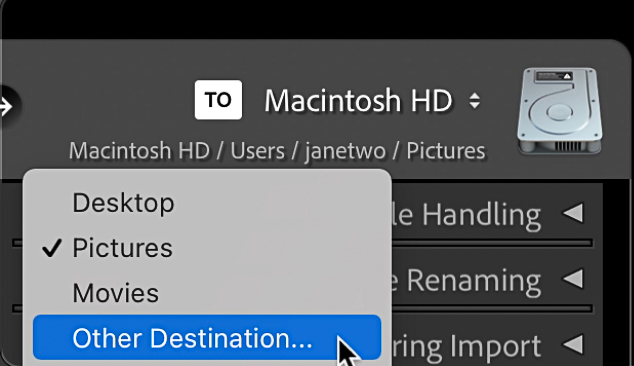
If you’re copying or moving photographs, the Destination panel determines where they will be stored.
This is where your folder structure becomes important.
Lightroom can create a new folder during the import, and you can organise photographs into a single folder, subfolders or folders based on dates.
Don’t rush this part.
Before clicking Import, look carefully at the destination shown by Lightroom. A few seconds spent checking the destination can save a lot of head-scratching later.
Don’t be afraid of subfolders
There’s no requirement to put every photograph from your entire life into one enormous folder.
A sensible folder structure makes it easier to understand where your originals are stored even if you temporarily need to work outside Lightroom.
For example:
2026
→ January
→ February
→ March
Or:
2026
→ Client Name
→ Shoot Name
The choice is yours. The important thing is that it remains logical as your archive grows.
Build previews – but understand what they are
Lightroom Classic creates previews so that it can display your photographs quickly.
During import you can choose between options including:
- Minimal
- Embedded & Sidecar
- Standard
- 1:1
A 1:1 preview represents the photograph at 100% and can be useful when you need to inspect detail closely. However, creating large previews takes additional time and storage space.
Standard previews are often a sensible general-purpose choice. You can also generate 1:1 previews when you actually need them rather than automatically creating them for every photograph.
The best setting therefore depends on your computer, your workflow and how often you need to inspect images at 100%.
Smart Previews can be extremely useful
Smart Previews are particularly useful if your original photographs are stored on an external drive.
They are smaller files that Lightroom Classic can use for editing when the original files aren’t physically connected to your computer. When the original drive is connected again, Lightroom can synchronise the edits with the original files.
This can be particularly handy for photographers who keep a large archive on external storage but want to work on a laptop without carrying the entire archive around.
You can create Smart Previews during import or generate them later for selected photographs.
They aren’t a replacement for your original RAW files, but they can make a Lightroom Classic workflow much more flexible.
Don’t import duplicates unnecessarily
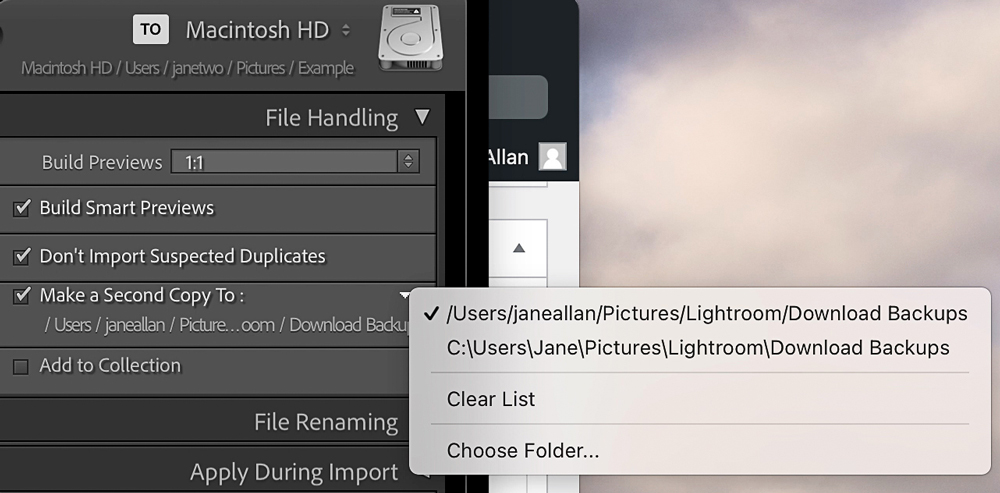
Lightroom Classic can help identify photographs that it believes are duplicates.
It’s worth leaving Don’t Import Suspected Duplicates enabled unless you have a specific reason not to.
The point of a catalogue is to make your archive easier to manage. Importing the same photographs repeatedly simply makes that job harder.
Add keywords while you import
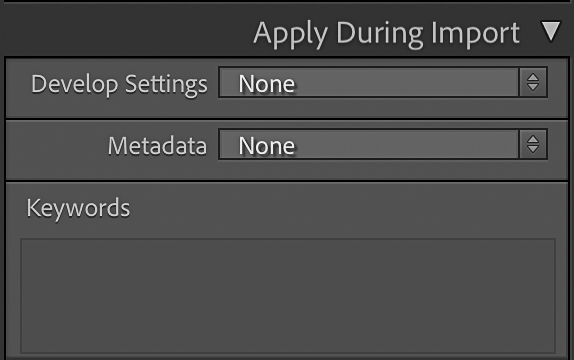
Keywords are one of Lightroom’s most useful tools for finding photographs later.
Imagine trying to find a photograph of a particular subject from several years ago. If you’ve added useful keywords, you don’t necessarily need to remember which folder contains it.
For example, a photograph might have keywords such as:
dog, Labrador, beach, sunset, Wales
The more useful your keyword system becomes, the less dependent you are on remembering exactly where a photograph was stored.
Don’t go overboard, though. A small number of meaningful keywords is better than adding dozens that you’ll never use.
Add your copyright and metadata
The Import window also allows you to apply a metadata preset.
This is particularly useful for photographers who regularly need to include information such as:
- Photographer name
- Copyright information
- Creator information
- Contact details
- Website information
Create the metadata preset once and you can apply it during future imports rather than typing the same information repeatedly.
It’s a small amount of preparation that can save considerable time over the life of a photography archive.
You can apply a Develop preset during import
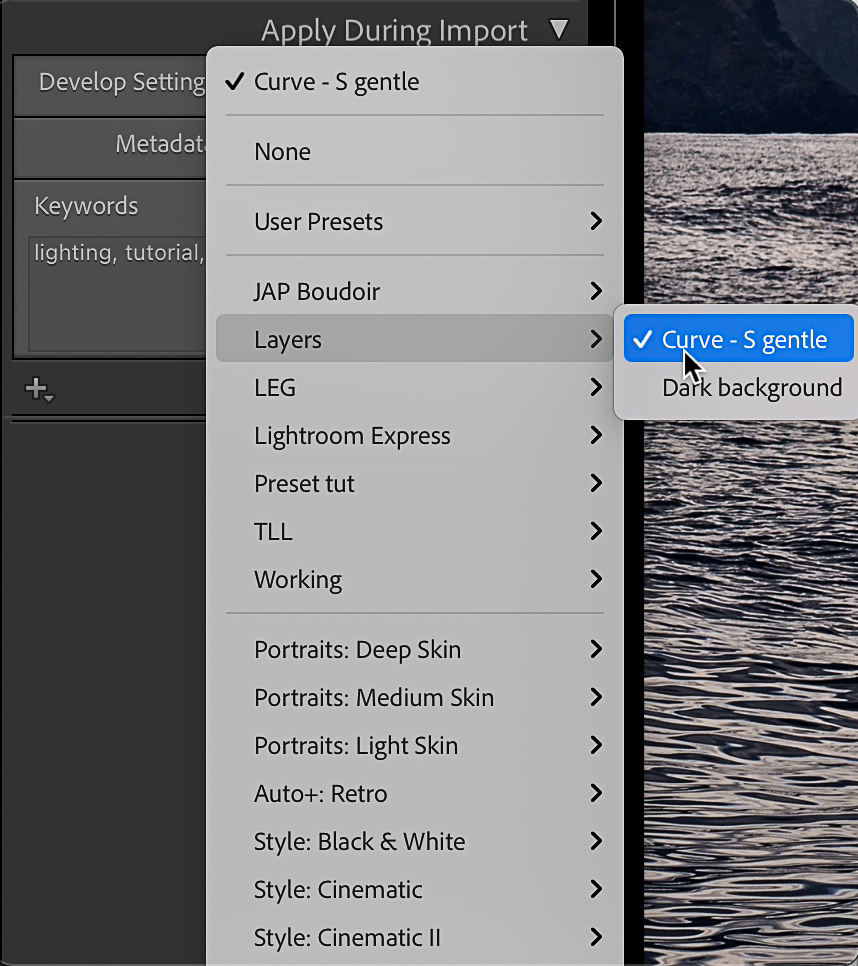
Lightroom also allows you to apply a Develop preset as photographs are imported.
This can be useful if you have a very consistent workflow.
However, there’s no need to apply a preset simply because the option is there.
Many photographers will prefer to import the photographs first, review and select their keepers, and then apply their chosen processing to the photographs they actually intend to work on.
The best workflow is the one that saves you time without making your photographs look processed before you’ve properly considered them.
What about renaming files?
You can rename photographs during import using Lightroom’s filename templates.
There is nothing wrong with doing this, but it isn’t essential.
Some photographers prefer to keep the original camera-generated filename and rename or organise photographs later. Others have a carefully designed naming convention and want every file renamed immediately.
Either approach can work.
The important thing is consistency.
If you decide to rename files, make sure the system will still make sense several years from now.
Assisted Culling can help with large imports
Recent versions of Lightroom Classic have added Assisted Culling, which can analyse a folder and help identify stronger photographs, rejects and images that may need attention.
This is particularly interesting for photographers returning from a large wedding, event or commercial shoot with hundreds or thousands of frames.
It doesn’t remove the need for your judgement. Think of it as another tool for speeding up the initial selection process rather than something that decides which photographs are worth keeping for you.
The most important step: back everything up
This is the part that shouldn’t be optional.
Your Lightroom catalogue and your photographs are two different things.
A Lightroom catalogue backup protects the catalogue database. It does not back up the original photographs referenced by that catalogue.
Ideally, you should therefore have a backup strategy covering both:
- Your original photographs
- Your Lightroom Classic catalogue
And your backup shouldn’t simply be another copy sitting beside the original files.
If the computer or drive fails, you don’t want the backup to disappear at the same time.
Adobe recommends keeping backup copies on a separate drive where possible and using a broader backup strategy rather than relying solely on Lightroom’s catalogue backup facility.
A simple Lightroom Classic workflow
If you’re starting from scratch, don’t feel that you need to configure every Lightroom feature before importing your first photograph.
A straightforward workflow could be:
1. Create or choose your main catalogue
For most photographers, one catalogue is a good starting point.
2. Decide where your photographs will live
Choose an internal or external drive and establish a folder structure.
3. Create a sensible folder for the new shoot
For example:
2026 > September > Smith Wedding
4. Insert your memory card
Open the Import window.
5. Select Copy
Copy the photographs from the card to your chosen destination.
6. Check the destination
Make sure Lightroom is going to put the files exactly where you expect.
7. Apply useful metadata and keywords
Add copyright information and any keywords that will help you find the photographs later.
8. Build Smart Previews if useful
Particularly worthwhile if your originals are stored on an external drive.
9. Import and review
Let Lightroom complete the import before doing anything with the memory card.
10. Back up
Make sure the photographs and catalogue are protected.
Then, and only then, format the memory card for its next job.
Don’t make Lightroom more complicated than it needs to be
There are an enormous number of options in Lightroom Classic, and that can make the programme seem more complicated than it really is.
You don’t need to use every feature.
A good Lightroom workflow comes down to a few fundamentals:
Know where your original photographs are stored.
Keep your catalogue organised.
Use folders for physical storage and collections for virtual organisation.
Add useful metadata and keywords.
Back up both the catalogue and the original photographs.
Once those foundations are in place, you can gradually introduce Smart Previews, advanced collections, Assisted Culling, sophisticated keyword systems and other tools as your needs grow.
The real benefit isn’t having the most complicated Lightroom system.
It’s being able to find the photograph you want, know where the original is, and know that it isn’t going to disappear when a hard drive eventually decides to ruin your day.