How to Find and Use Good Light for Portrait Photography
By Norman Phillips
Good portrait photography starts with learning to see light.
Before choosing a flash, changing camera settings or reaching for a reflector, take a moment to look at the light that is already there. Where is it coming from? How hard or soft is it? Which parts of the subject are being illuminated, and which are falling into shadow?
Learning to answer those questions will often improve your portraits more than adding another piece of equipment to your camera bag.
This is particularly important when photographing portraits and weddings on location, where you rarely have complete control over the environment. The ability to recognise useful natural light and then make small adjustments when necessary is a valuable skill.
Start by finding the light
When photographing outdoors or in a client’s home, don’t immediately try to create your own lighting setup.
First, look at the available light.
A window, doorway, open shade, a covered area or even the position of nearby buildings can all change the quality and direction of the light falling on your subject.
Sometimes the existing light is already doing exactly what you need. At other times it may be pleasant but too flat, too directional or uneven across a group.
The important thing is to recognise what you have before deciding what to add.
This approach also helps you avoid over-lighting a portrait. Artificial light doesn’t always need to become the main source of illumination. Sometimes a small amount of additional light is all that is required to give an image more shape and separation.
Look at the direction of the light
The direction of light has a major effect on how a face or group appears.
Light coming from the side can create modelling and definition. Light from directly in front can be flatter. Light from above can create shadows beneath the eyes and nose, while light from behind can create a strong separation from the background but may leave the subject’s face underexposed.
Move yourself and your subject rather than automatically moving the light.
A few steps can make a surprisingly large difference.
This is particularly useful when photographing groups. You may need to find a position where everyone is receiving reasonably consistent illumination rather than simply finding the most attractive light for one person.
Don’t overlook open shade
Open shade can be an excellent source of portrait light.
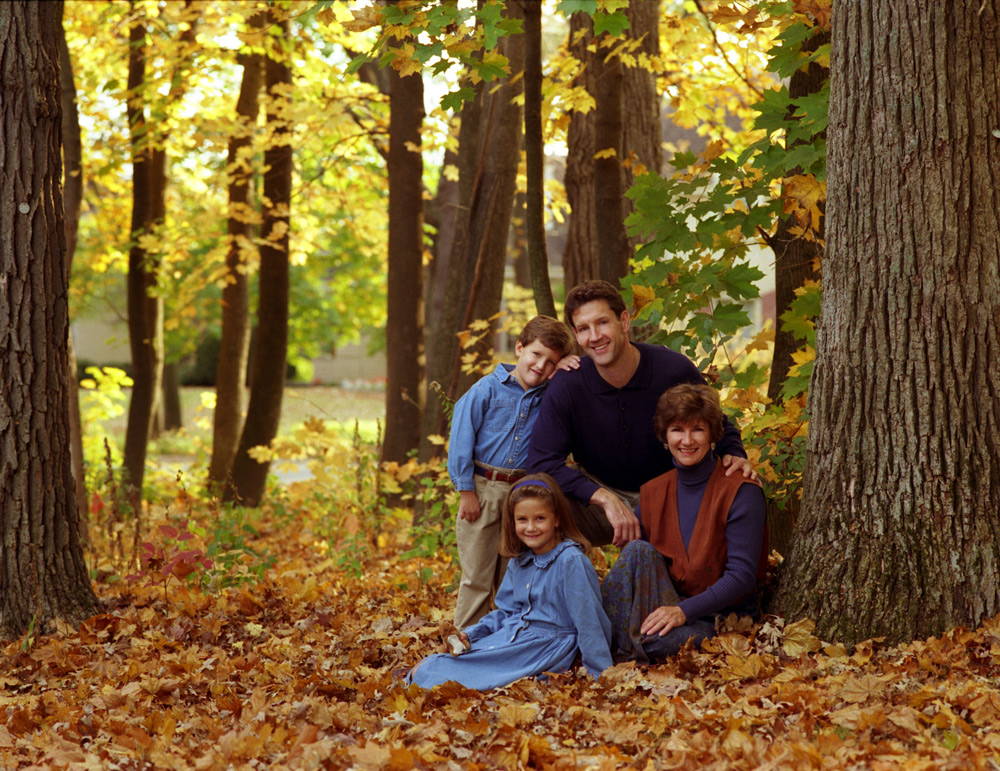
Under trees, for example, the direct sunlight may be blocked while the surrounding sky still provides illumination. This can produce soft, flattering light.
However, shade can sometimes become too flat. That is where a small amount of carefully positioned additional light can help.
One example from Norman Phillips’ work involved a family portrait photographed beneath trees in autumn. The ambient light was pleasant but lacked some direction and sparkle. Rather than replacing it with flash, a portable flash was positioned to one side of the camera and used as a subtle additional light.
The ambient exposure remained the foundation of the image, with the flash providing a small amount of extra modelling.
The important lesson isn’t the exact flash power or distance used for that particular photograph. It is the principle: use the existing light as your starting point, then add only what is needed.
Using flash without making it look like flash
Additional lighting doesn’t have to announce itself.
When using flash outdoors, one of the easiest ways to make an image look unnatural is to allow the flash to become disproportionately bright compared with the surrounding light.
Instead, think about what you are trying to add.
Perhaps you want a little more definition on the face. Perhaps you want to separate the subject from the background. Or perhaps you simply need to lift an area that has fallen into shadow.
A relatively small amount of additional light can be enough.
The position of the flash matters just as much as its power. Moving the light further to one side changes the direction of the illumination and therefore the modelling on the subject. Moving it closer or further away changes how evenly it covers a group.
Experiment with the position of the light rather than relying solely on changes to its output.
Window light can do much of the work
The same principles apply indoors.
A large window can provide beautiful portrait light without the need for complicated equipment. But when photographing a group, the challenge is often getting reasonably even illumination across everyone.
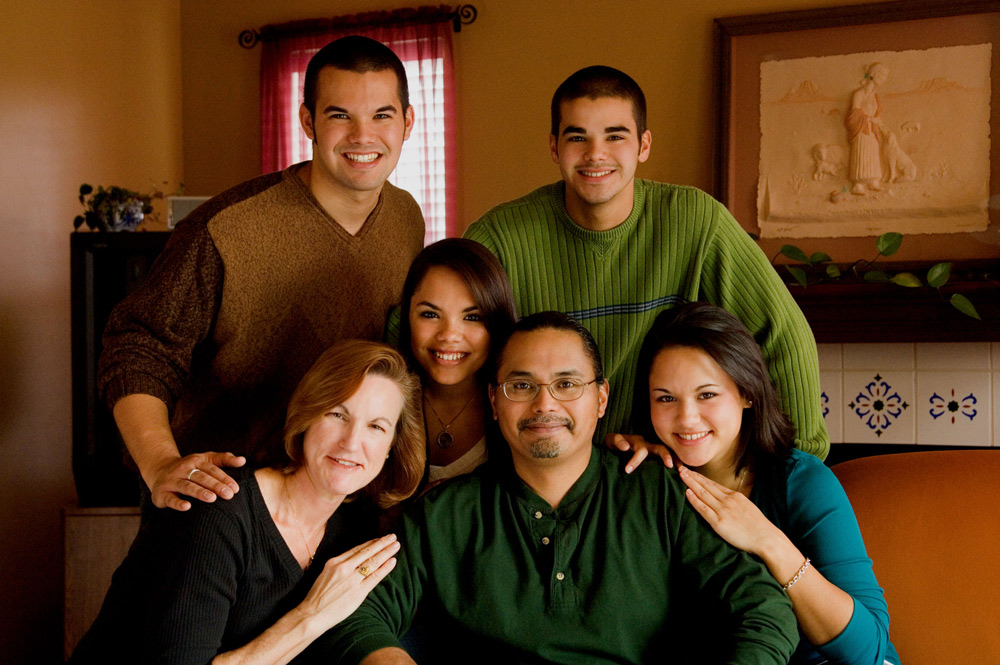
Norman’s example of an indoor family portrait used a window to the right of the camera as the principal light source. The group was positioned so that the window illuminated them from an angle, creating some modelling while still providing attractive overall light.
Reflectors were then used to help balance the illumination.
A white reflector can provide a soft lift to shadow areas. A silver reflector produces a stronger effect and can be useful when more light is required.
Again, the equipment isn’t the important part. The important part is recognising what the window is already doing and deciding where the photograph needs more or less light.
Watch for uneven exposure across a group
Photographing several people together introduces another problem: not everyone is necessarily receiving the same amount of light.
This is especially noticeable when a group is positioned near a window or another directional light source.
Someone closer to the light may be significantly brighter than someone further away. Skin tones can also react differently depending on the position of each person.
Small changes in positioning can often solve the problem.
Rather than treating the group as a collection of individual portraits, look at the whole lighting pattern. Is one person much brighter than the others? Is someone disappearing into shadow? Can the group be moved or rotated slightly to create a more even result?
A reflector can then be used to make smaller corrections where necessary.
Learn to see before you learn to light
Photography lighting equipment can be incredibly useful, but equipment doesn’t replace the ability to recognise good light.
The more experienced you become, the more quickly you should be able to walk into a location and start identifying possibilities.
You might see:
- a large window providing soft directional light
- an area of open shade offering flattering illumination
- a doorway creating contrast and shape
- reflected light from a nearby wall
- strong backlight that could be used creatively
- an area where a small amount of flash would improve the existing light
This way of working gives you more options because you aren’t dependent on one particular lighting setup.
Don’t be afraid to move the subject
One of the simplest lighting techniques is also one of the most overlooked: move the person.
If the light isn’t working, try changing the subject’s position before changing your equipment.
Turn them slightly towards the window. Move them away from a harsh patch of sunlight. Step into open shade. Change the distance from the light source.
These small adjustments can completely change the appearance of a portrait.
The same is true outdoors. You don’t necessarily need to find a spectacular location. You need to find a location where the light works for the photograph you are trying to create.
Use equipment to solve a problem
There is nothing wrong with using flash, reflectors or other lighting equipment. The key is understanding why you are using it.
Instead of thinking:
“What lighting equipment should I use here?”
ask:
“What is the light doing, and what does the photograph need?”
If the existing light is too flat, you may want to introduce some direction.
If the shadows are too deep, a reflector may be enough.
If the subject is losing separation from the background, a little additional light might help.
If the natural light is already excellent, you may not need anything at all.
That approach encourages you to make deliberate lighting decisions rather than simply following a fixed recipe.
Practice seeing light everywhere
You don’t need a portrait session to practise.
When you’re walking around, look at how sunlight falls across buildings, people and streets. Notice the difference between direct sunlight and open shade. Look at the quality of light coming through windows at different times of day.
When you are photographing friends or family, deliberately try different positions rather than immediately adding artificial light.
Over time, you will start to recognise useful lighting situations almost instinctively.
That ability to find the light is one of the most valuable skills a portrait photographer can develop.
The equipment can come afterwards.
About Norman Phillips
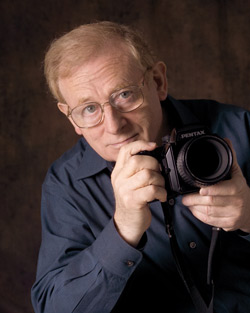
Norman Phillips FSWPP was an experienced photographer, educator and photographic judge who presented seminars and workshops in the UK and United States. He was the author of several books on lighting and posing and a long-time contributor to professional photography publications. His approach to lighting placed strong emphasis on understanding and controlling light rather than relying solely on equipment.