One-Light Maternity Photography: 3 Simple Lighting Setups
By Donatella Nicolini
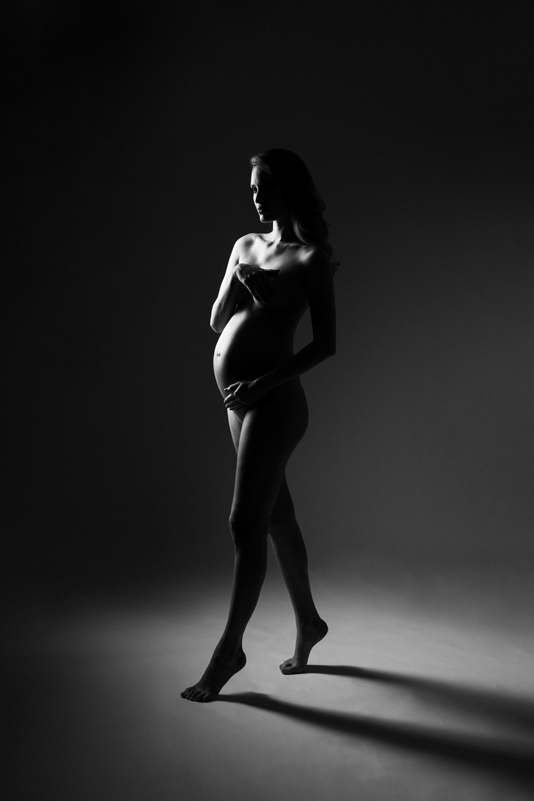
You don’t need a huge studio, a room full of expensive lights or a cupboard full of modifiers to create beautiful maternity portraits.
When Donatella Nicolini started her maternity photography business in 2017, she had little budget, no studio, few connections and just one inexpensive speedlight. Today, her studio looks very different, with considerably more space and a much larger collection of professional lighting equipment.
But she hasn’t forgotten what it was like to work with very little.
In fact, she believes that starting with limited equipment was valuable. Having only one light forced her to understand how light actually works, rather than solving every problem by adding another light or modifier.
That is an important lesson for any photographer.
You can create a surprising variety of professional maternity portraits with one light, one suitable modifier and a simple white backdrop. The trick is learning how to position and control the light.
Here are three simple setups to try.
1. Low-key maternity silhouette
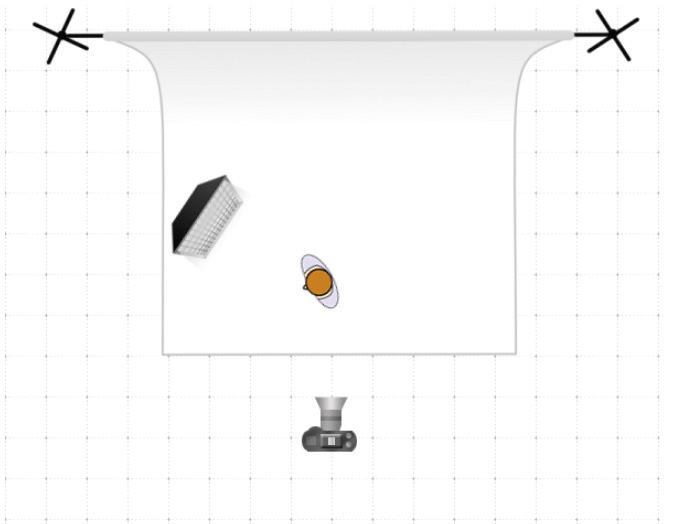
Silhouettes are a wonderfully timeless option for maternity photography. They can be elegant, simple and very effective, without requiring a complicated lighting setup.
For this setup you need:
- One studio flash or other suitable artificial light
- A large octabox or similar softbox
- A grid for the modifier
- A white seamless backdrop
The objective is to make the white backdrop appear dark while keeping enough light on the subject to define the outline of the body.
Control the spill
The most important part of this setup is controlling where the light goes.
Position the light behind the subject and direct it towards her rather than towards the background. A grid on the softbox helps restrict the spread of light and makes it easier to prevent unwanted illumination reaching the backdrop.
This is one of those situations where small details matter. If the grid isn’t fitted properly or the light is angled too broadly, light can spill onto the white background and it will begin to appear grey rather than dark.
Take a moment to check the edges of the modifier and make sure the light is being directed where you want it.
The principle is simple:
Light the subject, not the background.
With the right positioning, the white backdrop can become a deep, dark background, providing a strong contrast against the outline of the expectant mother.
Don’t forget ambient light
A silhouette like this relies on controlling the balance between flash and the existing light in the room.
If your studio has large windows or plenty of daylight, that ambient light can lift the background or reveal detail that you don’t want in the image.
There isn’t one magic camera setting that works in every studio. Instead, test the ambient exposure with the flash switched off and adjust your aperture and shutter speed until the existing light is sufficiently controlled.
Then introduce the flash and adjust its power and position.
The important thing is to understand why you are changing the settings rather than simply copying someone else’s numbers.
Keep the pose simple
A silhouette works particularly well when the outline of the body is clear.
Ask your subject to experiment with the position of her arms, hands and head so that they don’t merge into the main outline. Small changes can make a considerable difference to the shape of the finished photograph.
Think about the silhouette as a graphic shape rather than simply a portrait.
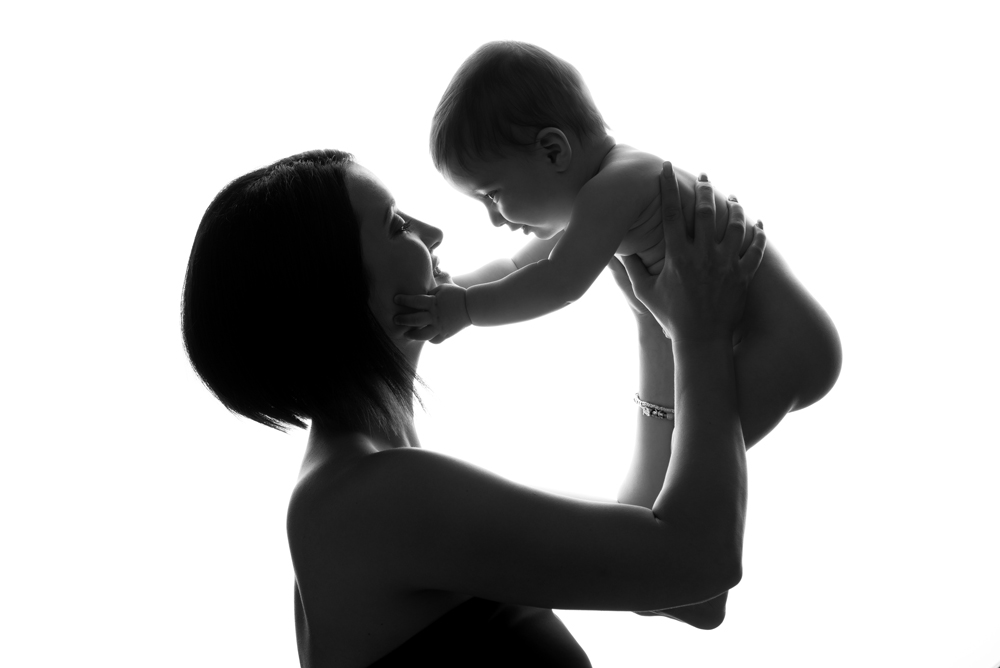
2. High-key silhouette
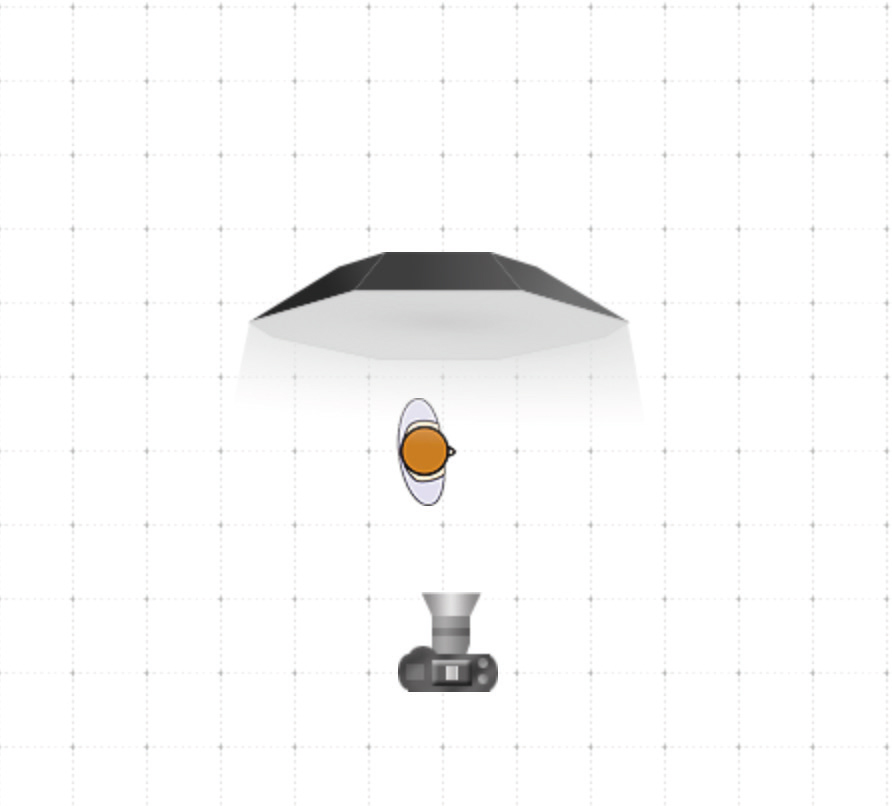
A high-key silhouette gives you almost the opposite effect.
Instead of turning the white background dark, you use the light source to create a bright, clean background while the subject becomes a strong graphic shape.
This can work particularly well for maternity photographs involving couples, as well as images featuring a mother and baby.
Again, you can achieve the effect with just one light.
A large softbox or octabox is particularly useful because it provides a broad source of light.
There are three things to think about:
- Lighting
- Distance
- Posing
Lighting
Place the subject directly in front of the light source, with the light positioned behind her from the camera’s point of view.
You want enough power to produce the bright background you are looking for, but there is no particular advantage in automatically running the flash at maximum power.
Very high power can increase recycling times and make the session less efficient.
Instead, adjust the power according to your particular setup, modifier and working distance.
Distance
Distance has a major effect on the result.
If your subject is receiving too much light on the face or body, try moving her slightly towards the camera.
If she is becoming completely dark and you are losing the subtle definition around her face and body, moving her closer to the light source can change the balance.
Small movements can make a surprisingly large difference.
This is one reason why understanding the relationship between light, subject and background is much more useful than memorising a particular lighting diagram.
Posing
The purpose of this lighting style should influence the pose.
Because you are creating a graphic, high-key image, look for clean shapes and interesting lines.
For a maternity portrait, the curve of the body is already an important visual element. Avoid allowing arms, hands or clothing to create unnecessary visual clutter.
With two people, look for ways of creating separation between their outlines while still making the relationship between them obvious.
The simpler the image, the more important the shape becomes.
3. One-light feathered portrait
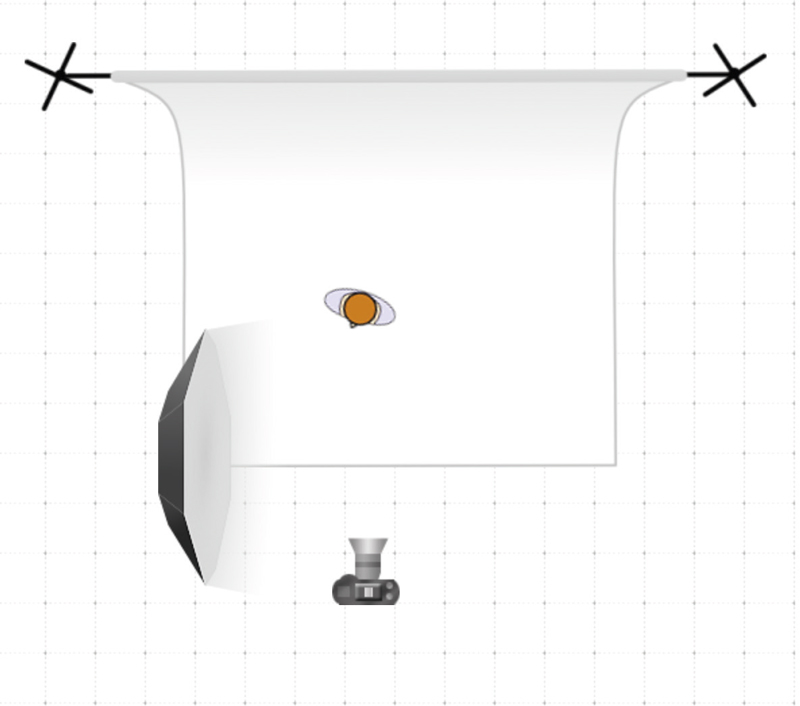
The third setup produces a completely different look.
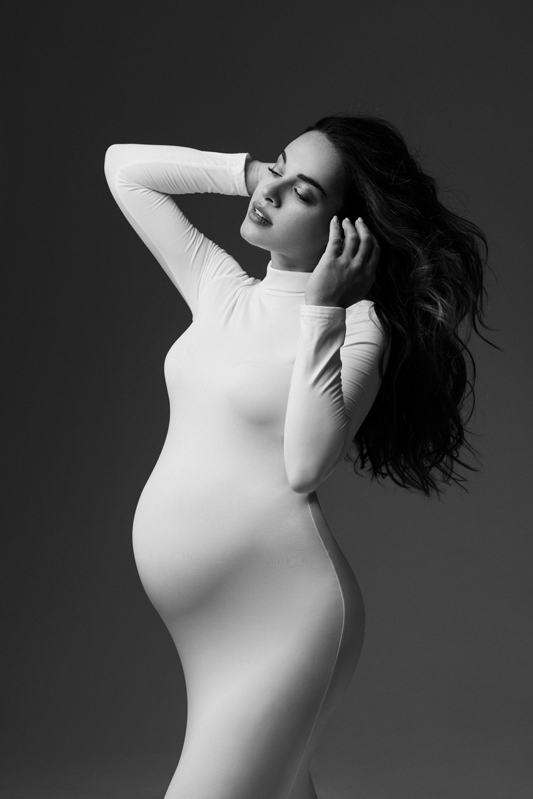
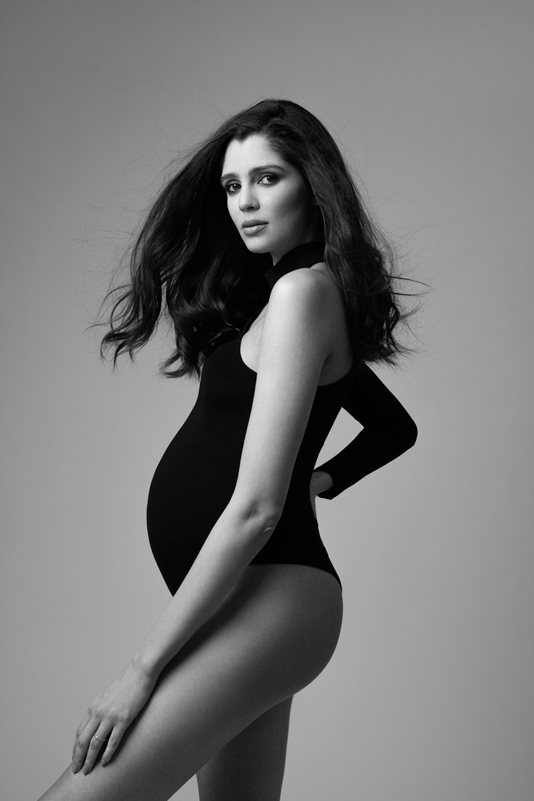
A feathered-light portrait can be clean, sophisticated and fashion-inspired, while still being remarkably simple to create.
You need just one large softbox or octabox.
Position it to the side of your subject and turn it slightly away from her. Rather than pointing the centre of the softbox directly at the subject, you are using the softer, more controlled light coming from the edge of the modifier.
This is known as feathering the light.
Why feathering works
Where you position a large softbox makes a big difference to the character of the light.
Point it directly at the subject and you get one distribution of light. Turn it away and use the edge of the light source, and you can create a different balance of highlights and shadows.
For a portrait with strong contrast, that can be extremely useful.
The exact position will depend on your room, modifier and subject, so don’t worry about finding one perfect angle.
Move the light.
Watch what happens.
Then move it again.
That process of observing the effect of each small change is how you develop an understanding of lighting.
Distance matters
The distance between the softbox and your subject is particularly important.
If the subject is too far away, you may lose some of the contrast and definition that make this technique effective. The resulting image can look flatter, leaving you trying to recreate contrast during editing.
Moving the light closer can give you much greater control over the transition between light and shadow.
As always, there are practical limits. You need to leave enough room for your camera and for your subject to move comfortably.
But don’t automatically assume that the light needs to be several feet away.
Try bringing it closer and see what happens.
Find the best side
Don’t automatically put the light on the same side for every client.
Look at your subject.
Which side of her face works best?
Which direction does she naturally turn towards?
Where do you want the shadow to fall?
Once you’ve identified the side that works best, position the light accordingly.
This is a good example of why lighting shouldn’t be treated as a fixed recipe. The setup needs to work for the person in front of the camera.
Styling can make simple lighting more powerful
The lighting may be simple, but that doesn’t mean the finished photograph has to be.
Clothing can have a huge influence on the result.
For high-contrast portraits, Donatella particularly likes simple black or white clothing. The clean tones help emphasise the shape of the subject and work especially well when the final image is converted to black and white.
A close-fitting dress can create a very different shape from something with flowing fabric, large sleeves or additional volume.
Think about styling and lighting together.
If you know that you want to create a graphic black-and-white portrait, for example, choose clothing and accessories that support that idea rather than trying to decide everything after the photograph has been taken.
The same principle applies to colour.
The clothing, background and light should all contribute to the look you are trying to create.
Use distance to change the background
One of the most useful things about these simple setups is that you can change the appearance of the background without adding another light.
Subject-to-background distance matters.
Move the subject and light further from the background and the background can become darker.
Move them closer and it can become lighter.
The exact result will depend on the size of your room, the reflectivity of the walls and floor, the modifier and the amount of ambient and flash light.
But it is worth experimenting with.
If you have a small studio, don’t assume that a white backdrop can only ever look white.
The way you position your subject and light can dramatically change how that backdrop appears in the final photograph.
You don’t need more equipment — you need more control
One of the easiest traps for photographers is to believe that the next piece of equipment will solve the problem.
Sometimes it will.
But often the real problem is that we haven’t fully explored what the equipment we already own can do.
A single light can be:
- A backlight
- A source for a silhouette
- A soft portrait light
- A feathered light source
- A way of creating a bright background
- A way of creating a dark background
Changing its position, distance, angle and power can produce dramatically different results.
Add a modifier and you gain another level of control.
Change the subject’s position and you change the relationship between the light, subject and background again.
That’s an enormous amount of creative potential from a very small equipment list.
Try these setups before buying anything else
If you’re building a maternity photography portfolio, it can be tempting to think you need a fully equipped studio before you can start producing professional work.
You don’t.
Before buying another light, try to get three completely different looks from the one you already have.
Start with the low-key silhouette.
Then create the high-key version.
Finally, move the light to the side and experiment with feathering.
Photograph the same person using each setup and compare the results.
Then start changing one thing at a time:
- Move the light closer.
- Move it further away.
- Change the angle.
- Change the subject’s distance from the background.
- Change the pose.
- Change the clothing.
- Change the camera position.
You’ll quickly discover that one light can do much more than you initially thought.
Build your skills before building your equipment collection
Having more lights and modifiers certainly gives you more options, and as your photography business develops there is nothing wrong with investing in equipment that makes your work easier.
But equipment should expand your possibilities rather than compensate for a lack of understanding.
Learning to work with one light is an excellent exercise because it forces you to pay attention to what the light is actually doing.
Once you understand that, adding a second light becomes a creative decision rather than a necessity.
That is the real lesson behind these three maternity lighting setups.
You don’t need a huge amount of equipment to create professional-looking maternity portraits. You need to understand the equipment you have, control the light carefully and make deliberate decisions about the photograph you want to create.
So before you decide that your studio is too small, your equipment isn’t good enough or you need to buy another modifier, try moving the light you already have.
You might be surprised by what it can do.