Astrophotography Processing in Affinity Photo: Stacking, Colour & Detail
Astrophotography produces some of the most spectacular images in photography, but the finished result often bears little resemblance to the original files captured by the camera.
Nebulae, galaxies and other deep-sky objects can contain an extraordinary amount of information that is barely visible in the individual exposures. The challenge is to extract that information during post-processing without destroying the subtle detail contained in the original data.
Affinity Photo provides a particularly interesting workflow for astrophotographers because its dedicated Astrophotography Persona is designed specifically for combining and processing astronomical images.
This makes it possible to stack multiple exposures, align astronomical images, combine different filter channels and then apply conventional image-editing techniques to produce a finished photograph.
Why astrophotography needs specialist processing
A conventional photograph might be captured as a single exposure and then adjusted for exposure, contrast, colour and sharpness.
Astrophotography is often very different.
A typical deep-sky image may be constructed from numerous exposures, sometimes captured through different filters. Individual frames can contain considerable noise, while the astronomical subject itself may be extremely faint.
The final image therefore needs to be assembled from the available data before extensive tonal and colour adjustments are made.
This is why an apparently disappointing astronomical exposure can sometimes contain far more information than you might expect.
The processing stage is not simply about making a photograph look better. It is about revealing information that is already present in the captured data.
What is the Affinity Photo Astrophotography Persona?
Affinity Photo includes a dedicated Astrophotography Persona designed for working with astronomical image data.
It provides tools for combining multiple exposures and is particularly useful when working with image sets captured for astrophotography.
For someone coming from conventional photography, some of the terminology and workflow can initially seem unfamiliar.
The underlying principles, however, are relatively straightforward:
- Capture multiple exposures.
- Organise them according to their filters or purpose.
- Stack and align the images.
- Combine the resulting data.
- Assign colour where appropriate.
- Make tonal and colour adjustments.
- Refine the final image using normal image-editing tools.
Once the workflow is understood, the process can become surprisingly efficient.
Stacking astrophotography images
Image stacking is one of the foundations of modern astrophotography processing.
Instead of relying on one exposure, the photographer captures a series of images of the same subject.
These images contain the same astronomical information but different patterns of random noise.
By combining the exposures, it is possible to improve the signal-to-noise ratio and produce a cleaner final image.
A set might contain only a few exposures or dozens of individual frames.
The more advanced the astrophotography setup becomes, the more complex the image set can be.
Organising images by filter
Narrowband astrophotography frequently involves capturing separate image sets through different filters.
Three particularly important filters are:
- Hα (Hydrogen-alpha) – around 656 nm
- SII (Sulfur II) – around 672 nm
- OIII (Oxygen III) – around 496 nm
Each filter records a different part of the light emitted by an astronomical object.
Rather than producing a conventional RGB photograph directly, the separate datasets can later be combined to create a colour image.
The photographer therefore has considerable creative and technical control over the final colour interpretation.
A basic Affinity Photo astrophotography workflow
The exact workflow depends on the data you have captured, but a simplified process looks like this.
1. Organise the source images
Group the images according to their filter.
You might have separate sets for Hα, SII and OIII, for example.
The number of images in each group does not necessarily need to be identical.
2. Stack the images
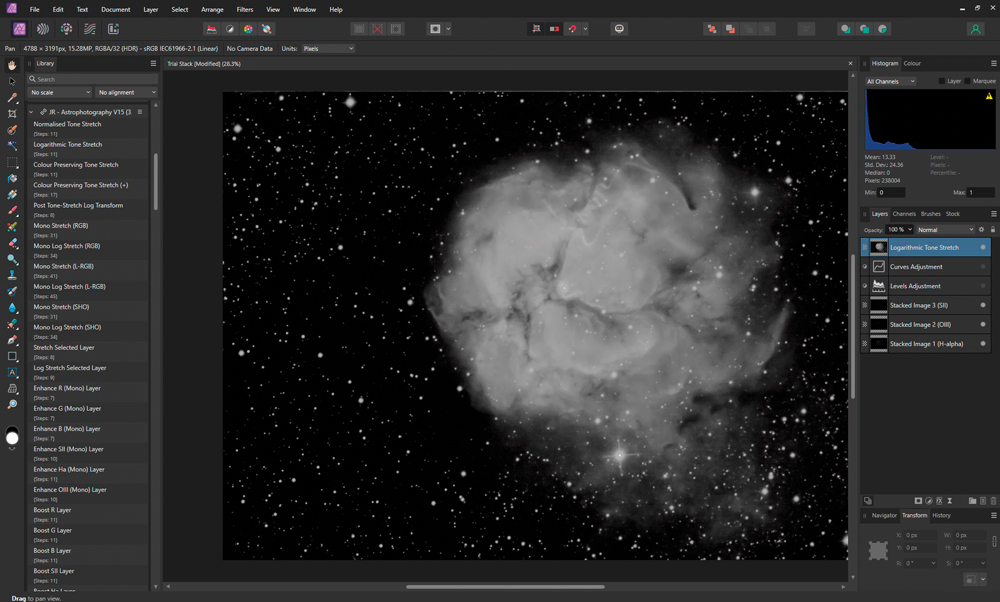
Affinity Photo’s Astrophotography Persona can be used to create an astrophotography stack.
The software aligns the images and combines the information contained within the individual frames.
This is the stage where multiple exposures become a single dataset containing a cleaner representation of the astronomical subject.
3. Prepare the resulting layers
If you are using macros to automate parts of the workflow, pay attention to layer naming.
A macro needs to know which layer contains which data, so consistent naming can be important.
This is one of the differences between a conventional Photoshop or Affinity workflow and a specialised astrophotography workflow.
4. Assign the filter data to colour channels
The separate filter datasets can then be mapped to colour channels.
There is no requirement to think only in terms of conventional RGB photography at this stage.
For narrowband images, different combinations can be used to create different interpretations of the same astronomical data.
5. Apply tonal adjustments
This is where astrophotography begins to look very different from conventional image editing.
Extremely faint variations in brightness may need to be brought forward using curves, levels, contrast and other tonal controls.
Adjustments that would look wildly excessive on a conventional portrait or landscape photograph can be perfectly reasonable when processing astronomical data.
6. Refine the finished image
Once the astronomical data has been combined, the image can be treated much more like a conventional photograph.
Colour, contrast, local detail and composition can all be refined to produce the desired final result.
The remarkable power of curves
One of the most striking aspects of astrophotography processing is the extent to which photographers manipulate curves.
A conventional photographer might make relatively subtle curve adjustments.
Astrophotographers often work much more aggressively because the objective is to reveal extremely faint structures against a dark background.
A nebula may occupy only a small part of the available tonal range in the original data.
Careful curve adjustments can progressively bring that structure into view.
The important word is careful.
Aggressive processing can also exaggerate noise, gradients and unwanted artefacts, so it is important to examine the image at different stages rather than continually increasing contrast simply because more detail appears.
Why stacking improves image quality
Noise is one of the major limitations when photographing faint astronomical subjects.
Increasing exposure or ISO can make the subject more visible, but it can also increase noise.
Stacking provides another way of improving the result.
When several independent exposures are combined, random variations tend to average out while the consistent astronomical signal remains.
The result can be a much cleaner image from data that initially appears too noisy to use.
This is one reason astrophotographers often capture large numbers of exposures rather than relying on a single frame.
Narrowband astrophotography
Narrowband imaging is particularly powerful for photographing emission nebulae.
Nebulae can contain ionised gases that emit light at characteristic wavelengths. By using narrowband filters, astrophotographers can isolate these wavelengths and record them separately.
The three commonly encountered datasets are:
Hα — Hydrogen-alpha
Hydrogen is abundant in many nebulae and the Hα emission appears around 656 nm.
SII — Sulfur II
Sulfur emission is associated with particular ionised regions and is commonly recorded around 672 nm.
OIII — Oxygen III
Oxygen III emission around 496 nm is another important source of information in emission nebulae.
Because the resulting images are often captured using monochrome astronomical cameras, colour has to be introduced during processing.
What is the Hubble Palette?
One popular approach to combining narrowband data is known as the Hubble Palette.
The Hubble Palette traditionally assigns:
- SII to red
- Hα to green
- OIII to blue
This produces the familiar blue-green and orange appearance associated with many processed nebula photographs.
The colours are not intended to reproduce what the nebula would necessarily look like to the human eye.
Instead, the technique creates a false-colour representation that helps separate different emission sources and reveal structure within the object.
Other channel combinations are also possible.
Astrophotographers can experiment with different mappings to produce different interpretations of the same source data.
You don’t have to use the Hubble Palette
The Hubble Palette is only one possibility.
Different channel combinations can produce very different results.
For example, Hα can be incorporated into an RGB image, while other combinations can be used to emphasise particular structures.
This is one of the creative aspects of astrophotography processing.
Once the separate datasets have been captured, the photographer is no longer constrained by conventional colour photography in the same way.
The important thing is to understand what each dataset represents before deciding how to combine it.
Macros can speed up the workflow
One of the advantages of Affinity Photo is the ability to use macros to automate repetitive processing steps.
Astrophotography processing can involve many repeated operations, so a well-designed macro can save considerable time.
James Ritson, an Affinity specialist with a particular interest in astrophotography, has produced a range of astrophotography-related macros and tutorials.
The benefit isn’t simply speed.
Macros can also help provide a consistent starting point for a particular type of image, leaving the photographer free to concentrate on the creative and interpretive aspects of processing.
However, automated processing should be regarded as a starting point rather than a substitute for understanding what the data contains.
From astronomical data to an image
There is an important distinction between processing astronomical data and simply applying a filter to a photograph.
The initial stages can involve stacking, calibration, alignment and channel combination.
Only after those stages have been completed does the image begin to resemble the sort of file familiar to a conventional photographer.
At that point, many of the skills you already possess become useful again.
Curves, levels, colour correction, local adjustments and selective sharpening can all play a role.
The difference is that astrophotographers are often working with incredibly faint signals and therefore push these tools much further.
Processing can reveal surprising detail
One of the most rewarding parts of astrophotography is discovering what is actually contained in an apparently poor original exposure.
A raw astronomical frame can look almost unusable.
After stacking and carefully increasing the tonal separation, structures that were barely visible can suddenly emerge.
This can be counter-intuitive to photographers accustomed to evaluating an image immediately after capture.
With deep-sky astrophotography, the capture is often only the beginning.
What about professional telescope images?
It is easy to compare an amateur astrophotograph with images produced by the Hubble Space Telescope or James Webb Space Telescope and conclude that there is little point trying to compete.
That misses the purpose of amateur astrophotography.
Professional observatories have enormous technical advantages, but amateur photographers can still produce remarkable images using relatively modest equipment.
There is also a significant difference between downloading an already processed astronomical image and working through the complete process yourself.
The latter involves learning how to capture, organise, stack and interpret astronomical data.
That process is a skill in its own right.
Can you process publicly available telescope data?
There are also opportunities to experiment with astronomical data captured by professional observatories.
Some organisations provide access to datasets from large telescopes, allowing photographers and astronomy enthusiasts to practise processing images that they could never capture using their own equipment.
This can be a useful way to learn advanced processing techniques.
However, there is an important distinction between astrophotography and astrophotographic image processing.
If you did not operate the camera or telescope that captured the original data, you have processed an astronomical image rather than made the original photograph.
For competitions, always check the individual competition rules concerning source material and image creation.
Affinity Photo as an astrophotography tool
Affinity Photo is particularly interesting because it sits between dedicated astronomical software and conventional photographic editing.
Its Astrophotography Persona provides specialist tools for stacking and astronomical image preparation, while the wider application provides the familiar editing capabilities needed for final processing.
That combination makes it possible to move from astronomical data to a finished image without necessarily having to use several completely separate applications.
For photographers who already understand layers, masks, curves and colour adjustment, this can provide a relatively approachable route into astrophotography processing.
A beginner’s workflow
If you are new to processing astronomical images in Affinity Photo, don’t begin with an enormous dataset and a complicated narrowband workflow.
Start simply.
Capture
Begin with a small set of images of the same subject.
Stack
Use the Astrophotography Persona to combine and align them.
Inspect
Look carefully at what information is actually present before making aggressive adjustments.
Adjust
Use curves, levels and other tonal controls to bring out faint detail.
Experiment with colour
If working with narrowband data, try different channel assignments and colour combinations.
Refine
Use Affinity Photo’s conventional editing tools to improve the final image.
Save your workflow
Once you discover a sequence of adjustments that works well, consider turning repetitive operations into a macro.
The most important lesson
Astrophotography processing is less about applying spectacular effects and more about understanding the information contained within the captured data.
A photograph that initially appears flat, noisy or almost empty may contain an enormous amount of recoverable detail.
The skill lies in revealing it gradually.
Affinity Photo provides a useful environment for this because its dedicated astrophotography tools handle the specialised stages of stacking and alignment, while its conventional editing tools provide everything needed for the later stages of tonal and colour refinement.
For photographers accustomed to conventional image processing, astrophotography can therefore feel like learning an entirely new discipline — but many of the underlying skills remain familiar.
The difference is that the data is often hiding in places where a conventional photographer would never think to look.