What Is Banding in Photos? Causes, Detection and How to Fix It
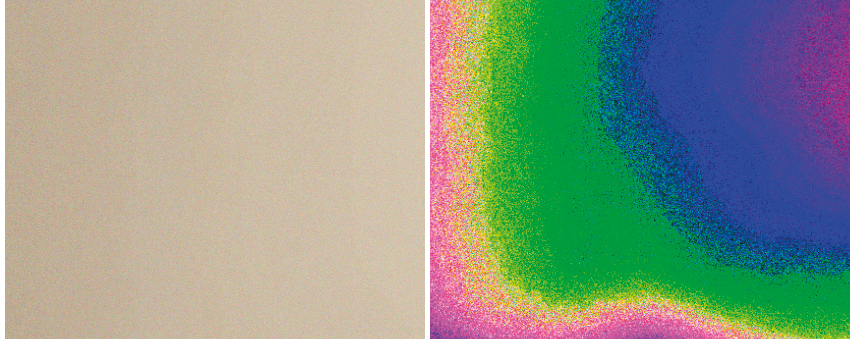
Banding is one of those image problems that can remain almost invisible during editing, only to become painfully obvious when a photograph is printed, displayed at full size or projected onto a large screen.
It is particularly common in areas that should contain smooth transitions, such as skies, studio backgrounds, skin tones, mist, vignettes and monochrome gradients. Heavy editing can make the problem considerably worse, particularly when an image has undergone aggressive noise reduction, blurring, glow effects, colour manipulation or strong tonal adjustments.
Banding was a recurring problem during the judging of photography competitions, where technically imperfect images could be eliminated from consideration. It is also something professional photographers need to watch for when preparing images for clients, exhibitions and high-quality printing.
The good news is that banding can often be prevented. The key is understanding where it comes from and knowing how to look for it before the final file leaves your hands.
What is banding in photography?
Banding occurs when an image contains visible steps or lines between tones that should transition smoothly.
Imagine a clear blue sky. In a well-processed photograph, the colour should gradually change from one tone to another. If there are not enough usable tonal values, or processing has damaged the subtle differences between them, the smooth gradient can break into a series of visible bands.
There are two broad forms of banding that photographers may encounter.
Straight-line banding
Straight-line banding normally appears as regular horizontal or vertical lines across an image.
It can originate from camera hardware, sensor readout, lighting or printing equipment. For example, flickering artificial lighting combined with an unsuitable shutter speed can produce patterns across an image.
This type of banding is therefore not necessarily something that can be repaired in software. The best solution may be to identify and eliminate the problem during capture.
Tonal or amorphous banding
The second type is less regular and is often seen in skies, backgrounds, clouds, skin or other areas containing smooth tonal transitions.
Instead of obvious lines, you may see a series of subtle changes in brightness or colour where there should be a continuous gradient.
This is the type of banding that can be particularly easy to miss during editing.
Why does banding happen?
There isn’t a single cause of banding. It can enter the workflow at several different points.
Common causes include:
- excessive tonal adjustments
- working with limited bit depth
- aggressive noise reduction
- Gaussian blur and other smoothing effects
- glow and soft-focus effects
- excessive skin smoothing
- strong colour or saturation adjustments
- heavily darkened skies
- JPEG compression
- repeated saving and exporting
- masks and gradients
- some camera and lighting problems
- printer problems
- display or colour-management issues
This is why banding can sometimes seem mysterious. The original RAW file may look perfectly clean, yet a processed version of the same image can contain obvious bands.
Why smooth areas are particularly vulnerable
Banding is easiest to see where an image contains very little detail.
A photograph of a forest full of leaves and branches can hide surprisingly severe tonal problems because there is so much structure in the image.
A clear sky is very different.
If a sky contains a smooth transition from light blue to dark blue, there may be nothing to disguise a small difference between adjacent tones. Once processing removes or compresses some of those tonal values, the eye can start to see the individual steps.
The same principle applies to:
- studio backgrounds
- fog and mist
- smooth skin
- walls
- water
- sunsets
- vignettes
- monochrome backgrounds
- artificially generated gradients
These are the places where you should look first.
How editing can create banding
One of the most common causes of banding is not the camera at all. It is what happens during post-production.
Suppose a photograph contains a relatively subtle range of tones in a sky. If you dramatically darken that sky, increase contrast and then add saturation, you are manipulating a relatively small set of tonal values.
The more aggressively those values are pushed around, the greater the risk that the smooth transition will break down.
The problem can become even more obvious when additional effects are applied.
Blur and glow effects
Blur sounds as though it should make banding less obvious because it removes detail.
Unfortunately, the opposite can sometimes happen.
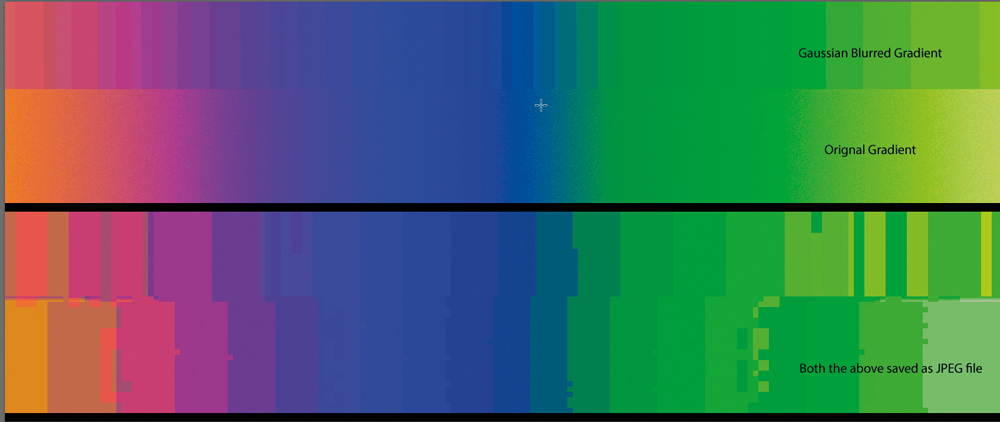
When a smooth gradient is already working with a limited range of tones, blurring it further can leave large areas represented by very similar values. Subsequent processing or compression can then make the individual tonal steps more obvious.
This is one reason that excessive use of glow, glamour effects and background softening can produce unexpected artefacts.
Skin smoothing
Skin is another common victim.
Aggressive smoothing can remove the subtle texture and tonal variation that normally disguises transitions. If the resulting skin is then brightened, darkened or selectively coloured, visible bands can appear following the contours of the face.
The effect may look perfectly acceptable at a small screen size and become obvious at 100% or in a large print.
Heavy tonal manipulation
Extreme edits to shadows, highlights and colour can also expose weaknesses in an image.
This is particularly relevant to photographs that have already been heavily processed or images created from multiple generations of exported files.
The more processing an image undergoes, the more important it becomes to keep an eye on the smooth areas.
Bit depth and banding
Bit depth is an important part of the story.
An 8-bit image provides 256 possible values per colour channel. A 16-bit image provides vastly more possible values — 65,536 per channel.
That additional precision gives you considerably more room to manipulate an image before tonal differences become visible.
This does not mean that a 16-bit file is immune from banding. It simply gives you more information to work with.
A useful way to think about it is that every aggressive adjustment potentially reduces the range of tones available to represent part of the image. Starting with more information gives you greater protection against that loss.
Work in 16-bit when appropriate
If your software and workflow support it, working from a RAW file into a 16-bit editing environment is a sensible way of protecting tonal information during significant adjustments.
This is particularly worthwhile when working on:
- landscapes
- sunsets
- astrophotography
- studio backgrounds
- monochrome images
- HDR images
- composites
- heavily processed photographs
It won’t magically remove banding from an already damaged image, but it can reduce the likelihood of creating it during editing.
Why skies are such a common problem
Skies deserve special attention.
A bright, relatively featureless sky contains a large smooth tonal gradient. If you make it considerably darker, you may be pushing those tones towards the shadow end of the available range.
Add a strong graduated adjustment, increase contrast, boost saturation and then export a heavily compressed JPEG, and the chances of visible banding increase.
This is why a sky can look beautiful during the early stages of editing and suddenly develop ugly steps after the final round of adjustments.
Always check the finished version rather than assuming that because the RAW file was clean, the final image will be clean too.
JPEG compression and banding
JPEG is extremely useful. It produces relatively small files while retaining excellent visual quality for many photographic applications.
However, JPEG is a lossy format and achieves its small file sizes by discarding image information.
The effect is normally difficult to see in detailed photographic areas. It can be much more obvious in smooth gradients.
This makes skies and other large areas of subtle tone particularly vulnerable.
JPEG compression can also interact badly with an image that has already been pushed hard during editing.
For this reason, keep your master editing file in an appropriate high-quality format and treat the JPEG as an output file rather than the file from which you repeatedly continue editing.
Don’t repeatedly edit and resave JPEGs
If you open a JPEG, make adjustments, save it, open that file again, make more adjustments and save it again, you are repeatedly working from an already compressed image.
Where possible, return to your original RAW or master file and produce a fresh final export.
This is especially important for competition entries and high-quality prints.
How to detect banding before it becomes a problem
The first step is simply to know where to look.
Don’t only inspect the main subject. Examine the areas where smooth tones should exist.
Look carefully at:
- skies
- studio backgrounds
- skin
- clouds
- mist
- water
- vignettes
- gradients
- large areas of shadow
- monochrome backgrounds
View the image at 100% and also at the size at which it will actually be displayed or printed.
An artefact that is invisible at 25% may become obvious at 100%. Equally, something that looks alarming on a highly magnified screen may be completely irrelevant in the final print.
Use a temporary solar curve to reveal banding
One particularly useful diagnostic technique is the so-called solar curve.
This is not an effect you apply to the finished photograph. It is a temporary inspection tool.
Create a Curves adjustment layer and construct a curve containing several alternating peaks and valleys. The resulting effect dramatically exaggerates small tonal changes.
Areas that initially look smooth can suddenly reveal repeating tonal structures or steps that were difficult to see in the original image.
The important point is that the solar curve is being used as a diagnostic tool, not as part of the final edit.
Once the inspection is complete, simply disable or remove the adjustment layer.
Why this works
The exaggerated curve increases local tonal differences and makes subtle irregularities much easier to see.
It can therefore provide an early warning that a smooth area is vulnerable to banding.
This is particularly useful before committing an image to a large print or competition submission.
Check the image at 100%
A final image should always be inspected at an appropriate level of magnification.
At 100%, you can look for:
- tonal steps
- mask edges
- cloning patterns
- halos
- sharpening artefacts
- JPEG artefacts
- dust spots
- strange colour transitions
- excessive smoothing
- unexpected texture
However, don’t make the mistake of assuming that 100% is the only useful view.
Also zoom out and look at the image as a whole.
The objective is to identify problems without losing sight of how the photograph will actually be experienced.
What can you do if an image is already banded?
Unfortunately, there isn’t one universal banding-removal button.
The best solution depends on how the banding was created.
Go back to the master file
If possible, start with the original RAW or master editing file.
Look at the adjustments that affect the problem area and reduce their intensity.
For example, you might find that the banding disappears when you:
- reduce a strong gradient adjustment
- reduce saturation
- reduce contrast
- reduce a glow effect
- undo excessive blur
- use a more subtle mask
- restore some natural texture
- replace an artificial background
This is usually preferable to trying to disguise the problem afterwards.
Add controlled texture or noise
Adding a very small amount of noise can sometimes help break up visible tonal steps.
The idea is not to make the photograph visibly noisy. Instead, a fine texture can provide additional variation that disguises the abrupt transitions.
This needs to be handled carefully.
Too much noise simply creates another problem, and the result can look worse than the original banding.
Always judge the effect at the intended output size.
Rebuild the gradient
If the problem is confined to a background or sky, rebuilding that area can sometimes be the cleanest solution.
For example, you may be able to:
- isolate the affected area;
- create a smoother replacement gradient;
- introduce subtle texture;
- blend it into the surrounding image;
- check the transition at 100%;
- inspect the final output again.
This can be considerably more effective than repeatedly applying filters to the damaged area.
Don’t assume more blur will fix it
Adding yet more blur is a tempting solution, but it can make matters worse.
If the original banding was caused or aggravated by smoothing, applying additional blur may further reduce the useful tonal variation.
Fix the underlying cause wherever possible rather than simply throwing another filter at the symptom.
What about banding caused by the camera or lighting?
Not all banding is created in Photoshop, Affinity Photo or another editing application.
If you see regular lines across an image straight out of the camera, investigate the capture process.
Potential causes include:
- electronic shutter behaviour
- sensor readout
- flickering LED or fluorescent lighting
- shutter speed interacting with artificial lighting
- camera processing
- scanning problems
In some situations, the solution is to change the shutter speed or lighting. In others, you may need to change the capture method or reshoot the image.
This is an important distinction: software banding and capture-related banding require different solutions.
Banding can also occur during printing
A photograph that looks perfect on screen can still develop problems when printed.
Printer-related banding can result from issues such as:
- blocked print nozzles
- incorrect printer settings
- paper-feed problems
- print-head alignment
- unsuitable media settings
- colour-management problems
- incorrect profiles
If you see regular bands across multiple photographs rather than only one particular image, suspect the printer or print workflow before rebuilding every photograph.
Run the printer’s nozzle check and alignment procedures and verify the paper, quality and colour-management settings.
Don’t forget the display
The final viewing environment matters too.
Different monitors, projectors and software can display the same image differently.
A photograph containing subtle tonal transitions may appear clean on one display and reveal problems on another, particularly when viewed at high brightness, high contrast or with different colour-management settings.
For critical work, don’t rely entirely on a single monitor.
If the photograph is going to be printed, inspect a proof or test print under appropriate viewing conditions.
Monochrome images can be especially vulnerable
Black-and-white images deserve particular attention.
A colour photograph has several channels contributing information to the final image. A monochrome photograph may contain much less visual variation, particularly across a smooth background.
Strong tonal manipulation can therefore make steps in the gradient much easier to see.
This is one reason why apparently simple black-and-white images can sometimes be surprisingly difficult to process cleanly.
Use a ringaround to find the best setting
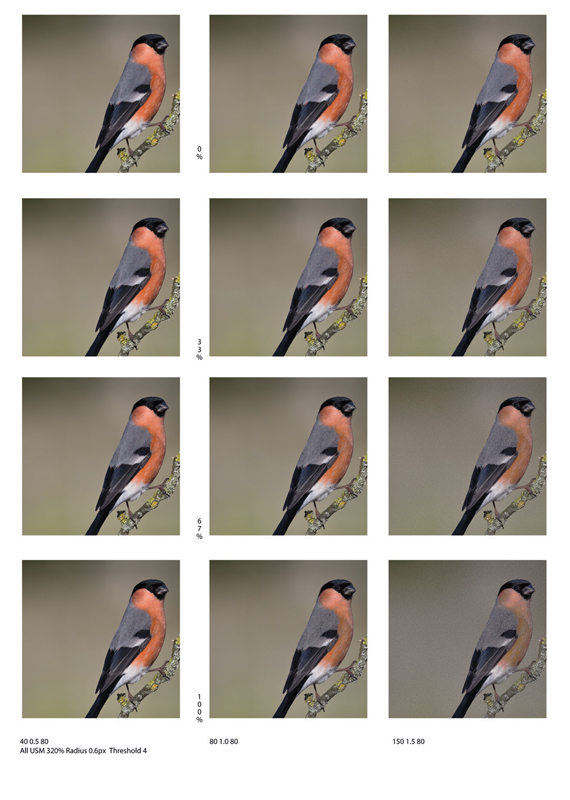
One of the most useful approaches to image processing is to stop guessing.
A ringaround is simply a series of versions of the same image, each processed with a slightly different setting.
For example, you might create several versions of a photograph with progressively stronger:
- noise reduction
- sharpening
- contrast
- colour saturation
- toning
- gradient adjustments
- glow
- banding reduction
Arrange the results together and compare them.
Start with an obviously weak setting and progress towards one that is clearly too strong. The optimum result is often easier to identify when you can compare several alternatives side by side rather than trying to remember what the previous version looked like.
This approach is particularly useful when teaching yourself how far a particular adjustment can be pushed before image quality begins to suffer.
A practical banding-check workflow
Before exporting a finished photograph, work through this simple process.
1. Return to the master file
Avoid repeatedly editing an exported JPEG.
2. Inspect the smooth areas
Pay particular attention to skies, backgrounds, skin, clouds and gradients.
3. View at 100%
Look for tonal steps, lines, halos and processing artefacts.
4. Zoom out
Make sure any apparent problem is relevant at the intended viewing size.
5. Try a diagnostic curve
Use a temporary solar curve to exaggerate subtle tonal problems.
6. Check your processing
Look at strong gradients, blur, glow, smoothing, saturation and tonal adjustments.
7. Check bit depth
Where appropriate, retain a higher-bit-depth workflow for significant editing.
8. Export carefully
Use the correct colour space and an appropriate quality setting for the destination.
9. Inspect the exported file
Don’t assume the export is identical to the master.
10. Check the print if the image is being printed
A finished print is the final test.
How to prevent banding in your photography workflow
The easiest banding problem to fix is the one you never create.
A few simple habits can make a significant difference:
- Start with the best-quality original file available.
- Work at higher bit depth when appropriate.
- Avoid unnecessarily extreme adjustments.
- Be particularly careful with smooth skies and backgrounds.
- Don’t overuse blur, glow or skin-smoothing effects.
- Avoid repeatedly editing and resaving JPEGs.
- Keep a high-quality master file.
- Make masks and gradients as smoothly as possible.
- Inspect images at 100%.
- Check the final exported file rather than just the working file.
- Proof important prints before producing the final version.
- Learn to recognise problems introduced by your own editing software.
Banding is often a warning sign
Banding isn’t necessarily evidence that an image was poorly photographed.
It can be introduced surprisingly late in the workflow, sometimes by a single aggressive adjustment or export.
However, visible banding in a finished competition image or professional print is still a technical problem. Judges, clients and viewers don’t necessarily care where the fault originated — they simply see the defect.
That makes final quality control an essential part of professional image preparation.
The most important lesson is therefore simple: don’t wait until the print or competition submission to discover banding.
Look for it while you still have the opportunity to fix the cause.
Final thoughts
Modern cameras and editing software give photographers enormous control over tone, colour and detail. But that control also makes it possible to push an image beyond the point where the underlying data can produce a smooth result.
Banding is one of the consequences.
Work from the best source file you can, preserve as much tonal information as practical, be cautious with aggressive processing and always inspect the finished image rather than assuming it is fine because it looked good during editing.
And when you’re unsure whether an adjustment is helping or hurting, make a ringaround and compare the results.
A long, careful look at the final image can be worth far more than another plug-in or another slider.