Food Photography Lighting: Dave Montizambert’s Guide to Lighting a Fast-Paced Shoot
Good food photography depends on more than simply making a dish look appetising. Lighting, composition, camera position and timing all play an important role — particularly when you’re working on location and have only a limited amount of time to produce a series of images.
Internationally recognised photographer and educator Dave Montizambert shares his approach to learning lighting, passing knowledge on to the next generation and, most importantly, how he approached a fast-paced food photography shoot where the entire lighting setup had to be created and packed away within three hours.
Why learning photography lighting properly matters
Dave Montizambert has an insatiable appetite for learning.
For him, discovering a new photographic technique or principle is exciting, but learning something intellectually isn’t the same as being able to use it confidently.
“You never really understand anything until you actually do it,” Dave explains, adding that new techniques often need to be practised repeatedly before they become second nature.
This is particularly true when learning photographic lighting.
It’s easy to watch a lighting tutorial, read an article or attend a workshop and feel that you understand the technique. The real test comes when you put the camera down, set up the lights and attempt to reproduce the result yourself.
For Dave, teaching has become one of the ways he motivates himself to keep learning.
Preparing for a lecture, workshop, video tutorial or magazine article gives him a deadline and a reason to explore a subject in depth.
The process of teaching others also forces him to understand the subject more thoroughly.
Don’t just learn lighting — practise it
One of the biggest challenges for photographers learning lighting is motivation.
You can spend hours watching tutorials and collecting ideas without ever putting them into practice.
Dave’s solution is to create a reason to use the knowledge.
By preparing to teach others, he gives himself a deadline. He then has to research, experiment and put the technique into practice.
The result is a deeper understanding of the subject.
This is an important lesson for photographers at any level.
If you’ve recently learned a new lighting technique, don’t simply add it to your mental list of things you might try one day.
Set up your lights.
Find a subject.
Make some photographs.
Then repeat the exercise until the technique becomes part of your normal workflow.
Learning photography lighting through hands-on experience
Dave’s belief in practical learning became particularly relevant during a 30-day apprenticeship with photography student Elise Rouget.
Following a lecture and workshop at the University of Nimes in southern France, Dave was approached about hosting one of the university’s photography students as part of an Erasmus programme.
Elise spent 30 days working with Dave at his studio on Vancouver Island.
The apprenticeship combined real photographic assignments with practical learning.
Elise assisted on professional commissions and worked on her own photographic assignments, while Dave shared his approach to lighting techniques and lighting theory.
The pair worked on a wide variety of subjects, including food photography, wine and liquor photography, portraits and outdoor work.
There was even a language barrier to overcome, with Elise learning English and Dave admitting that his French was limited.
Translation apps helped — although, according to Dave, the results often produced plenty of laughter.
A three-hour food photography challenge
One of the most demanding assignments was a food photography shoot at Gigi’s Oyster Bar.
The challenge was simple:
Set up, light and photograph multiple food images before the restaurant opened.
The entire shoot had a three-hour window from arrival to departure.
Normally, Dave’s food photography shoots can take between two and four hours for a single setup. On this occasion, there was no food stylist either, meaning Dave and Elise were responsible for making adjustments to the food themselves.
Speed was therefore essential.
Dave’s solution was not to create a completely new lighting setup for every photograph.
Instead, he created one effective lighting arrangement and then changed the food and made relatively small adjustments to the camera and reflectors.
The result was a much faster workflow.
The key to speed shooting: keep it simple
When time is limited, photographers can easily fall into the trap of trying to perfect every detail.
Dave takes a different approach.
For a fast-paced commercial shoot, the objective isn’t necessarily to create a masterpiece.
The objective is to create good, saleable photographs efficiently.
His approach was to establish the lighting for the first and most important image, then replace the food with the next subject while keeping the lighting broadly consistent.
This meant that instead of starting again for every photograph, only small adjustments were required.
The first image took around an hour and a half to complete.
After that, the remaining images could be produced in approximately 20 minutes each.
That is a significant time saving.
Building the food photography lighting setup
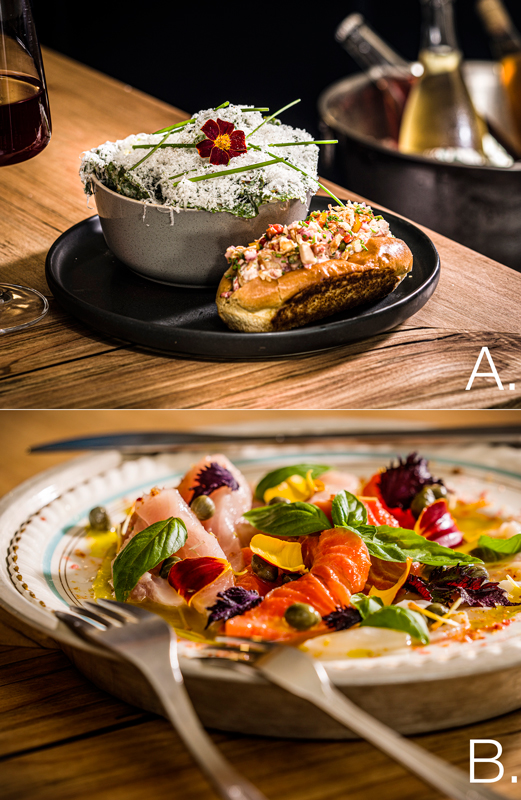
For the first image — a salad and shrimp roll combination — Dave initially used a rough stand-in version of the food.
This allowed him to establish:
- Camera position
- Lens choice
- Depth of field
- Lighting direction
- Exposure
- Overall composition
Only once those elements were established did the final food go into position.
This is an extremely practical approach to commercial photography.
There’s little value in waiting for the final subject before discovering that the camera needs to be moved or the lighting needs to be completely redesigned.
Using a stand-in gives the photographer an opportunity to solve those problems first.
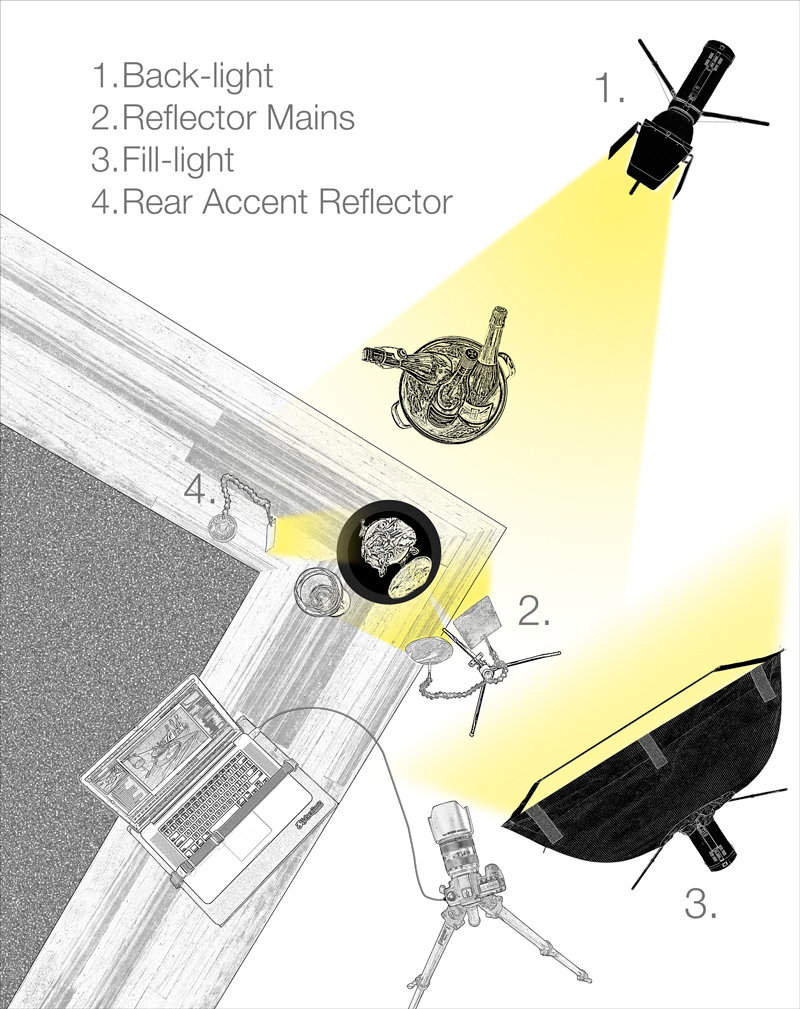
Creating depth with backlighting
Dave’s main objective with the lighting was to create a heightened sense of depth.
He achieved this using a monoblock studio strobe positioned behind and to the camera-right of the food.
Barn doors were fitted to the light to help control how the illumination spread across the foreground and background subjects.
Dave also tilted the strobe slightly upwards to help feather the light.
The backlight was measured using an incident light meter and adjusted to approximately one stop below the camera exposure on the rear of the food.
This gave the image a strong sense of illumination from behind while keeping the highlights under control.
Using reflectors as a main light
One of the more interesting elements of Dave’s setup was the use of small silver reflectors.
Two silver cards were positioned in front of the food and slightly towards camera-right.
They were placed above the subjects so they could capture some of the unused light spilling over the top of the set from the backlight.
The reflected light was then directed back onto the food and dishes.
This created bright, controlled areas of illumination that acted effectively as the main light.
It is a useful reminder that effective lighting doesn’t always require another expensive light.
Reflectors can be used to redirect existing light and create very specific effects.
Adding controlled fill light
A second monoblock strobe with a small softbox was positioned in front and to camera-right.
Its purpose was to lift the shadows without overpowering the main lighting effect.
Dave set the fill light significantly darker than the camera exposure, allowing it to provide gentle illumination while retaining the contrast created by the main and backlighting.
The light was also angled slightly upwards towards the ceiling to help distribute it more evenly across the scene.
A third silver-card reflector was positioned behind and to camera-left to create an additional highlight along the back of the food.
The result was a lighting arrangement that created depth while still allowing the individual dishes and ingredients to remain clearly visible.
Why you shouldn’t completely rebuild your lighting for every photograph
Once the first food image had been completed, the next subject was positioned in essentially the same location.
The camera position, height and lens zoom were adjusted to suit the new composition, but the main lighting was left largely unchanged.
Only the silver reflectors needed significant adjustment.
This is the key to Dave’s fast-shooting workflow.
Build a lighting setup that works, then make the minimum changes necessary.
For a series of similar subjects, completely rebuilding the lighting for every photograph wastes valuable time and can actually introduce inconsistencies between images.
A consistent lighting setup also helps create a coherent visual style across a series.
A simple approach to lighting can save time
Dave’s food photography shoot demonstrates an important principle that applies far beyond food photography.
Good lighting isn’t necessarily about using the greatest number of lights.
It’s about understanding what each light is doing and knowing which elements actually need to change.
For this particular shoot, Dave was able to maintain the backlight and fill light while adjusting the reflectors and making relatively small changes to the camera position.
That allowed the team to work quickly without sacrificing the overall quality of the images.
Why lighting fundamentals matter
Dave has spent much of his career teaching photographers about lighting, and he believes strongly in understanding the underlying principles rather than simply collecting “tips and tricks”.
Online photography education has made learning easier than ever.
There are now countless tutorials, videos and courses available to photographers.
But Dave believes photographers still benefit enormously from hands-on experience with someone who understands the fundamentals.
Understanding the principles of light makes it easier to evaluate new techniques and decide whether they are actually useful.
Rather than memorising a particular lighting setup, you understand why it works.
And once you understand why it works, you can adapt it.
Passing knowledge on to the next generation
Dave’s apprenticeship with Elise was not an isolated experience.
Earlier in his career, he also worked with numerous interns at his studio.
Some came from photography colleges and universities, while others were talented amateurs who wanted to learn more about professional photography.
They came from local, national and international backgrounds and stayed for anything from a few days to several years.
For Dave, teaching was never simply about passing information in one direction.
Working with other photographers also helped him sharpen his own skills.
Explaining a lighting principle to someone else can reveal gaps in your own understanding and encourage you to examine techniques that you might otherwise take for granted.
Teaching can make you a better photographer
For photographers who have developed experience in a particular area, teaching can be an effective way to deepen their own knowledge.
You don’t necessarily need to become a professional educator.
You could:
- Give a talk at a local camera club
- Speak to a photography college
- Run a small workshop
- Mentor another photographer
- Create a video tutorial
- Write an educational article
- Demonstrate your workflow to other photographers
Explaining how you work forces you to think carefully about the decisions you make.
It can also introduce you to photographers who may have different ideas, approaches and experiences.
Dave Montizambert’s advice for photographers
Dave’s experience highlights a useful lesson for photographers at every stage of their career:
Don’t just learn photography. Use what you learn.
The internet has made it easier than ever to discover new photography techniques, but knowledge only becomes useful when it changes what you do with your camera.
Learn a lighting principle.
Set up a light.
Photograph something.
Look at the result.
Change the setup.
Try again.
Repeat the process until you understand it.
And if you really want to test whether you’ve understood something, try teaching it to somebody else.