Catchlights in Portrait Photography: How to Create and Retouch Them
By Dave Montizambert

Catchlights might be one of the smallest details in a portrait, but they can make a surprisingly big difference.
These tiny reflections in the eyes can add life and dimension to a portrait. Get them right and the eyes can appear bright, alert and engaging. Get them wrong — or lose them completely — and the eyes can sometimes look flat or lifeless.
In this article, I’ll look at catchlights, how they are affected by portrait lighting, particularly butterfly lighting, and how you can create or enhance them in Photoshop when necessary.
But be warned: once you start looking at catchlights, you can fall down quite a rabbit hole.
What is a catchlight?
A catchlight is a reflection of a light source visible on the surface of a subject’s eye.
Because the surface of the eye is wet and reflective, it acts a little like a tiny mirror. The shape, size, position and brightness of the reflected light can therefore tell us something about the lighting used to create the photograph.
This is why catchlights are important to portrait photographers.
They add a sense of life to the eyes.
But they are also subject to the same laws of light as everything else in the photograph.
Butterfly lighting and catchlights
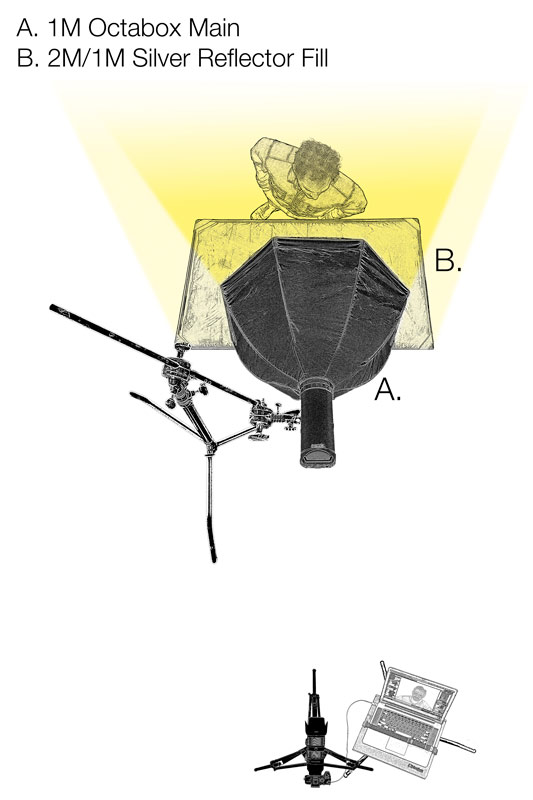
Butterfly lighting, also known as Paramount lighting, is popular with portrait and glamour photographers.
One reason is that the relatively frontal position of the light gives the subject plenty of freedom to turn their head without one eye disappearing into deep shadow.
It can also produce a flattering balance between relatively soft facial shadows and dimensionality.
Unlike on-camera flash, which tends to throw most of its shadows behind the subject, butterfly lighting places the main light above and in front of the subject.
This creates the characteristic butterfly-shaped shadow beneath the nose.
The result is more dimensional than flat on-camera flash, while generally being less dramatic than lighting patterns such as Rembrandt, Loop or strong side lighting.
For many portrait photographers, that balance is part of the appeal.
The catchlight problem
Catchlights can become difficult when your subject has features that physically block the reflection of the main light.
Heavy brows, deep-set eyes, heavy eyelids and thick-framed glasses can all reduce or completely obscure the catchlight.
This can leave the eyes looking less lively.
One simple solution is to lower the main light.
However, there is a trade-off.
Lowering the light moves it into a more frontal position, which reduces the amount of shadow form across the face.
You therefore have a choice.
Do you prioritise the lighting pattern?
Do you prioritise the catchlights?
Or do you simply look for a subject whose face is more catchlight-friendly?
Fortunately, there is another option.
Creating catchlights in post-production
I often keep my main light relatively high and concentrate on getting the head angle and pose right.
If the catchlights aren’t quite working, I can then create or enhance them during post-production.
This is particularly useful when heavy eyelids or glasses obscure part of the natural reflection.
When retouching eyes with heavy eyelids, I remove a little from the top of the artificial catchlight and allow the eyelid to partially obscure it.
That partial obstruction makes the reflection appear more believable.
The same principle applies to glasses.
The catchlight should appear to interact with the glasses frame rather than simply sitting on top of everything.
Creating believable reflections takes some skill because we are extremely sensitive to eyes.
We are very good at detecting tiny inconsistencies in them.
A catchlight can therefore look perfectly convincing at first glance but still feel subtly wrong.
A real example
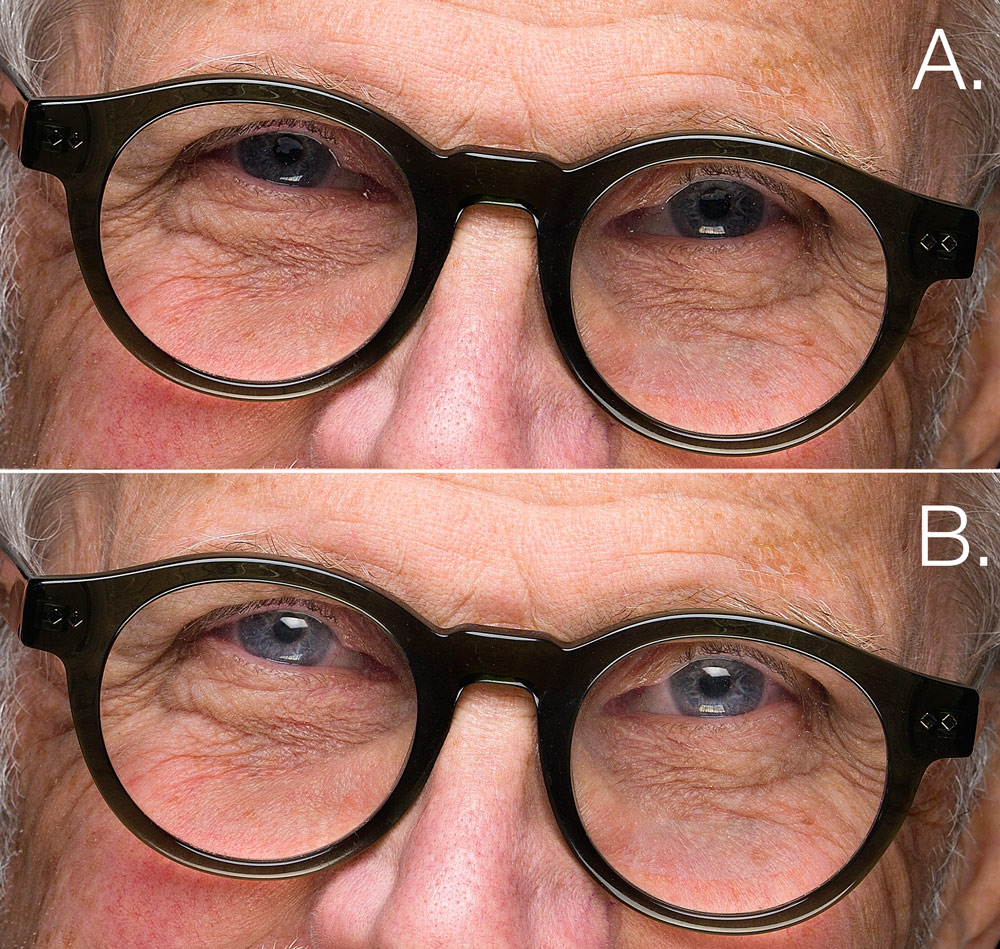
For an example, take a portrait of my friend and willing photo test victim, John Penhall.
John was wearing stylish glasses with relatively thick frames.
I had asked him to jut out and lower his chin slightly to tighten the flesh around his neck.
That produced the facial shape I wanted, but it also meant that the glasses frames blocked the natural catchlights in his eyes.
Rather than compromise the pose, I decided to add the reflections in Photoshop.
I manually created reflections based on the position and shape of my main light.
Importantly, I didn’t place them directly against the eyelids.
Instead, I positioned them slightly lower so that it appeared as though the upper section of the glasses frame was blocking part of the reflection.
That’s a small distinction, but it helps sell the illusion.
There is some flexibility in how much you can cheat.
Our eyes are remarkably sensitive to realism, but we’re not measuring every reflection with a ruler.
You can therefore push things slightly if the result still looks natural.
Don’t make catchlights too bright
Brightening a naturally occurring catchlight is a common retouching technique.
But there is a danger.
Make it too bright and the eyes can start to look unnatural.
How bright is too bright?
Unfortunately, there isn’t a single answer.
It depends on the image, the lighting and the final size of the photograph.
I’ve noticed that when an image is displayed relatively small, you can often get away with brighter catchlights.
With a larger image, excessive brightness becomes much easier to spot.
The key is subtlety.
The size of your light source matters
Catchlights also behave according to the physics of light.
A larger light source produces a larger reflection in the eye.
However, because the same energy is spread across a larger area, the intensity of the reflection decreases.
For example, imagine changing from a 2 × 3-foot softbox to a 4 × 6-foot softbox.
The larger source covers four times the area.
The resulting catchlight is therefore larger, but its intensity is reduced.
This gives us another photographic trade-off.
The larger source produces beautifully soft shadows and a more subdued specular highlight, but the catchlight itself may appear less lively.
You can brighten it in post-production, but again, you need to be careful.
If the light on the face is extremely soft while the catchlight is unnaturally bright, your brain can detect that something doesn’t quite add up.
The visual qualities of the catchlight should make sense in relation to the lighting that produced it.
Creating a realistic catchlight in Photoshop
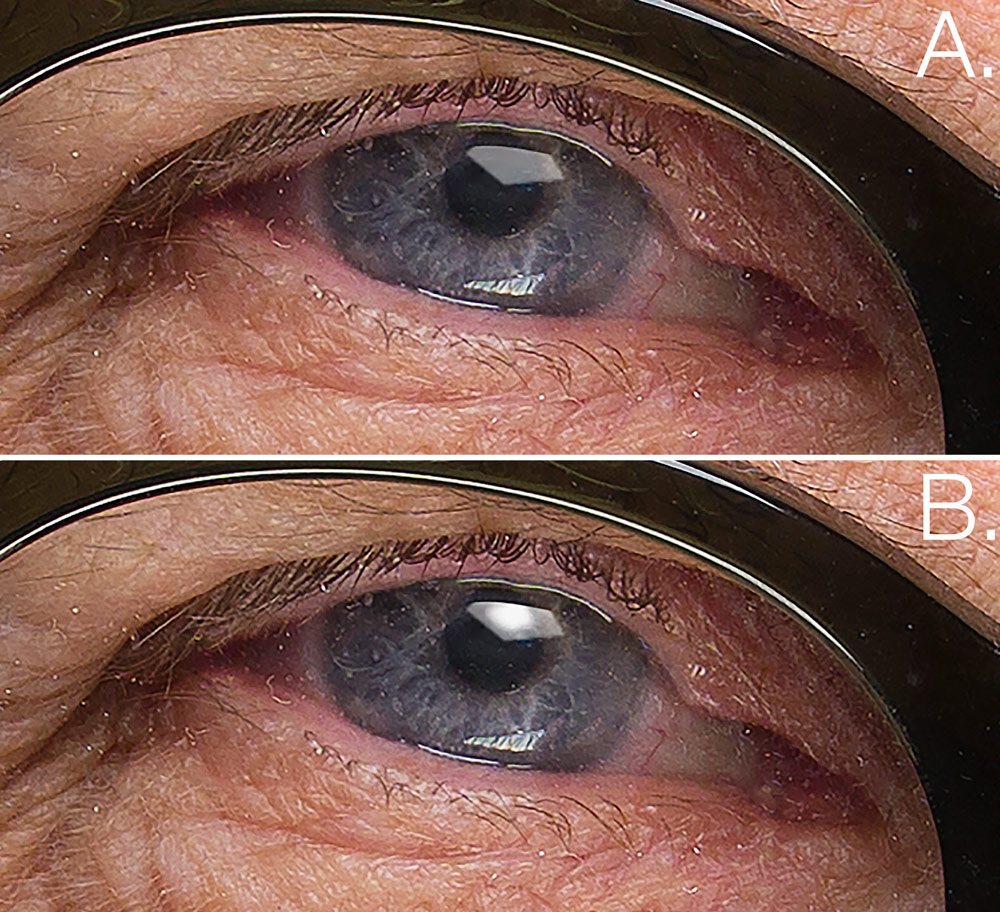
If I need to create a catchlight manually, I use a simple two-layer approach.
Step 1: Create the main catchlight
Create a new layer and make a selection corresponding to the shape and size you want for the catchlight.
Feather the selection slightly — around one pixel is usually sufficient.
Fill the selection with white and then reduce the layer opacity until the reflection looks believable.
The goal here is to create the overall shape and brightness.
Don’t make it perfect yet.
Step 2: Add a brighter centre
Create a second empty layer.
Select the Brush tool and use a brush smaller than the original selection.
Set the brush to a very soft edge and enable the airbrush function.
Use white as the foreground colour and reduce the flow to a relatively low setting, such as 10 or less.
With the original selection still active, place the brush over the centre of the catchlight and add a small amount of white.
The aim is to create a brighter centre while allowing the brightness to fall away gradually towards the edges.
Adjust the opacity of the layer if necessary.
The first layer establishes the overall reflection.
The second adds the punch.
Why the two-layer approach works
The result should resemble the behaviour of a large light source.
The catchlight is relatively large and subdued around its edges but has a brighter central area.
That gives the eye a reflection that looks more like a real light source rather than a simple white blob painted onto the eyeball.
The important thing is not to make it obviously perfect.
Real reflections aren’t perfectly uniform.
Can AI retouching create catchlights?
Modern AI retouching tools can make this process considerably faster.
For photographers working on large numbers of images, that can be attractive.
The downside is control.
I find that many automated tools give you limited control over exactly how the catchlight is shaped, positioned and blended with the existing eye.
For an individual portrait where the eyes are important, I still prefer to create the catchlight manually.
For a large batch of images where time is more important, AI can be a practical solution.
As with any automated retouching, however, check the results carefully.
Eyes are one of the first places where an unnatural edit can become obvious.
Catchlights and specular highlights
Catchlights are really just a particular type of specular highlight — the reflection of a light source from a shiny surface.
This is something product photographers understand extremely well.
Photographing dark or reflective products requires a detailed understanding of how specular highlights behave.
Portrait photographers generally have an easier time because human skin is relatively matte and diffuses much of the reflected light.
The eye is different.
Its wet surface creates a strong reflection, which is why catchlights are so visible.
The same principle also applies to oily or sweaty skin, where specular highlights can become more prominent.
The final balance
Good portrait lighting is often about making compromises.
You might have the perfect lighting pattern but poor catchlights.
You might have beautiful catchlights but a flatter lighting pattern.
A large softbox may produce wonderfully soft light but relatively subdued reflections in the eyes.
Moving the light may improve the catchlights but change the shape of the shadows.
There isn’t always a single technically perfect solution.
For me, the priority is the person.
I’ll concentrate first on getting the head angle and pose right so that the subject looks their best.
Then I’ll worry about the catchlights.
If I can get everything naturally in camera, that’s ideal.
If I can’t, there’s nothing wrong with using Photoshop to finish the job.
The trick is knowing where to stop.
Catchlights should make the eyes look alive — not advertise the fact that you’ve been retouching them.
And that’s how you can have your cake and eat it too.