Controlling Available Light: How to Mix Window Light and Flash
By Dave Montizambert
Available light can produce beautiful results, but it isn’t always as predictable as photographers would like.
Cloud moves across the sky. The sun changes position. The light coming through a window gets brighter or darker. Shadows shift.
For simple photographs, this isn’t necessarily a problem.
For more complex lighting setups, however, changing natural light can make it surprisingly difficult to maintain consistency.
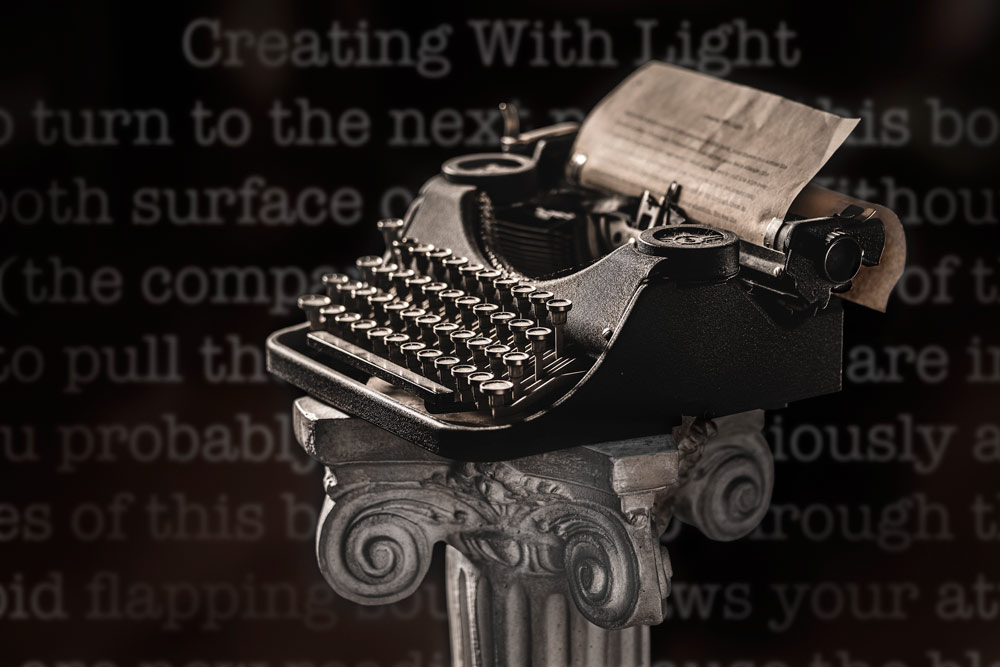
In this lighting exercise, photographer, author and educator Dave Montizambert explores exactly that problem, using an old typewriter and a pedestal as his subject.
The project demonstrates how to start with available window light, introduce studio flash and ultimately take control of the ambient light completely.
From an old typewriter to a lighting exercise
Back in the late 1990s, I wrote my first book, Creative Lighting Techniques.
It was a considerably more involved process than producing a photography book today. The project took around a year to write, while the accompanying images had to be shot on film, scanned and converted to CMYK before hours of colour correction could begin.
To commemorate the project, I created a piece of found art using my mother’s 1950s Underwood typewriter.
I loaded the typewriter with the first page of my book, printed on an old sheet of typewriter paper, and positioned the whole arrangement on a Corinthian column beside my sofa.
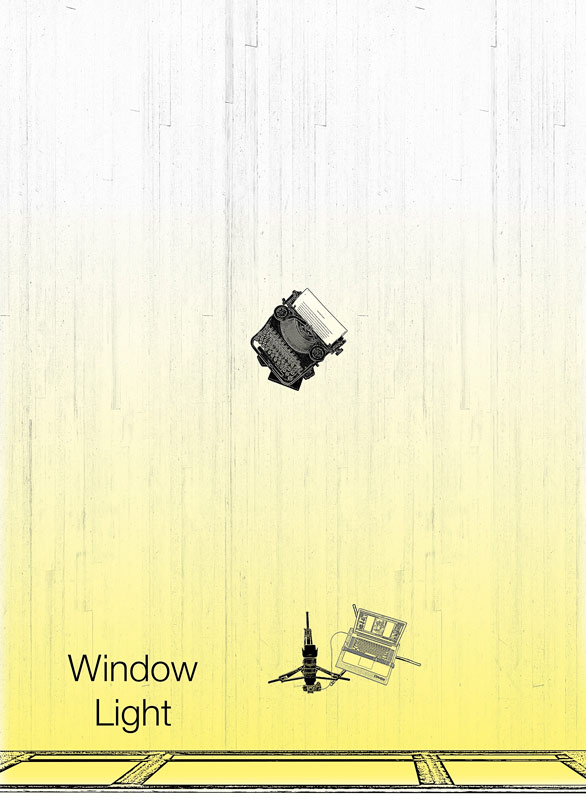
The location had one major advantage: beautiful backlighting from a bank of windows.
For years I looked at the arrangement and thought:
“I really should photograph this.”
Eventually, around 20 years later, I did.
And the resulting image became a useful exercise in controlling available light.
The problem with available light
The typewriter was positioned in an area of the room surrounded by seven large windows.
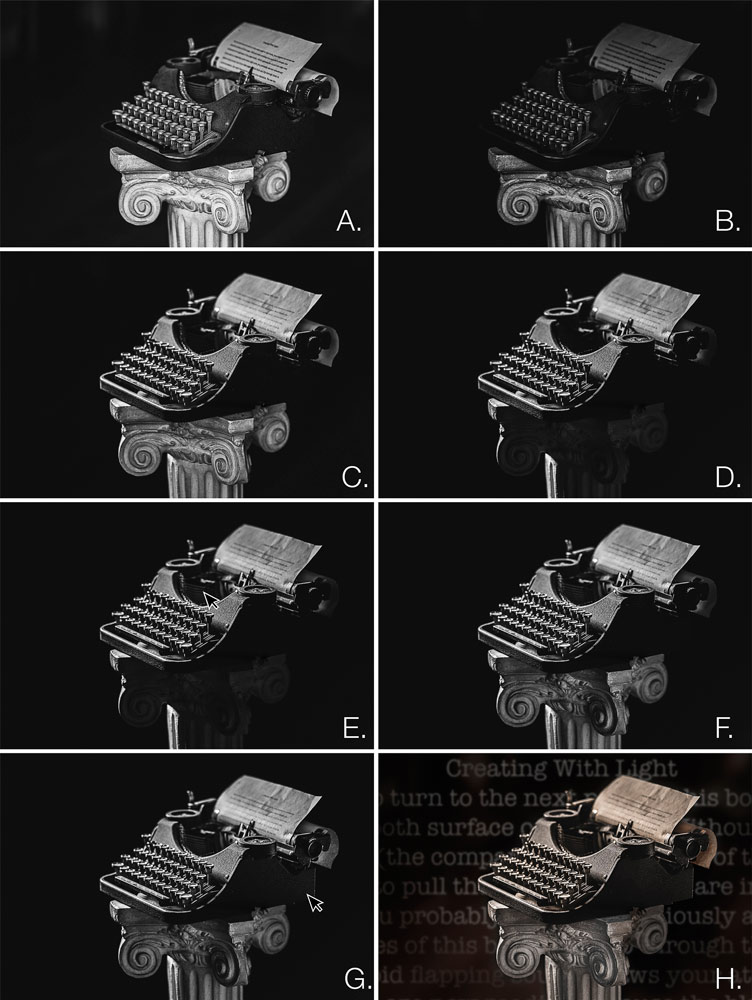
The first approach was simply to photograph the subject using the existing window light.
An incident meter reading showed that at f/2.8 and ISO 100, a shutter speed of 1/15 sec was required for a correct exposure.
The exposure was technically correct, but the resulting image was relatively flat.
The frontal direction of the light also meant that the typewriter and the pedestal competed for attention.
I wanted something with considerably more impact.
Step 1: Underexpose the window light
The first change was to deliberately underexpose the available window light.
I wanted to maintain an aperture of f/2.8, so I increased the shutter speed from 1/15 sec to 1/125 sec.
That reduced the window light by three stops.
The result was a considerably darker image.
But that was exactly what I wanted.
Rather than treating the window light as the main source, I could now use it as a subtle fill light.
This is an important principle when working with available light:
You don’t always have to accept the existing light as your main light.
You can deliberately underexpose it and introduce another light source to take control of the image.
Step 2: Introduce studio flash
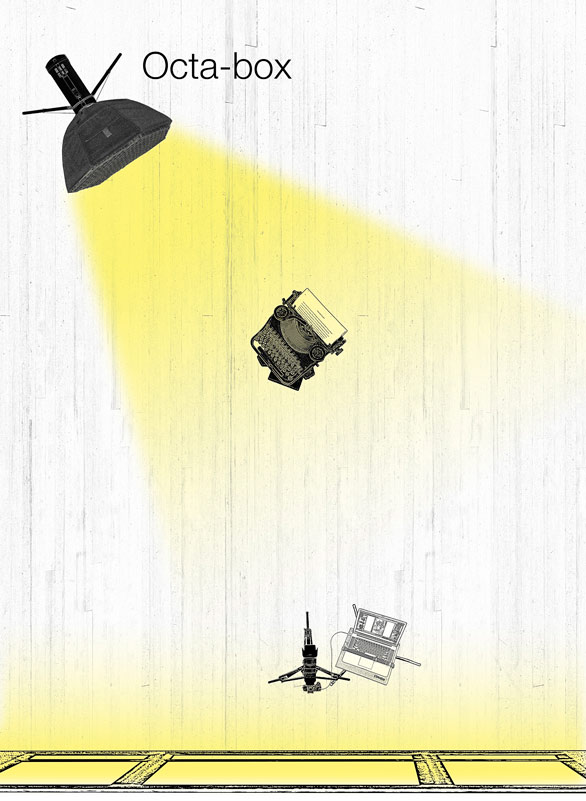
I then introduced a studio strobe fitted with a 22-inch octabox and 30-degree soft grid.
The light was positioned behind and to camera-left of the typewriter.
The grid helped control spill, preventing unwanted light from spreading onto the background.
The result was much more dramatic.
The backlighting created greater depth and gave the typewriter considerably more visual presence.
The window light was still contributing to the photograph, but it was no longer controlling the overall appearance.
Why changing window light can become a problem
This is where the idea behind the title comes in.
Available light is often described as “constant light” because it is always there.
But natural light isn’t necessarily constant.
During the shoot, the conditions changed as clouds moved across the sky, sunlight appeared and disappeared, and the position of the sun changed.
That meant the amount and quality of window light falling on the subject was continually changing.
For a quick photograph, that might not matter.
For a complex lighting setup requiring careful adjustment and fine-tuning, it can become frustrating.
This is one reason studio flash can be such a useful tool.
Rather than allowing the changing ambient light to dictate the result, you can control the dominant light source yourself.
Step 3: Take control of the ambient light
For the final version, I closed the blackout curtains.
This dramatically reduced the amount of window light reaching the subject.
The ambient exposure dropped to approximately minus seven stops.
Now the room was effectively dark from the camera’s point of view, allowing the studio strobe to become the dominant source.
This provided a much greater degree of control.
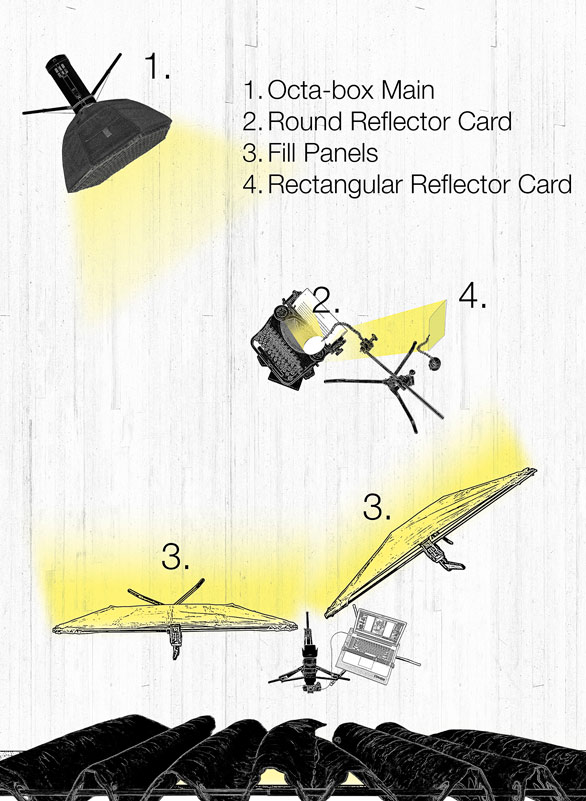
The main light was a 1200Ws monoblock strobe fitted with the 22-inch octabox and 30-degree soft grid.
The light was positioned to produce the desired directional effect across the typewriter.
Using reflectors to control the shadows
Removing the ambient window light created another problem: the shadows became too deep.
The solution wasn’t necessarily more light from another flash.
Instead, I used reflectors.
Two large white panels were positioned to provide general shadow fill.
These brought some detail back into the darker areas without destroying the direction and contrast created by the main light.
Two smaller silver reflector cards were then introduced as accent lights.
One of these created a subtle highlight along the rear edge of the typewriter.
That small highlight was important.
The back of the typewriter was almost entirely black, so without some reflected light it could easily disappear into the background.
The silver reflector created just enough separation to suggest the shape of the object.
Why subtle lighting can be more effective
It’s tempting when lighting a dark object to add plenty of fill.
But more light isn’t necessarily better.
The aim was not to make every part of the typewriter equally visible.
Instead, I wanted to suggest its form through carefully controlled highlights and shadows.
The darker areas create mystery and contrast, while the small highlights provide enough information for the viewer to understand the shape.
This is one of the advantages of working with controlled artificial lighting.
You can decide exactly which parts of the subject need to be seen.
Creating a hybrid black-and-white image
There was another creative decision to make.
The high-contrast lighting suited black-and-white processing particularly well.
However, I also wanted to retain some colour because the warm tones helped reinforce the vintage character of the typewriter, paper and setting.
The solution was to combine the two.
I created a high-contrast black-and-white version of the photograph and then produced a normally processed colour version.
The colour version was placed above the black-and-white layer in Photoshop.
I then changed the blend mode from Normal to Colour and reduced the opacity to approximately 70%.
This allowed the colour information to influence the monochrome image without changing the high-contrast tonal structure.
The result was a hybrid image combining the visual impact of black and white with the warmth of colour.
Adding the book page
The final creative element was the background.
To reinforce the connection between the typewriter and the book I had written decades earlier, I created a background featuring the first page of the book’s manuscript.
Photoshop’s AI-powered selection and background tools helped with this stage of the process.
The result brought the entire concept together.
The photograph wasn’t simply a picture of an old typewriter.
It had become a visual representation of the history behind it.
The lighting setup
The final setup used a combination of controlled flash, white reflectors and silver reflector cards.
Camera
- Full-frame mirrorless camera
- 70–200mm lens
- Focal length: 110mm
- Aperture: f/2.8
- Shutter speed: 1/125 sec
- ISO: 100
Main light
- 1200Ws monoblock strobe
- 22-inch octabox
- 30-degree soft grid
- Light positioned approximately 71 inches from the centre of the keyboard
- Light height: approximately 58.5 inches
Fill
Two large white reflector panels were used to provide approximately three stops of shadow fill.
Accent lighting
Two silver reflector cards were used to create controlled highlights and edge separation.
Ambient window light
The original window-light exposure was:
f/2.8 at 1/15 sec, ISO 100
At the final camera setting of f/2.8 at 1/125 sec, the window light became approximately three stops underexposed, allowing it to act as a subtle fill source.
The lesson: available light doesn’t have to control you
The most important lesson from this exercise isn’t really about photographing a typewriter.
It’s about understanding the relationship between ambient light and controlled light.
Natural light can be beautiful.
But it changes.
If you need absolute consistency, studio flash gives you another level of control.
You can deliberately underexpose the ambient light, introduce flash as the main source, and then use reflectors to fine-tune the shadows.
The result is a lighting setup that is far more predictable.
And that gives you the freedom to concentrate on the photograph rather than constantly chasing the changing light outside the window.
Three approaches to available light
The exercise demonstrates three useful approaches that photographers can apply to their own work:
1. Use the available light
Let the window light become your main source and work with whatever it gives you.
This is quick, natural and often beautiful.
2. Combine available light with flash
Underexpose the ambient light and introduce flash as the dominant source.
This gives you greater control while retaining some of the character of natural light.
3. Eliminate the ambient light
Block the window light and allow your flash to become the primary source.
This provides the greatest consistency and control, particularly for complex or time-consuming setups.
None of these approaches is inherently better.
The important thing is understanding that you have a choice.