How to Create a Photography Calendar: Design, Printing and Selling Tips
A photography calendar can be much more than a collection of attractive images.
For photographers, it can become a product to sell, a promotional tool for clients or simply a way of turning a portfolio into something tangible that people can enjoy throughout the year.
Despite the convenience of calendars on smartphones and computers, there is still something appealing about a physical calendar hanging on the wall.
It can be checked at a glance, used for appointments and birthdays, and — unlike a digital calendar — it remains visible throughout the year.
For photographers, that visibility can be particularly valuable.
Why create a photography calendar?
A well-designed photography calendar has one major advantage over many forms of marketing: it stays in front of the recipient for months.
A leaflet may be thrown away.
An email can disappear into an inbox.
A social media post can be forgotten within hours.
A good calendar, however, can remain on a wall for an entire year.
That makes it particularly interesting as a promotional product.
A wedding photographer could create a calendar featuring beautiful wedding images. A landscape photographer could produce a collection of seasonal landscapes. A wildlife photographer could create a year of animal portraits.
Commercial photographers could even produce calendars for clients featuring their products, premises or employees.
The possibilities are considerable.
Start with the photographs
The most important part of a photography calendar is, unsurprisingly, the photography.
Before thinking about fonts, colours or software, decide what the calendar is actually about.
You might create a theme around:
- landscapes
- wildlife
- pets
- architecture
- travel
- cars
- sport
- flowers
- local photography
- seasonal images
- portraits
- a particular location
A strong theme makes the calendar feel like a coherent product rather than twelve unrelated photographs.
Think about the whole year
Choosing twelve photographs simply because they are your twelve favourite images can produce a disappointing calendar.
Consider whether the images work together.
Do they have a consistent visual style?
Do they provide variety?
Could some images be associated naturally with particular months?
For example, a landscape photographer might use snow and winter scenes early in the year, spring flowers around April and May, summer landscapes during the warmer months and autumn colour towards October and November.
The photographs don’t have to literally represent the month, but a subtle seasonal connection can make the calendar feel more considered.
Leave room for the calendar
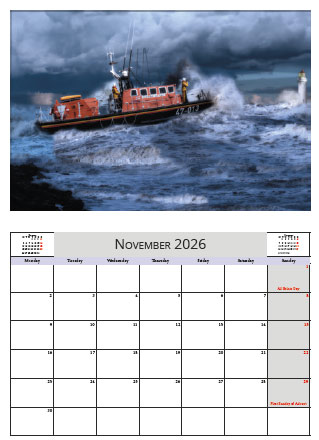
One of the easiest mistakes is designing twelve beautiful photographs and then trying to squeeze a calendar onto them afterwards.
The image and calendar need to work together.
Think about where the dates will sit before choosing the final crop.
If the calendar occupies the lower third of the page, you need to ensure that the photograph still works with that area covered by text.
Alternatively, you might create a separate area for the calendar grid.
For a commercial calendar, this can be particularly important because you may also need space for a logo, website address or contact information.
How much information should a calendar contain?
Keep the calendar useful.
People will want enough room to write appointments, birthdays and reminders.
A visually impressive calendar that provides tiny date boxes may look good but quickly become frustrating to use.
Consider whether you need to include:
- UK bank holidays
- school holidays
- religious holidays
- sporting events
- moon phases
- local events
- important dates for your target audience
A specialist calendar can use these details to its advantage.
For example, a sports photographer could include major sporting dates, while a wildlife photographer might highlight important conservation dates.
The key is relevance.
Designing the calendar
There are many ways to create a calendar.
For a simple project, you could assemble the pages manually.
For a professional calendar, however, dedicated layout software provides considerably more control.
Applications such as Adobe InDesign, Affinity Publisher and CorelDRAW are particularly useful because they are designed to work with multi-page documents.
This makes it easier to maintain consistent typography, margins, page sizes and positioning across the entire calendar.
Once the basic design is established, repeating elements can be controlled globally rather than modified individually on every page.
That can save a considerable amount of time.
Don’t type every date manually
This is one of the most important practical lessons.
Do not manually enter every date into your calendar unless you absolutely have to.
A single incorrect date can make the calendar unusable and, if your business name appears on it, potentially damage your reputation.
Instead, use a calendar generator, template or automated workflow.
Spreadsheet software can also be useful for generating calendar data.
The advantage of creating the dates separately is that you can check them independently before importing them into your design.
For more sophisticated workflows, design software such as InDesign can be combined with scripts or data-driven techniques to generate calendar layouts automatically.
Creating calendars in InDesign
Adobe InDesign is particularly well suited to calendar design because it combines multi-page documents with sophisticated typography, master or parent pages, paragraph styles and scripting.
A typical workflow might be:
- Create the document at the final printed size.
- Set the margins and bleed.
- Establish the calendar grid.
- Create paragraph and character styles.
- Set up the image area.
- Add recurring branding elements.
- Generate or import the calendar dates.
- Add holidays and other relevant dates.
- Populate each month with the appropriate photograph.
- Check the entire document before exporting a print-ready PDF.
Parent pages are particularly useful for elements that need to appear repeatedly.
For example, a logo, page number, website address or decorative element can be placed on a parent page rather than manually recreated twelve times.
Affinity Publisher is another option
You don’t necessarily need Adobe InDesign to produce a professional calendar.
Affinity Publisher can also handle multi-page calendar projects and provides the layout tools required for professional print work.
For photographers who already use Affinity Photo, Publisher can be an attractive option because the applications work well together.
The important thing isn’t necessarily which application you choose.
It’s understanding the principles of good layout and preparing the final artwork correctly for your printer.
Choosing the right calendar format
The format will have a major effect on both the appearance and cost of your finished calendar.
Common options include:
- A4
- A3
- square formats
- portrait
- landscape
- spiral-bound calendars
- wire-bound calendars
- desk calendars
A square format can work particularly well for photography because it gives the image considerable space while retaining a compact overall shape.
A3 calendars provide a much larger viewing area and can make dramatic landscape or wildlife photography particularly effective.
Think about where the calendar is likely to be displayed.
A calendar intended for a kitchen wall has different requirements from one designed to sit on an office desk.
Preparing your photographs for print
Your photographs may look excellent on a monitor but still produce disappointing printed results if the files aren’t prepared correctly.
Before sending artwork to a printer, check:
- image resolution
- colour space
- image dimensions
- bleed requirements
- safe areas
- sharpening
- black levels
- overall contrast
- PDF settings
Always check the printer’s artwork specifications before beginning the design.
Different printers and products can have different requirements.
If the printer supplies an artwork template, use it wherever possible.
Don’t forget the bleed
If an image runs all the way to the edge of the printed page, the artwork will normally need to extend beyond the final trim line.
This is called the bleed.
The exact amount required varies between printers, so check the specification before preparing your document.
Failing to include sufficient bleed can result in unwanted white edges after trimming.
It’s a small technical detail, but an important one when producing a professional product.
Proof the calendar carefully
Calendar design has one particularly unpleasant trap.
You can create twelve beautiful pages, print thousands of copies and only then discover that one of the dates is wrong.
Proofread the calendar carefully.
Check:
- every month
- every date
- days of the week
- leap years
- bank holidays
- additional dates
- spelling
- website addresses
- telephone numbers
- social media information
- photographer or company branding
Ideally, have someone else proof it as well.
A fresh pair of eyes will often find mistakes that the designer has become blind to.
How many calendars should you print?
This is where the business side becomes important.
Most professional calendar printers offer different quantities, with the unit cost generally falling as the print run increases.
But don’t automatically order thousands simply because the per-unit price is lower.
Think about how many you realistically expect to sell or distribute.
If you’re testing a new product, a smaller initial print run may be much less risky.
Once you know that customers like the calendar, you can increase production in future years.
Selling photography calendars
A calendar can be an effective additional product for photographers.
Landscape photographers could sell calendars through their websites.
Wildlife photographers can use them to support conservation projects.
Wedding photographers could create calendars for venues or suppliers.
Commercial photographers could produce bespoke calendars for businesses.
And local photographers can create calendars celebrating their area.
The key is to treat the calendar as a product rather than simply another collection of photographs.
Consider:
- who will buy it?
- what makes it different?
- what size should it be?
- how much will it cost to produce?
- what will you charge?
- where will you sell it?
- how will you package it?
- how will you fulfil orders?
Calendars as promotional products
You don’t necessarily have to sell the calendar.
A business-branded calendar can also be an excellent marketing tool.
Imagine a photographer giving their best commercial clients a calendar featuring twelve of their strongest images.
The recipient sees the photographer’s work every month.
That creates repeated exposure without requiring another email, advert or social media post.
For businesses, the same principle applies.
A company calendar featuring its products, premises or people can keep its brand visible throughout the year.
The calendar can become part of your photography business
The real attraction of calendars is their versatility.
They can be:
- a product
- a gift
- a promotional item
- a portfolio
- a marketing tool
- a fundraiser
- a commercial commission
For photographers looking for additional revenue streams, that makes the humble wall calendar worth considering.
And unlike many digital products, a physical calendar has a presence.
It occupies space.
It gets used.
People look at it repeatedly.
That physical connection is precisely what makes a well-designed photography calendar such an effective photographic product.
Final thoughts
Creating a photography calendar doesn’t have to be complicated.
The most important decisions are actually made before you open the design software.
Choose a strong theme, select photographs that work together, design the calendar around the images and make sure the finished product will be useful as well as attractive.
Then choose the right software and printing process for the scale of your project.
Most importantly, check every date before you send the file to print.
A great photograph might make someone buy your calendar, but an accurate, well-designed and genuinely useful calendar is what will keep it on their wall for the next twelve months.