Portrait Lighting Techniques: Creating Dramatic, Moody Portraits
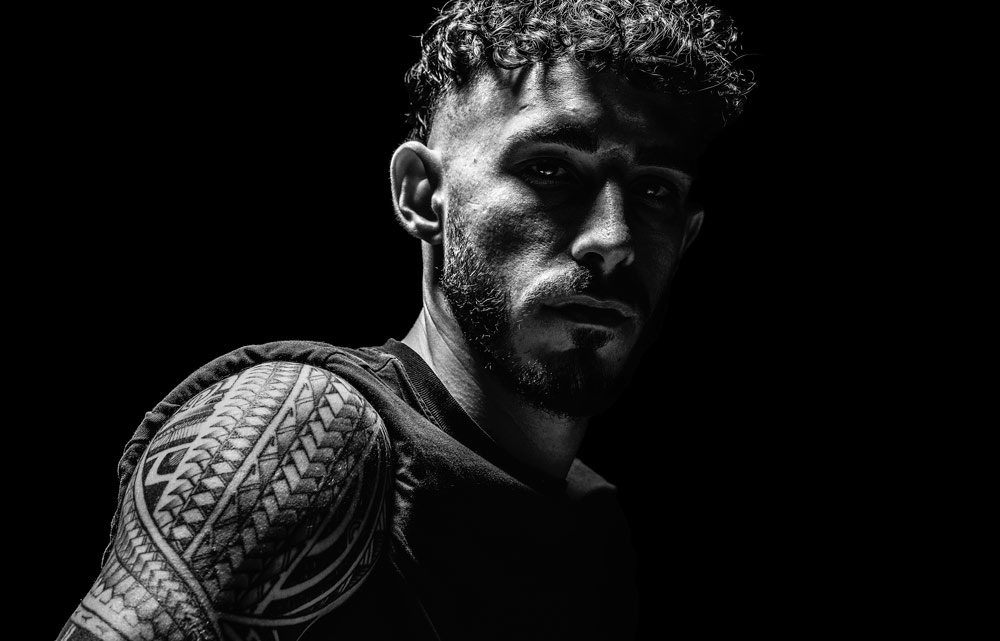
Dave Montizambert explores how understanding light can help photographers move beyond conventional portrait lighting and create more dramatic, controlled images.
Portrait lighting doesn’t have to follow a fixed set of rules.
The traditional approaches to lighting are excellent starting points, but they are guidelines rather than laws. Once you understand what those guidelines are designed to achieve, you can begin to experiment with breaking them.
That’s particularly true when creating dramatic, low-key portraits where shadow, contrast and catchlights become important parts of the image.
I recently gave my second annual lecture and workshop at the University of Nîmes in southern France. My previous session had focused on the fundamentals of portrait lighting, but this time I wanted to take the students further.
The aim was to explore what happens when you understand the principles of lighting well enough to deliberately step outside the norm.
One demonstration in particular focused on creating a mysterious portrait with most of the face deliberately left in shadow.
Breaking the Rules of Portrait Lighting
One of the first things I wanted the students to understand was that the “rules” of portrait lighting are really starting points.
They help you produce decent images in most situations, but following them rigidly doesn’t necessarily result in imaginative photography.
The challenge is to understand why a lighting technique works.
Once you understand that, you can change it deliberately rather than simply experimenting randomly.
For the demonstration, I worked with Lucas Amiel, one of the workshop models.
He wasn’t a professional model, but that didn’t matter. Finding the right subject for a particular concept is often more important than whether that person happens to work professionally as a model.
This is one reason photographers carry out test shoots. You are looking for the right combination of subject, concept, styling, lighting and environment.
Creating a Dark and Dramatic Portrait
The concept for the portrait was straightforward:
Create a mysterious, dramatic image by leaving most of the face in shadow while keeping some life in the eyes.
The result depended on carefully controlling two different aspects of the lighting.
The face needed to remain predominantly dark, while the eyes still needed strong, visible catchlights.
This is where understanding the relationship between the main light and fill light becomes important.
Catchlights Don’t Have to Come From the Main Light
A common assumption is that the catchlights visible in a portrait should come from the main light.
They don’t.
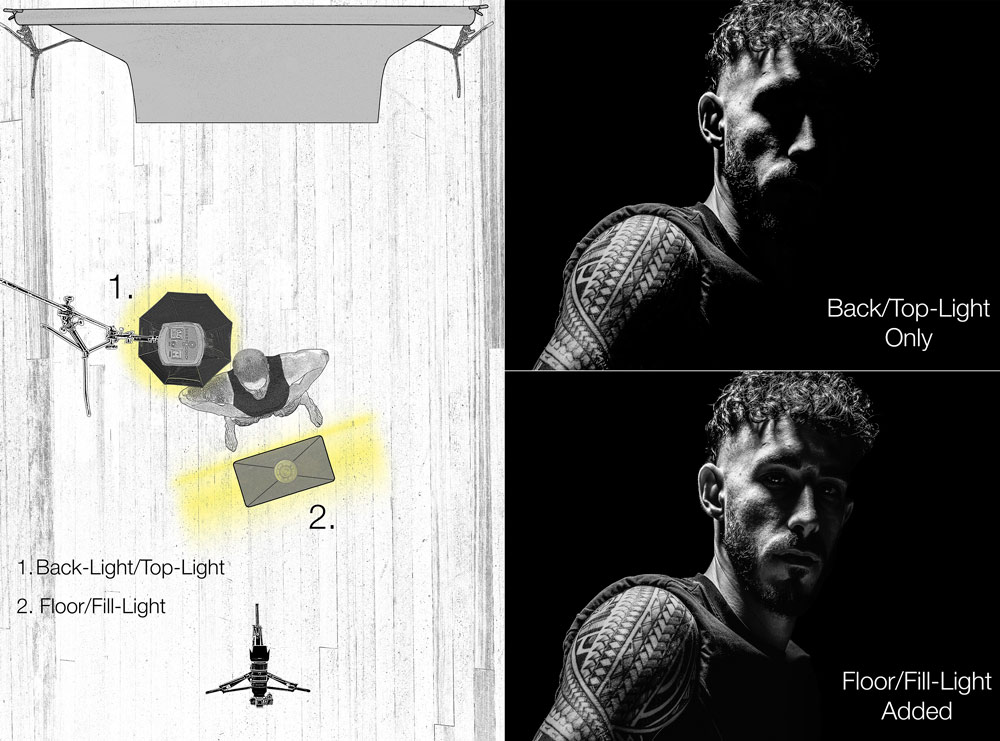
In this image, the catchlights were created by the fill light.
That allowed me to control the brightness of the subject’s face independently from the brightness of the catchlights in the eyes.
This is a useful concept for portrait photographers because it gives you another level of control over the final image.
Controlling the Brightness of the Face and Eyes
The relationship between the light source and the subject is crucial.
By changing the size and distance of the fill light, you can alter the amount of light reaching the shadowed side of the face while also changing the appearance of the reflection in the eyes.
For the Lucas portrait, the fill light was deliberately kept very low in relation to the main exposure.
The light hitting the shadowed side of his face measured approximately four stops below the main exposure using an incident meter.
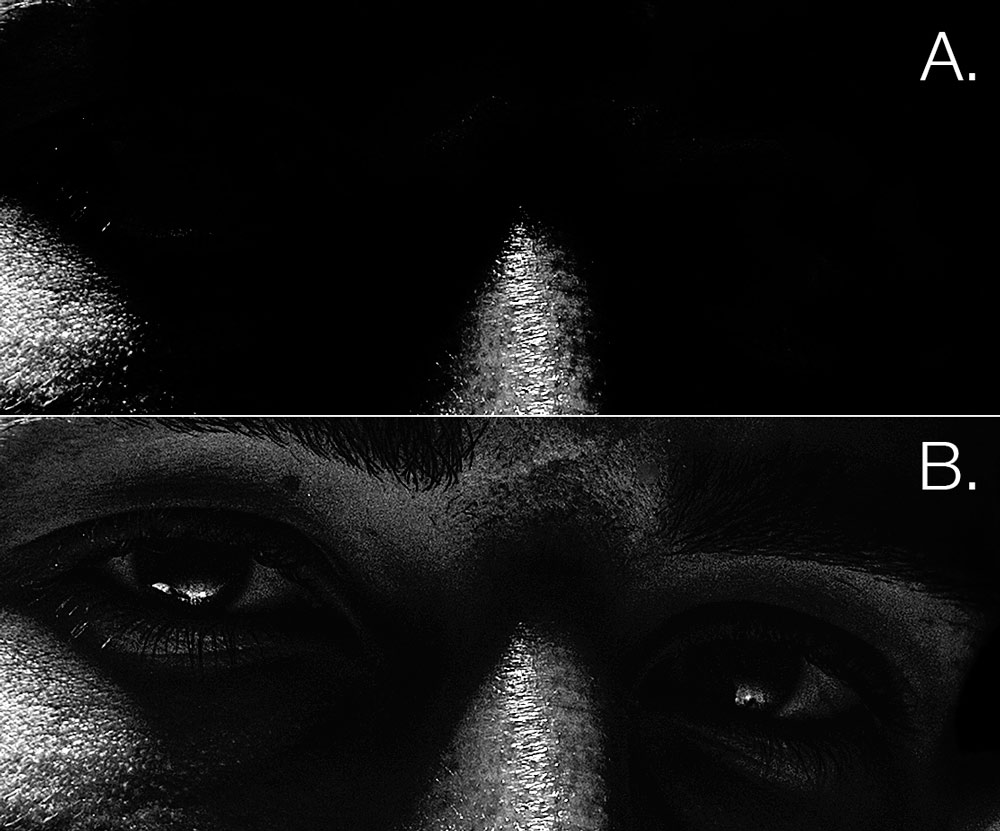
Despite that, the brightest areas of the catchlights in the eyes reached approximately 99% on Photoshop’s Brightness scale.
How is that possible?
The answer lies partly in the nature of the eye itself.
The catchlights were tiny reflections—only a couple of pixels in some areas—created by the direct strobe tube.
Around those bright points were softer reflections caused by light bouncing from the textured silver interior of the modifier and then reflecting again from the wet surface of the eye.
In other words, we were seeing reflections of reflections.
Using a Strip Bank in an Unusual Way
The fill light was a strip bank positioned on the floor in front of Lucas.
Rather than using the modifier in its conventional form, I removed the front diffusion panel and inner baffle.
This exposed the strobe tube and the silver interior of the modifier.
The result was a much more broken-up, specular reflection in the eyes.
This mattered because leaving the diffusion materials in place would have created much more predictable rectangular reflections.
Those reflections can look perfectly acceptable, but they would have had a much more obvious studio appearance.
By exposing the internal structure of the modifier, the catchlights became less uniform and more organic.
That helped support the mysterious, environmental feel of the portrait.
Why Understanding Light Matters
It would be possible to arrive at this type of image through trial and error.
You could move the lights around, change the power, adjust the modifier and take photograph after photograph until something looks right.
But that isn’t an efficient way to work.
Understanding the theory behind lighting allows you to predict what is likely to happen before you press the shutter.
If you understand how distance, size, direction and intensity affect your subject, you can make deliberate decisions rather than relying on luck.
That’s particularly important when you’re working with a client and have limited time to get the image.
Creativity and Technical Knowledge
Photography is often described as a creative pursuit, and rightly so.
Composition, colour, concept, timing and the relationship you build with your subject can all have a huge influence on the final photograph.
But creativity alone isn’t enough.
Photography is both art and science.
Technical knowledge doesn’t restrict creativity. When it becomes second nature, it can actually give you more creative freedom.
The more confidently you understand your equipment and lighting, the less time you need to spend thinking about the mechanics of making the photograph.
That leaves more mental space for the creative decisions.
Don’t Let Technical Knowledge Intimidate You
Many photographers find the technical side of photography intimidating.
Lighting theory can initially seem complicated, particularly when you encounter unfamiliar terminology, measurements and equipment.
But you don’t need to understand everything at once.
Start with one concept.
Learn what changing the distance between a light and your subject does.
Then explore what happens when you change the size of the source.
Experiment with the direction of the light.
Change the ratio between your main and fill lights.
Then look carefully at the results.
The important thing is to turn theory into practical understanding.
Practice Before the Client Arrives
One of the biggest mistakes a photographer can make is treating a paid assignment as the place to experiment with unfamiliar equipment.
If you’ve just bought a new light or modifier, test it before you use it on a client shoot.
If you’re trying a new lighting technique, practise it first.
A technique that looks straightforward in a YouTube video can behave very differently when you actually put it into practice.
The more familiar you become with your equipment, the more confidently you can use it when the pressure is on.
Build Your Lighting Skills Through Discipline
Technical ability develops through practice.
Think of discipline as a muscle: you strengthen it through regular use.
You don’t need to spend hours every day in the studio.
Try setting aside just 15 minutes, three or four times a week, to practise a lighting technique or revisit an area of theory.
Take one light and experiment.
Move it closer.
Move it further away.
Change its height.
Change the modifier.
Add a fill light.
Remove it.
Photograph the same subject repeatedly and pay attention to what changes.
Over time, those experiments build an instinctive understanding of light.
Eventually, you stop having to think consciously about every technical decision.
That’s when the real creative freedom begins.
Moving Beyond the Rules
The best reason to learn the rules of portrait lighting is so that you understand when and why to break them.
A conventional lighting setup might produce a technically sound portrait, but there is no reason to stop there.
Try putting the subject deeper into shadow.
Try creating catchlights with a different light source.
Try deliberately underexposing part of the face.
Try unusual modifiers or positions.
The important thing is that the decision should be deliberate.
Experimentation is part of photography, but knowledge allows you to experiment with purpose.
Final Thoughts
The dark portrait of Lucas was designed to challenge assumptions about what portrait lighting should look like.
The catchlights didn’t come from the main light.
The fill light was several stops below the main exposure.
Most of the face was deliberately allowed to fall into shadow.
And the modifier itself was altered to create a less predictable reflection in the eyes.
None of those decisions were accidental.
That’s the real value of understanding lighting.
Once the technical principles become second nature, you can stop worrying about whether you’re following the rules and start thinking about what you want the photograph to say.
Creativity and technical knowledge aren’t opposites. Combine the two, and you have far more control over the images you create.
So don’t overthink it.
Pick one lighting technique, set up a light and start practising.