How to Photograph Glass: It’s All About Contrast
Creating With Light by Dave Montizambert
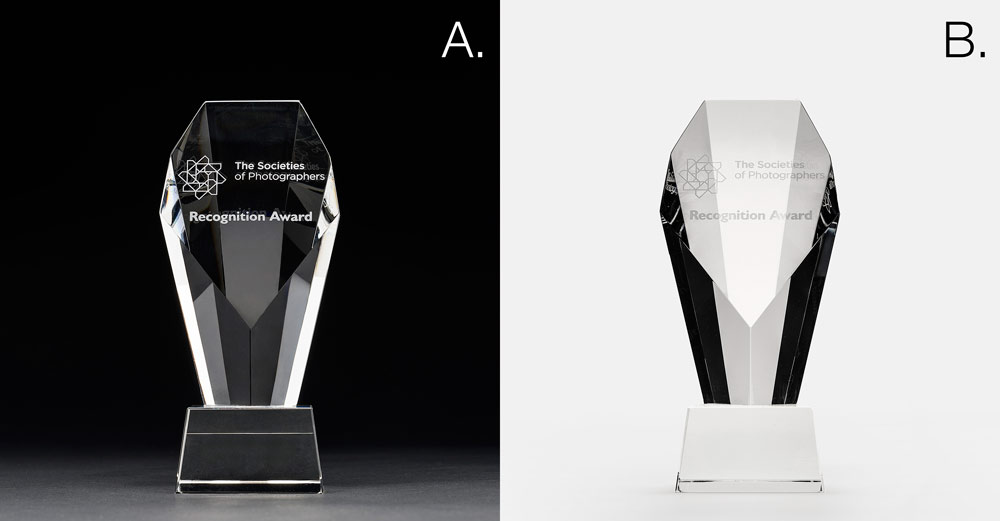
Photographing glass can be surprisingly difficult.
Unlike a solid object, glass doesn’t have a single inherent tone that can simply be exposed correctly. What you see through glass depends on the surfaces and objects surrounding it, while reflections and refractions can dramatically change its appearance.
The key to successful glass photography is therefore contrast.
Rather than trying to light the glass itself, the photographer needs to control what the glass reflects and what can be seen through it.
Why is glass difficult to photograph?
When photographing a conventional subject, we can create shape and form by placing light and shadow across its surface.
Glass is different.
It has no unique tone of its own. The apparent tone of the glass is largely determined by the surfaces visible through it and the reflections appearing on its surface.
This means there isn’t really a single “correct exposure” for glass.
A clear glass object photographed against a black background may appear predominantly black, while exactly the same object photographed against a white background may appear predominantly white.
The lighting therefore needs to be designed around the surroundings rather than simply pointing a light at the glass.
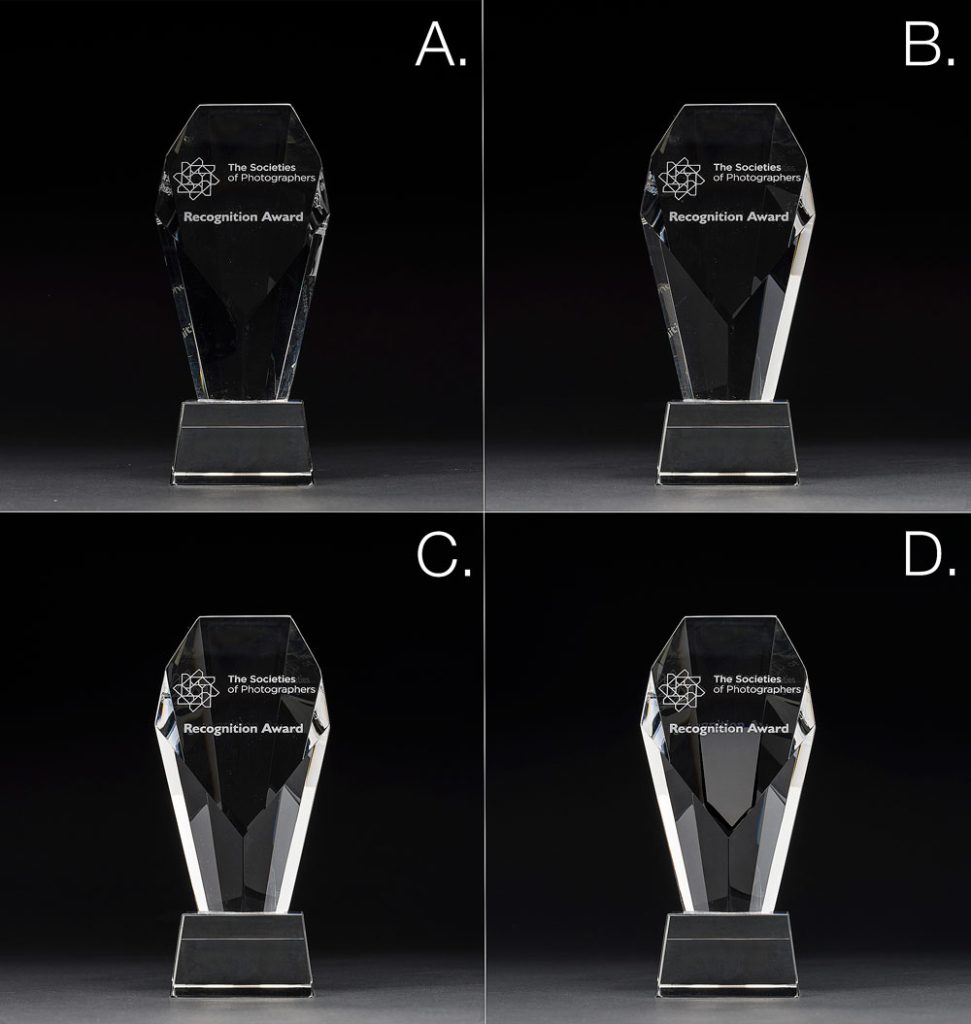
Lighting glass is all about contrast
The fundamental principle is simple:
Lighting creates contrast, and contrast reveals shape and form.
Consider a white wedding dress. Because the dress is already very close to white, adding a bright specular highlight isn’t necessarily the best way to reveal its shape. A shadow provides greater contrast against the white surface.
Glass works differently because its appearance is determined by what surrounds it.
If the glass is surrounded by dark surfaces, we can introduce lighter reflections to reveal its edges and shape.
If it is surrounded by light surfaces, we can use dark cards or flags to create darker reflections.
The basic rule
The principle can be reduced to two simple rules:
Glass against a dark background:
Use light-coloured surfaces to create reflections in the glass.
Glass against a light background:
Use dark surfaces or black cards to create contrast in the glass.
This is the foundation of successful glass lighting.
Why reflections reveal the shape of glass
Glass is highly reflective.
Although we cannot create a conventional shadow directly on the transparent surface, we can control the reflections appearing on it.
We can also create shadows and changes in tone on the surfaces behind and around the glass. These become visible through the transparent material and help reveal its shape.
The glass bends and refracts the light coming from these surrounding surfaces, producing changes in brightness and contrast that describe its form.
This is why simply lighting the glass itself isn’t necessarily the answer.
Instead, think about what the glass is seeing.
Lighting a glass award against a black background
For this example, I placed a glass award on a black tabletop.
Initially, the award appeared predominantly black because it was reflecting the dark surroundings.
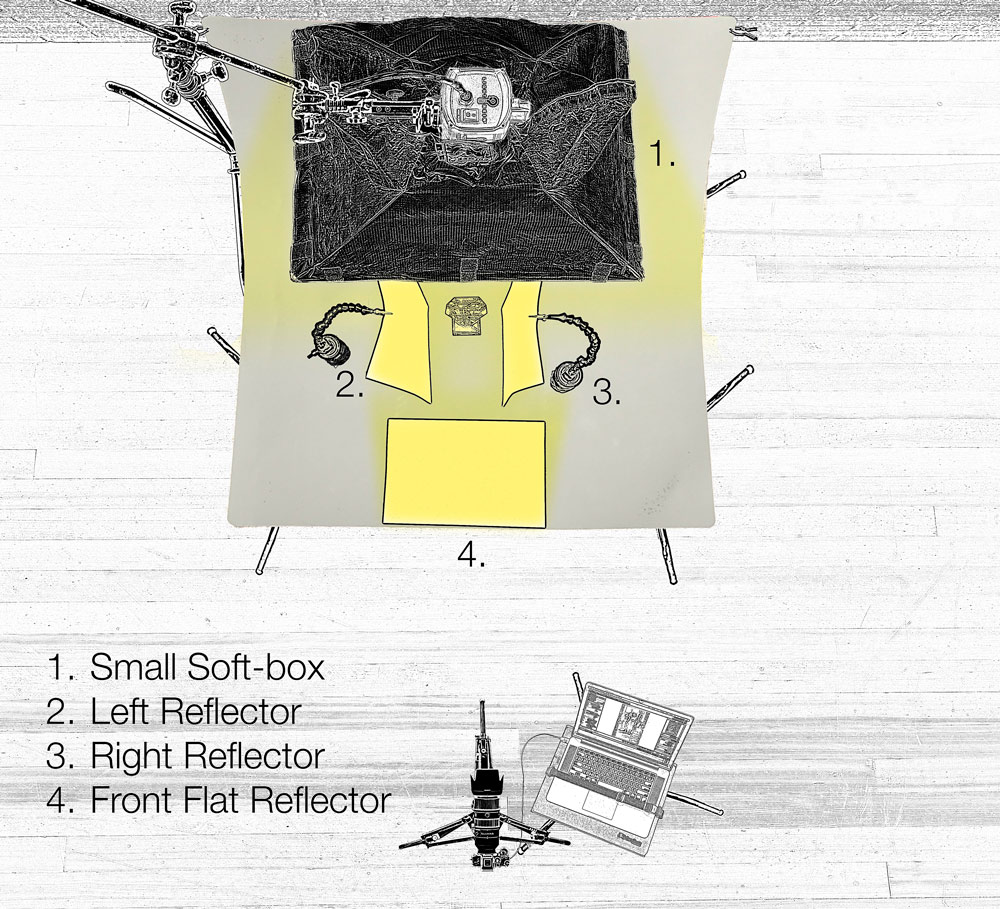
I then placed a 60 × 91cm (2 × 3ft) softbox fitted with a studio strobe above the subject.
The position of the softbox relative to the camera created reflections along the edges and around the engraved areas of the award.
This immediately gave the glass much more definition.
Adding white reflectors
The next step was to introduce controlled reflections.
A piece of white office paper was positioned to camera-left of the award and angled so that it caught light from the overhead softbox.
The paper then became a bright reflective surface visible in the glass.
This produced a specular highlight on the inside surface of the opposite side of the award.
Glass with multiple facets can be particularly challenging because every surface can reflect something different.
The same technique was then repeated on the opposite side.
A third piece of white paper was placed flat on the tabletop, just outside the camera’s frame.
This created another reflection across the front-facing cut of the glass.
The result was a series of controlled highlights that emphasised the different facets of the award.
These highlights also gave the object a more precious, jewel-like appearance.
Control the brightness of the reflections
The brightness of the reflections doesn’t necessarily require additional lighting.
Instead, simply changing the angle of the reflective paper can alter the amount of light it receives from the softbox.
This provides a surprisingly precise way of controlling the brightness and position of the reflection.
It is a useful reminder that when photographing reflective objects, the position of the light source isn’t the only thing you need to control.
You also need to control the position and angle of the surfaces being reflected.
Always judge the reflections from the camera position
There is an important practical lesson when working with glass.
The effect of a reflector or black card depends heavily on the viewing angle.
A piece of white paper may look perfectly positioned when viewed from beside the camera but produce almost no useful reflection from the actual shooting position.
This is why I recommend positioning reflectors and black cards while viewing the image through the camera.
I often shoot tethered for this reason, using Live View on a nearby phone, laptop or tablet.
You can then see exactly what the glass is reflecting and make small adjustments to the position of your cards and reflectors.
With reflective subjects, those small movements can make a dramatic difference.
Photographing the same glass against a white background
The white-background version uses essentially the same principle, but the lighting strategy is reversed.
The softbox remains in the same overhead position.
The black tabletop is replaced with white seamless paper.
The white reflective surfaces are then replaced with black cards positioned to either side of the award.
These black cards selectively block the white background from the glass, creating dark reflections and giving the transparent object definition.
No black card was needed at the front because the existing reflections provided sufficient definition.
That’s essentially the entire lighting change.
Why the black background was easier
Interestingly, the black-background version proved easier to light.
The engraving on the award also appeared more strongly defined against the black background.
With the white-background version, additional processing was required to make the engraving stand out.
The lesson is that the background isn’t simply a cosmetic choice when photographing glass.
It fundamentally changes the lighting problem.
A simple approach to photographing glass
If you’re struggling with a glass subject, start by asking one question:
What does the glass need to reflect to reveal its shape?
Then work backwards.
If the surrounding area is dark, introduce white or light-coloured reflective surfaces.
If the surroundings are light, introduce black cards or flags.
Don’t think of the glass as something you simply illuminate.
Think of it as a reflective and refractive surface that records the environment around it.
Once you start thinking in those terms, photographing glass becomes much more predictable.
The key principles
- Glass has no unique inherent tone.
- Its apparent tone comes from its surroundings and reflections.
- Contrast is what reveals its shape.
- Against dark surroundings, use light-coloured reflectors.
- Against light surroundings, use black cards or flags.
- Move reflectors while viewing the effect from the camera position.
- Small changes in angle can make a significant difference.
- Tethered shooting or Live View can make positioning much easier.
- The background influences the entire lighting strategy.
Final thoughts
Glass photography can initially appear difficult because traditional lighting principles don’t always apply.
Once you stop trying to “light the glass” and instead start controlling what the glass reflects, the process becomes much easier to understand.
The objective isn’t to find a single correct exposure for the glass.
It’s to create the right contrast to describe its form.
That principle applies far beyond glass awards. It can be used when photographing bottles, glassware, crystal, ornaments, jewellery and many other transparent or highly reflective subjects.