Panorama Photography: How to Get Consistent Exposure, Focus and Colour
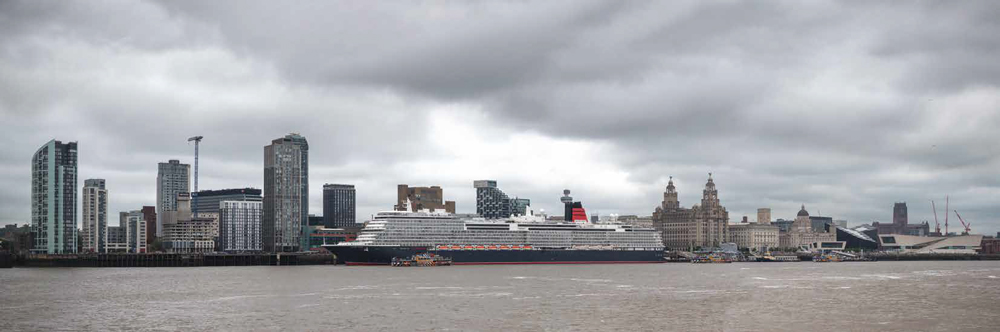
Learn how to shoot panorama photographs with consistent camera settings and process your RAW files for a seamless final image.
Creating a successful panorama isn’t simply a case of taking a series of photographs and letting your software stitch them together.
The quality of the finished panorama is heavily influenced by what happens before you press the shutter.
If exposure, white balance, focus, aperture or focal length changes between frames, the software has to work much harder to produce a convincing result. In difficult cases, differences between individual frames can remain visible even after the images have been stitched together.
The good news is that most of these problems can be avoided by taking control of your camera settings before you start.
Why consistency matters when shooting panoramas
A panorama is made by combining several overlapping photographs into one larger image.
Each individual frame needs to match the next as closely as possible.
Ideally, the photographs should have:
- The same exposure
- The same white balance
- The same focus
- The same aperture
- The same focal length
- Consistent image stabilisation settings
- Consistent colour and tonal characteristics
This is why manual camera settings are generally preferable when shooting a panorama.
If the camera is allowed to make independent decisions for every frame, even small variations can become obvious when the photographs are combined.
Use manual exposure for panorama photography
One of the most important settings to control is exposure.
With the camera set to an automatic exposure mode, the metering system may alter the shutter speed or aperture as you move across the scene.
That can result in one frame being slightly brighter or darker than the next.
The effect may be subtle when viewing the individual photographs, but it can become much more noticeable after stitching.
A better approach is to determine an appropriate exposure for the scene and then use manual exposure for the entire sequence.
Take a meter reading from a representative part of the scene rather than simply basing the exposure on the brightest or darkest area.
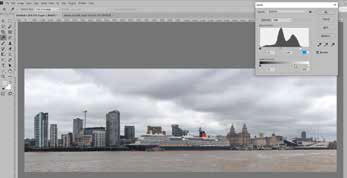
Check the histogram and highlight warnings where appropriate, then set the exposure manually.
Once you’re happy with the settings, keep them fixed for the entire panorama.
Should you use ISO Auto?
For a panorama, it is generally better to choose the ISO yourself rather than allowing Auto ISO to change between frames.
Changing ISO can introduce differences in brightness and noise characteristics between photographs.
Choose an appropriate ISO for the conditions and keep it fixed throughout the sequence.
Where possible, use the lowest practical ISO that gives you the shutter speed and aperture you need.
Keep the aperture fixed
Changing the aperture between frames can introduce several problems.
It changes depth of field and can also affect sharpness, vignetting and the optical characteristics of the lens.
For a panorama, choose the aperture you want before taking the first photograph and leave it there.
The exact aperture will depend on the subject, lens and desired depth of field, but the important principle is consistency.
Keep the shutter speed consistent — unless movement requires otherwise
Ideally, the shutter speed should also remain unchanged throughout the panorama.
However, moving subjects can complicate matters.
Trees moving in the wind, clouds, water, vehicles and people can all create problems when neighbouring frames are combined.
If movement is present, you may need to select a shutter speed that is fast enough to minimise it.
Water is particularly challenging because its appearance can change rapidly between frames.
This is one reason why panoramas of seascapes and rivers can require more post-processing than static architectural scenes.
Fix your white balance
Auto White Balance can cause colour variations between frames.
As the camera moves across the scene, the balance of colours within the frame changes. The camera may therefore decide that a different white balance is appropriate for each photograph.
The result can be subtle colour shifts running across the finished panorama.
Set the white balance manually.
If you’re shooting RAW, you have considerably more flexibility when correcting white balance later, but starting with a consistent setting makes the processing stage much easier.
Lock the focus
Autofocus is another setting that can cause problems.
If the camera refocuses between frames, the focus distance can change and the resulting images may not match.
For a panorama, focus on an appropriate part of the scene, confirm that you have the depth of field you need, and then switch the lens to manual focus.
This prevents the camera from changing focus as you move across the scene.
If you’re particularly concerned about accidentally moving the focus ring, a small piece of removable tape can help keep the controls in place.
Don’t change the focal length
Once you’ve chosen your composition and focal length, leave the zoom ring alone.
Changing the focal length between frames alters the geometry of the photographs and can make stitching considerably more difficult.
A fixed focal length also ensures that the relationship between the images remains predictable.
Remember that you don’t necessarily need an ultra-wide lens to create a panorama.
A moderate focal length can produce excellent results, and taking more frames allows you to create a very wide field of view while retaining plenty of detail.
Turn off image stabilisation when appropriate
Image stabilisation is extremely useful in many photographic situations, but it isn’t necessarily helpful when the camera is mounted securely for a panorama.
Depending on the camera and lens, stabilisation mechanisms can introduce small movements or changes in alignment that may affect the sequence.
If your camera is securely mounted on a tripod and the manufacturer recommends disabling stabilisation in this situation, turn it off.
Always check the behaviour of your particular camera and lens combination, as stabilisation systems vary.
Use a tripod and panoramic head where possible
A tripod makes it much easier to keep the camera level and maintain a consistent rotation between frames.
For more demanding panorama photography, a dedicated panoramic head can provide even greater control.
The aim is to rotate the camera around a controlled axis while maintaining consistent overlap between photographs.
For casual panoramas, however, you don’t necessarily need specialist equipment.
The most important thing is to maintain enough overlap between consecutive images for your stitching software to identify common features.
Around 25–30% overlap is a useful starting point, although more overlap can be beneficial in difficult scenes.
Watch for moving subjects
Not everything in a panorama will remain in the same position.
People may walk through the scene. Cars may move. Boats can travel through the frame and clouds can change shape.
Water is particularly problematic because it is constantly moving.
This means you may need to wait for a boat, vehicle or person to move into a suitable position before completing your sequence.
However, waiting also introduces another problem: the light can change.
A panorama sequence that takes several minutes can therefore contain differences caused by both moving subjects and changing illumination.
Plan your composition and camera settings before starting so you can work as quickly as possible.
Process the RAW files together
Once you’ve captured the panorama, the next challenge is processing the individual RAW files.
This is where consistency becomes particularly important.
It can be tempting to open each image individually and make corrections until it looks good.
For a panorama, that’s usually the wrong approach.
The objective isn’t to make every photograph look perfect independently.
The objective is to make all the photographs look like parts of the same photograph.
Choose a ‘hero’ image
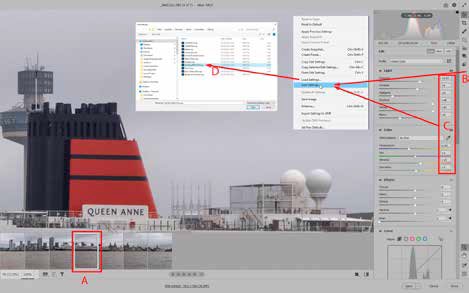
A useful workflow is to select one representative photograph from the sequence as your reference image.
Think of this as your hero image.
Make your global corrections to this photograph until you’re happy with the overall appearance.
Adjustments might include:
- Exposure
- White balance
- Contrast
- Highlights
- Shadows
- Whites and blacks
- Clarity or texture
- Colour adjustments
- Lens corrections
Once you’re happy with the result, synchronise or copy those settings across the other photographs in the panorama.
This provides a consistent starting point for the entire sequence.
Be careful with automatic corrections
Modern RAW-processing software can make remarkably good automatic adjustments.
However, automatic correction is usually designed to optimise each photograph individually.
That’s not necessarily what you want when processing a panorama.
If the software decides that one frame needs more exposure and another needs less, you can end up with visible differences between adjacent photographs.
The individual images might look excellent, but the panorama can reveal the variations.
For this reason, manually establishing a look on one reference image and applying the same settings across the sequence is often a better approach.
Adobe Camera Raw and Lightroom
Adobe Camera Raw and Lightroom provide tools that make this workflow relatively straightforward.
Process one representative image first, then synchronise the relevant settings across the rest of the panorama.
Depending on the images and the workflow, you may want to synchronise most global corrections while being more selective about settings such as cropping or local adjustments.
The exact procedure varies between versions of the software, but the principle remains the same:
Create one consistent correction and apply it across the sequence.
Stitch the panorama
Once the RAW files have been processed consistently, they can be stitched together.
Depending on your software, the panorama can be assembled automatically using applications such as Lightroom, Photoshop or other dedicated panorama programs.
The software analyses overlapping areas of the photographs and attempts to align them into a single image.
Modern stitching algorithms are extremely capable, but they cannot always solve problems caused by inconsistent source files.
The better the original sequence, the easier the stitching process becomes.
Look for stitching problems
Once the panorama has been assembled, inspect it carefully.
Pay particular attention to:
- Moving people
- Cars and boats
- Clouds
- Waves
- Tree branches
- Buildings and straight lines
- Areas close to the edges of the frame
- Changes in brightness or colour
Moving objects can produce strange duplicated or distorted shapes.
Water can be particularly troublesome because a boat or wave can appear in different positions in adjacent frames.
Sometimes the stitching software hides these changes remarkably well.
At other times, manual retouching is required.
Don’t be afraid to retouch the finished panorama
Panorama stitching is only part of the process.
Once the image has been assembled, you may need to use Photoshop or another image editor to clean up distractions.
Cloning, healing and content-aware tools can be useful for removing unwanted objects or repairing small areas where the stitching process has produced an obvious problem.
Transparent areas around the edges of the panorama can also sometimes be filled using content-aware tools, depending on the complexity of the scene.
Always inspect the finished image at a high magnification before considering it complete.
Why panoramas are worth the effort
One of the major advantages of panorama photography is the enormous amount of detail that can be captured.
A normal single frame might produce a file several thousand pixels wide.
A panorama made from multiple high-resolution photographs can be many times wider.
That additional resolution is particularly valuable when the final image is going to be printed at a large size.
Large panoramic files can therefore be excellent candidates for:
- Fine-art prints
- Large wall art
- Gallery displays
- Commercial interiors
- Murals and wallpaper
- Large-format exhibitions
The higher resolution also gives you more flexibility when cropping the finished image.
A simple panorama photography checklist
Before starting your next panorama, check the following:
Camera
- Shoot RAW where possible
- Set manual exposure
- Set a fixed ISO
- Choose a fixed aperture
- Set a fixed white balance
- Focus manually
- Keep the focal length fixed
- Disable image stabilisation when appropriate
Composition
- Use a tripod where practical
- Keep the camera level
- Allow plenty of overlap
- Plan your start and end points
- Look for moving subjects
Processing
- Choose one reference image
- Correct exposure and white balance
- Apply consistent RAW adjustments
- Avoid independently auto-correcting every frame
- Stitch the images
- Inspect the completed panorama
- Retouch any remaining problems
The key to better panoramas
The most important lesson is simple: consistency is everything.
The stitching software can do an impressive job of combining photographs, but it cannot completely compensate for camera settings that change from frame to frame.
Take control of the camera before you begin, keep your settings consistent, process the RAW files as a single set and inspect the finished panorama carefully.
Do that, and the process of creating a seamless high-resolution panorama becomes much more predictable — and the final image can contain an extraordinary amount of detail.