How to Create a Professional Portrait with One Light

You don’t need a studio full of lights to create a clean, professional-looking portrait.
With one flash, a suitable modifier and a little creative thinking, you can create a surprisingly polished headshot or portrait — even in a living room.
Photographer and lighting educator Dave Montizambert demonstrates this perfectly with a simple one-light butterfly lighting setup. What makes his approach particularly useful isn’t just the lighting pattern itself, but the way he solves the problems that appear along the way.
The background isn’t quite bright enough. The shadows are too dark. There isn’t another reflector available.
Rather than adding more expensive equipment, Dave finds ways to make the equipment already available work harder.
Start with butterfly lighting
Butterfly lighting is created by positioning the main light directly in front of and above the subject, pointing down towards the face.
The distinctive feature is the small, symmetrical shadow that appears beneath the nose, giving the lighting pattern its name. It is a classic portrait lighting technique that can produce clean, flattering results and works particularly well for headshots, beauty portraits and glamour photography.
The exact height and angle of the light aren’t fixed.
Raise or lower the light while watching the shadows on the face. The aim is to find the position that gives you the shape and contrast you want for the particular subject.
A large, diffused light source will generally produce softer transitions than a small, bare flash.
One light doesn’t mean one effect
A common misconception with one-light photography is that you’re limited to whatever the main light happens to produce.
In reality, the light can be redirected, softened and controlled in several ways.
Dave’s setup demonstrates this particularly well.
The main flash was positioned high above the subject and used through a large translucent panel. This softened the light falling on the face while still allowing the flash to illuminate the wall behind the subject.
That distinction became important when Dave wanted to change the background.
Turning a coloured wall into a white background
The original wall behind the subject was a mid-tone green rather than white.
Simply increasing the camera exposure wasn’t enough to produce the clean white background Dave wanted, because doing so also affected the exposure of the subject.
Instead, he introduced another layer of white fabric over the main light source.
The additional fabric reduced the amount of light reaching the subject. Dave compensated for that loss by opening the camera aperture and increasing the flash output.
The result was a brighter background and a correctly exposed subject.
The important lesson isn’t the exact number of stops involved. It’s understanding the relationship between the light reaching the subject and the light reaching the background.
If you change one without changing the other, you can alter the balance between the two.
You don’t need specialist fabric
This is also where a little improvisation can be useful.
For a home lighting exercise, you don’t necessarily need a specialist photographic diffusion material. A clean white sheet or similar translucent fabric can sometimes be used, provided it is suitable for the setup and positioned safely away from hot equipment.
The same principle applies with proper photographic materials: you’re simply controlling the amount of light reaching the subject.
Always make sure anything used around a flash or continuous light is appropriate for that equipment. Heat from some lighting systems can make improvised materials unsafe.
The problem with dark shadows
Once the main exposure and background were under control, Dave noticed another problem.
The shadows on the face were too dark.
This is a common issue with top-down portrait lighting. The main light can produce a pleasing pattern across the face, but areas underneath the nose, chin and cheekbones can become too deep.
The obvious solution would be to add another light or use a reflector.
But Dave had already used his available reflector elsewhere.
So he improvised.
Using a mirror as a reflector
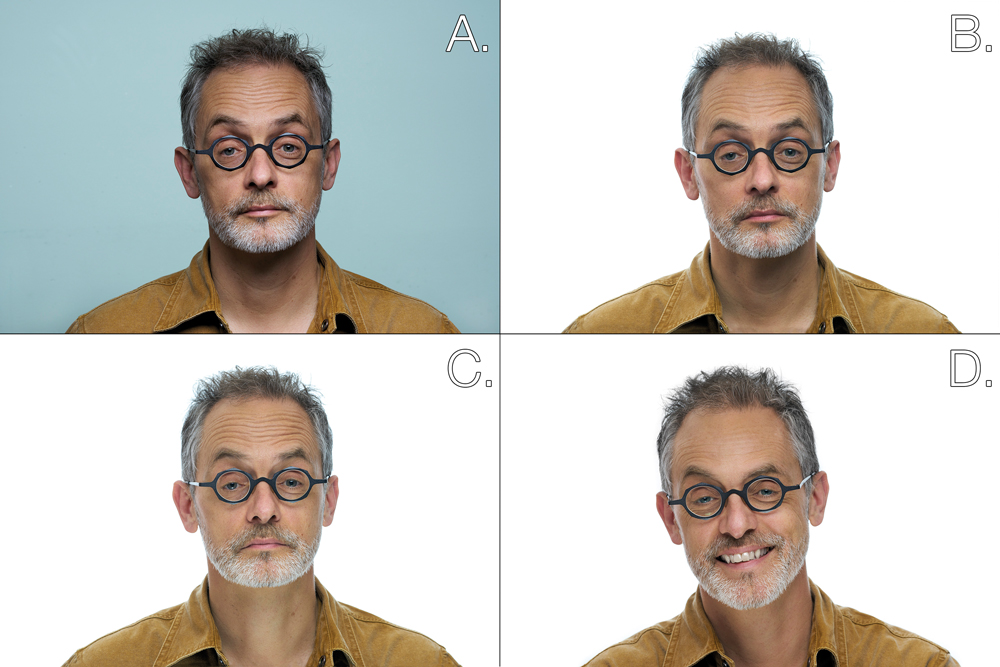
A bedroom mirror became the substitute reflector.
Placed in front of the subject and angled upwards, the mirror could catch some of the light from the main source and bounce it back towards the face.
The effect was immediately noticeable.
The shadows became brighter and, importantly, additional catchlights appeared in the lower part of the eyes.
Catchlights can add a great deal of life to a portrait, particularly when the main light is positioned high enough that the eyes don’t receive a strong reflection from it.
Dave could then adjust the amount of fill simply by changing the angle of the mirror.
Tilt it towards the light source and more light is reflected towards the subject.
Tilt it away and the fill becomes weaker.
This is a simple but effective demonstration of a fundamental lighting principle:
A reflector doesn’t create light. It redirects light that is already there.
A mirror works — but a proper reflector is easier
Although the mirror solved the problem, it isn’t necessarily the ideal long-term solution.
A conventional silver reflector has a textured surface that spreads the reflected light more broadly. A mirror has a smooth surface, so its reflection is much more directional.
That means a mirror can be more sensitive to small changes in position.
If the subject moves slightly forwards or backwards, they may move in and out of the strongest part of the reflected light.
A silver reflector is generally more forgiving, portable and considerably less fragile.
But if you’re experimenting at home and need to solve a problem with whatever is available, a mirror demonstrates just how much can be achieved by understanding the direction of light.
The setup can become a repeatable recipe
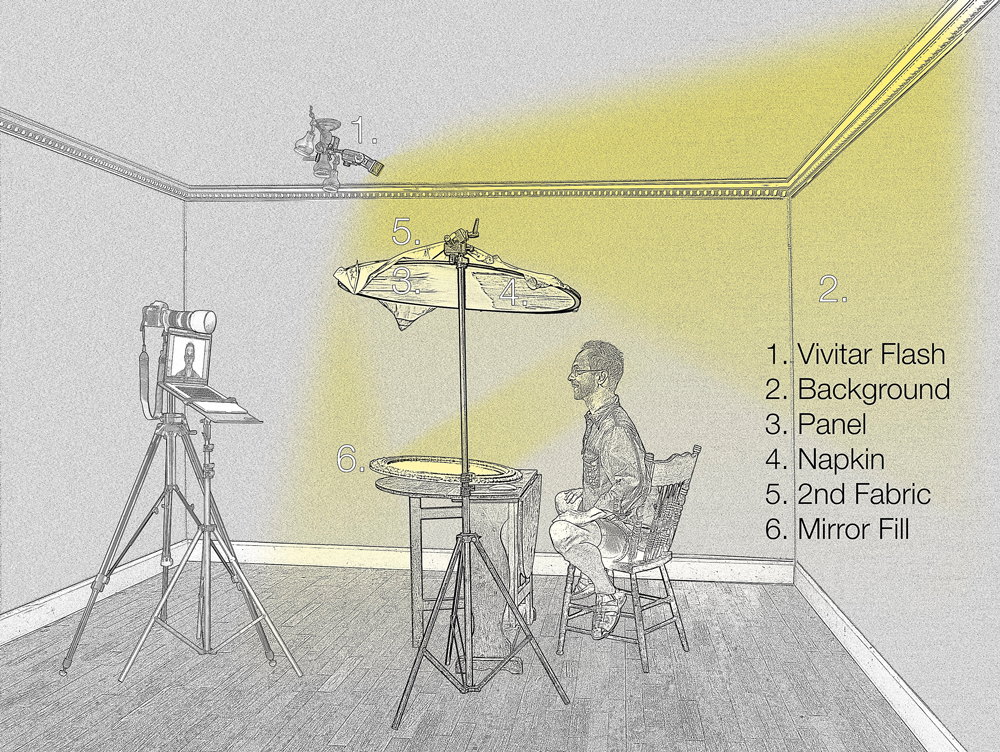
Once the lighting has been worked out, the setup becomes much easier to reproduce.
Dave’s original arrangement used a relatively simple layout:
- The subject positioned away from the background.
- The camera several metres from the wall.
- A longer focal length for the portrait.
- The flash positioned high and towards the front of the subject.
- A large translucent panel used to soften the main light.
- A reflector or reflective surface positioned below the subject’s face.
The exact distances and camera settings aren’t magic numbers.
Room size, flash power, modifier size, camera, lens and the subject themselves will all affect the result.
The useful thing is to understand what each part of the setup is doing.
Once you’ve established that, you can scale the arrangement to suit the space and equipment you have.
Why working at home can be useful
One of the most useful aspects of this exercise is that it doesn’t require a dedicated studio.
A living room, spare bedroom or office can become a temporary portrait space.
For photographers working on location, this way of thinking is particularly valuable.
Instead of asking:
“What equipment do I need to take with me?”
ask:
“What can I achieve with the equipment and environment I already have?”
A wall can become a background.
A white sheet can become a diffusion material.
A reflector can redirect your main light.
And, in an emergency, even a household mirror can become part of the lighting system.
That sort of problem-solving can save both time and money.
One light can produce a saleable portrait
Dave makes an important distinction about the final photograph.
It doesn’t have to be a masterpiece.
For many commercial portrait jobs, the requirement is to produce a clean, flattering and usable image efficiently.
That is a valuable lesson.
Photographers can sometimes become focused on creating increasingly complicated lighting setups when the client simply needs a strong, professional portrait.
One well-controlled light can often be enough.
The skill is learning how to get the most from it.
Watch your depth of field
There is another practical consideration when photographing yourself.
Opening the aperture to compensate for reduced light can produce a shallower depth of field.
That’s fine when you’re photographing someone else and can check their focus, but it becomes more difficult when you’re standing in front of the camera yourself.
For a self-portrait, Dave chose to increase the flash power so that he could work at a more useful aperture.
This is a good example of why exposure settings shouldn’t be treated in isolation.
If depth of field matters, don’t automatically solve every exposure problem by opening the aperture. Flash power, ISO and other variables may give you a better solution.
Turn your room into a small portrait studio
The real lesson from this exercise isn’t a particular flash, aperture or reflector.
It’s the process.
Start with one light.
Look at what it is doing.
Identify the problem.
Then find the simplest way of changing the light rather than automatically adding another piece of equipment.
Want a brighter background? Change the relationship between the subject, light and background.
Want softer shadows? Increase the apparent size of the light source or redirect some of the existing light.
Need more fill? Use a reflector.
Don’t have a reflector? Look around you.
This way of thinking is what turns lighting from a collection of recipes into a practical skill.
And once you’ve established a lighting arrangement that works, record the positions and settings. The next time you need a similar portrait, you can reproduce it far more quickly.
A final word of caution about older flashguns
If you’re experimenting with older flash equipment, be particularly careful before connecting an old flashgun directly to a modern digital camera.
Some older flash units can have trigger voltages that are unsuitable for modern camera electronics.
If you aren’t certain that a flashgun is compatible with your camera, don’t connect it directly. Check the specifications or use an appropriate safe triggering system instead.
A cheap second-hand flash is only a bargain if it doesn’t damage your camera.
The bigger lesson: understand the light
The best thing about a one-light exercise like this is that it removes some of the distractions.
You have one source.
You have a subject.
And you have to make the light work.
That forces you to pay attention to direction, softness, contrast, reflection, distance and exposure — the fundamentals that still matter when you eventually have two, three or ten lights at your disposal.
You don’t need more equipment to become better at lighting.
Sometimes you simply need to understand the equipment you already have.