How to Use Lighting to Create Better Portraits
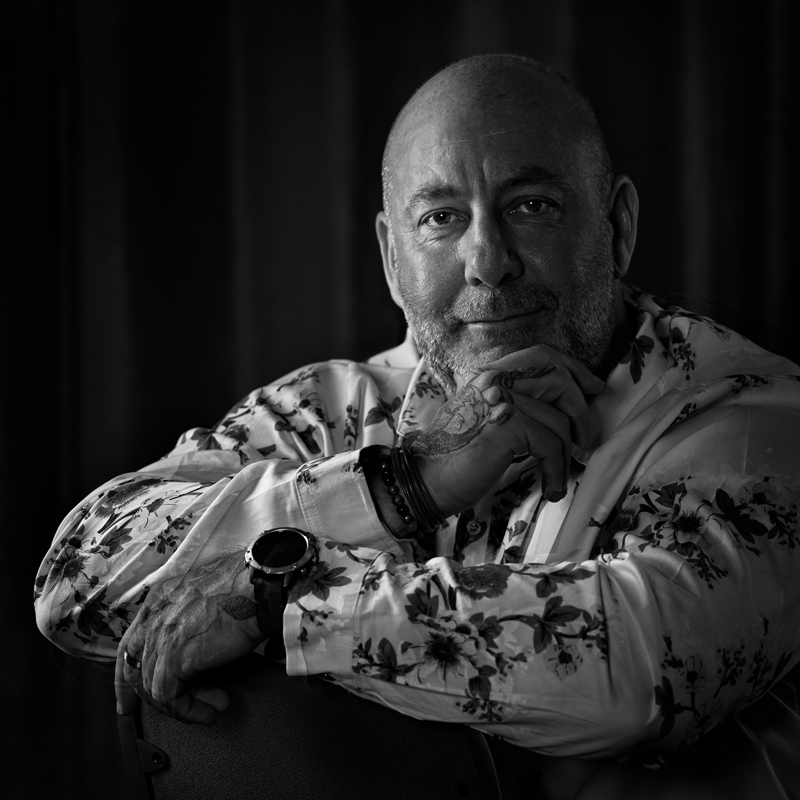
Good portrait lighting isn’t simply about making sure your subject is correctly exposed.
Light changes the way we see someone. It can make a portrait feel dramatic, soft, approachable, powerful, mysterious or intimate. It can shape the face, change the apparent size of the body, separate the subject from the background and help tell the story you want the photograph to tell.
That’s why understanding light is one of the most valuable skills a portrait photographer can develop.
As photographer Damian McGillicuddy puts it, “Light is might.”
The better you understand light and how to control it, the more control you have over the finished image.
Start with the story you want to tell
It’s easy to become focused on the technical side of lighting.
Which modifier should I use?
How many lights do I need?
Where should I put the softbox?
What power should the flash be?
Those questions matter, but they shouldn’t be the starting point.
Before setting up your lights, think about the person in front of your camera and ask yourself:
What do I want this portrait to say about them?
The lighting, pose, background, styling and camera position can then all work together to support that idea.
A technically perfect portrait can still feel flat if the lighting doesn’t suit the person or the story you’re trying to tell.
A simple portrait can change dramatically with light
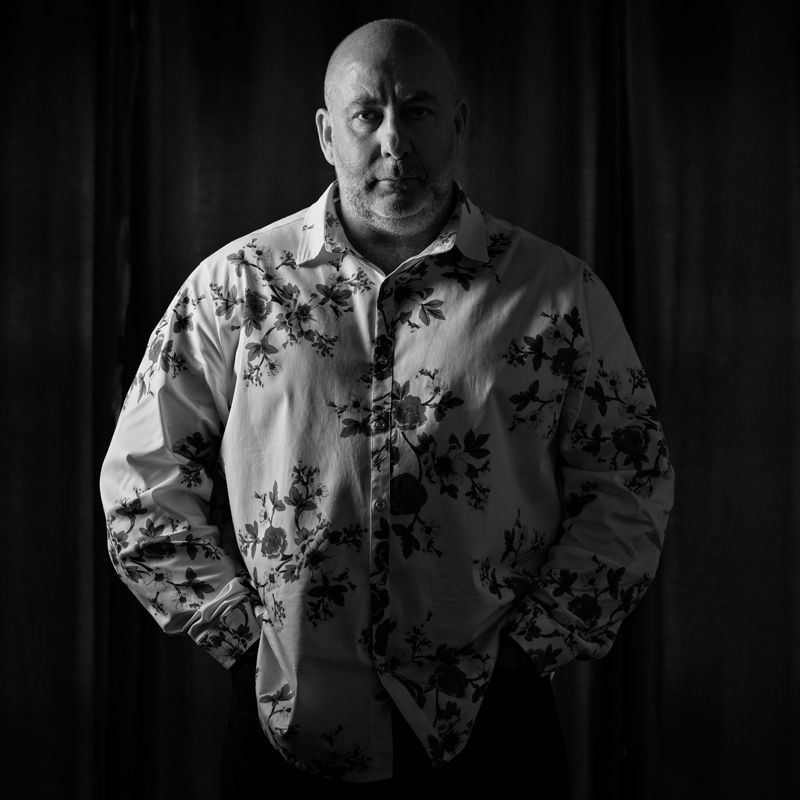
Damian demonstrated this during a Society Roadshow portrait session with photographer Gary Hill.
The first portrait used a single gridded light positioned to create split lighting.
The result was quite hard and dramatic. With strong shadows and little fill, the lighting suggested a tough, uncompromising character.
It was a perfectly acceptable photograph, but it didn’t necessarily reflect the person Damian wanted to portray.
That’s an important distinction.
A lighting setup can be technically successful while still telling the wrong story.
Add fill light to change the mood
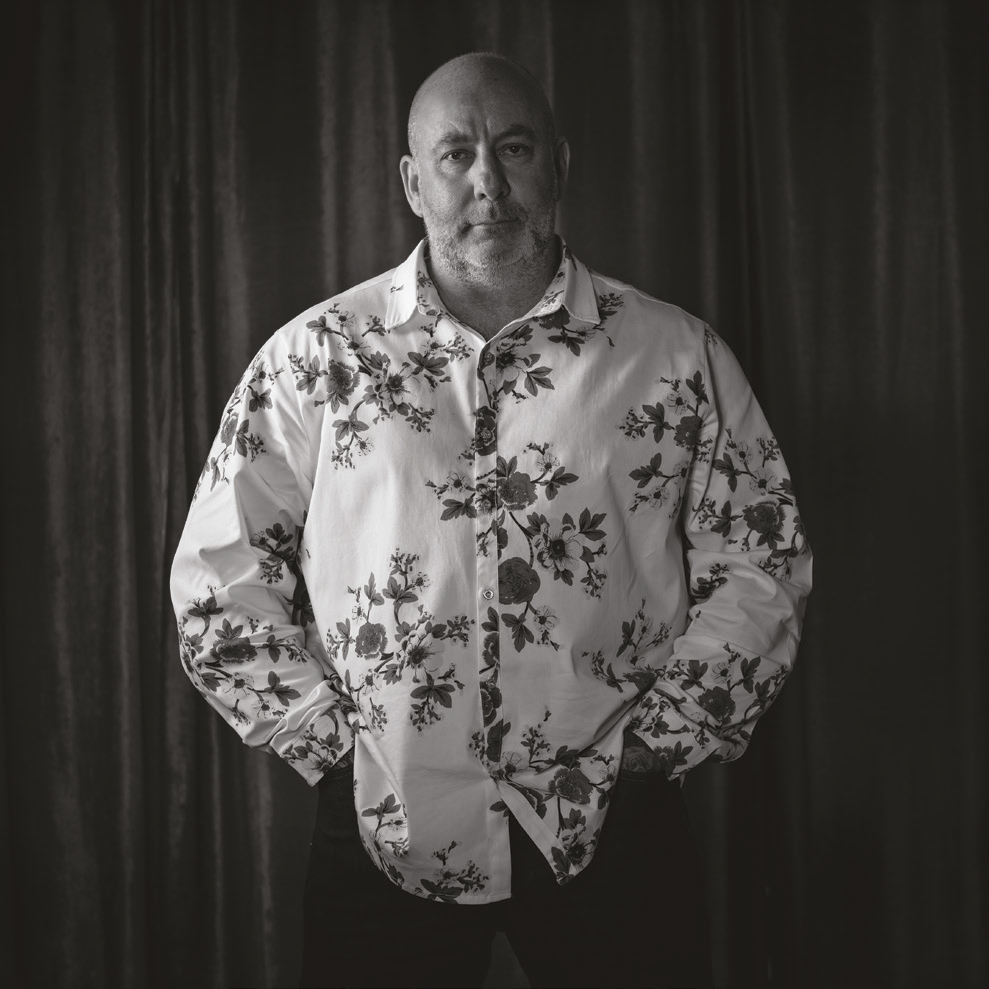
The next step was simply to introduce a second light as fill.
Fill light reduces the contrast between the illuminated and shadow sides of the face. By controlling how much fill you use, you can decide how dramatic or gentle the portrait feels.
More fill generally produces a more open, lower-contrast portrait.
Less fill allows deeper shadows and a more dramatic appearance.
The important thing is that you don’t simply add fill because you have another light available. You choose the amount of fill according to the mood you want.
Think about the lighting ratio
The relationship between your key light and fill light is often described as the lighting ratio.
You don’t necessarily need to calculate the ratio mathematically every time you create a portrait. What matters is learning to recognise what different levels of contrast do to the image.
Try moving your fill light closer or further away, or changing its power, and watch what happens to the shadows.
This is where lighting becomes much more than a collection of technical settings.
You’re making creative decisions.
Don’t forget catchlights
Catchlights are the reflections of the light sources visible in your subject’s eyes.
They can make a portrait feel much more alive.
In Damian’s example, the split lighting meant there were relatively few obvious catchlights. He therefore used a rounded modifier for the fill light.
Apart from opening up the shadows, the round shape produced attractive catchlights in the eyes.
It’s a small detail, but it demonstrates an important principle:
The shape and position of your modifier affect the final appearance of the portrait.
The quality, direction and shape of light all matter.
Lighting isn’t the only thing that shapes a portrait
Once the lighting was improved, Damian still wasn’t satisfied with the portrait.
Why?
Because lighting doesn’t work in isolation.
Gary is a large man with broad shoulders. That can be an asset in many portraits, but if the intention is to create a more approachable image, the way the subject is positioned becomes important.
Simply turning the body slightly changed the apparent width of the shoulders.
Suddenly, the portrait felt less intimidating.
No new light was required.
It was a change in posing and body language.
This is an important lesson for portrait photographers: if something isn’t working, don’t automatically reach for another piece of equipment.
Move the light.
Move the subject.
Change the pose.
Change your camera position.
Or change the relationship between the subject and the background.
Sometimes the simplest adjustment produces the biggest difference.
Create separation between your subject and background
For the final portrait, Damian moved Gary further away from the background.
This created what he describes as “zonal control” of the lighting.
In simple terms, the photographer is controlling different areas of the scene independently.
Moving your subject away from the background can make it easier to light the subject without unnecessarily affecting the background, and vice versa.
It can also help create depth in the photograph.
Rather than treating the whole scene as one area to illuminate, start thinking about it as a series of zones:
- The subject
- The background
- The shadow areas
- Areas requiring separation
- Ambient light within the scene
Once you start thinking this way, lighting becomes much more controllable.
Use a separation or rim light
A third light can be used behind the subject to provide separation from the background.
This type of light is sometimes called a rim light, hair light, kicker or separation light, depending on exactly how it is being used.
Its purpose is to create another layer within the image.
A carefully positioned light can pick out the edge of the subject and help separate them from a darker background.
This can be particularly effective when photographing someone against a dark or similarly toned background.
The light doesn’t have to be obvious.
In fact, the best separation light is often the one you notice only because the portrait suddenly feels more three-dimensional.
You don’t always need another flash
One of the cleverest parts of Damian’s setup was that he didn’t use his third flash to illuminate the background.
Instead, he deliberately allowed some of the available ambient light into the exposure.
This was achieved by using a slower shutter speed — often referred to by photographers as dragging the shutter.
With flash photography, the flash can provide the main illumination for your subject while a slower shutter speed allows more ambient light to register in the background.
This can give you greater control over the balance between the subject and the environment.
The key is understanding that your exposure isn’t necessarily controlled by one source of light.
You can use flash and ambient light together.
Think of your lights as having different jobs
A useful way to approach multi-light portraiture is to give each light a specific purpose.
For example:
Key light
The main source of illumination that establishes the direction and character of the light.
Fill light
Controls the depth of the shadows and overall contrast.
Separation light
Helps distinguish the subject from the background.
Ambient light
Provides additional illumination and can help retain the atmosphere of the environment.
You don’t necessarily need all four.
A great portrait can be made with a single light.
The point is to understand what each source is doing rather than simply adding lights because you have them available.
Start with one light
If you’re learning portrait lighting, don’t assume that you need a three- or four-light setup.
In fact, working with one light can be an excellent way to learn.
Place your key light and take a photograph.
Then change its height.
Move it closer.
Move it further away.
Change its angle.
Try a different modifier.
Move your subject.
Watch what happens to the shadows.
Once you understand what that one light is doing, introduce a second light and use it specifically to solve a problem.
Perhaps the shadows are too deep.
That’s where fill comes in.
Perhaps your subject is disappearing into the background.
That’s where separation light might help.
This approach gives every light a purpose.
Don’t let the equipment make the decisions
It’s easy to become obsessed with lighting equipment.
There are endless modifiers, flash heads, softboxes, grids, reflectors and accessories available to photographers.
But buying more equipment doesn’t automatically make you a better lighting photographer.
Understanding what light is doing is far more valuable.
A single light positioned carefully can produce a more effective portrait than three lights that have been added without a clear purpose.
Learn to see:
- Where the shadows fall
- How hard or soft the light is
- How quickly the light falls off
- How the light changes the shape of the face
- How much contrast the scene has
- How the background relates to the subject
- Where the catchlights appear
- How the subject’s pose changes the result
Once you understand those things, equipment becomes much easier to choose.
Use light to save time in post-production
There is another advantage to becoming better with lighting.
You can solve more problems at the point of capture.
If you get the lighting right when you make the photograph, you may spend less time trying to correct problems afterwards.
That doesn’t mean every photograph needs to be perfect straight out of camera. Editing is an important part of photography.
But good lighting can give you a stronger starting point.
Instead of relying on Photoshop or Lightroom to rescue an image, you’re using your understanding of light to create the image you wanted in the first place.
Professional development starts with looking at light differently
Improving your lighting doesn’t necessarily mean learning another complicated lighting diagram.
It can start by changing the way you look at every photograph you make.
Ask yourself:
Where is the light coming from?
What is it doing to the subject?
What mood does it create?
What would happen if I moved it?
What happens if I add or remove fill?
How does the background change the way the light feels?
Does the lighting actually suit the person I’m photographing?
Those questions will teach you far more than simply memorising a collection of lighting setups.
The final portrait is about more than the lights (hero image)
In Damian’s final portrait of Gary, the finished image came from a combination of decisions.
There was the key light.
There was fill.
There was separation light.
Ambient light was deliberately incorporated into the exposure.
The subject was moved away from the background.
The pose was changed.
The camera, lens and composition all played their part.
None of those decisions existed independently.
They worked together to create a portrait that said something about the person rather than simply showing what they looked like.
And that’s ultimately what good portrait lighting should do.
Light isn’t there simply to illuminate your subject. It helps you tell their story.
The more you understand it, the more creative control you have over the image.
So the next time you set up a portrait, don’t start by asking how many lights you need.
Start by asking:
What do I want this photograph to say?
Then use the light to make it happen.