Nik Collection for Photographers: What the DxO Plugins Do
There are plenty of photo-editing tools that promise to transform your images. The challenge is knowing which ones will actually improve your photographs rather than simply making them look different.
Nik Collection has been around for decades and has developed into a collection of specialist editing tools aimed at photographers who want more control over colour, contrast, black and white, sharpening, noise reduction and creative effects.
The software is now developed by DxO, and the current Nik Collection 9 includes seven plugins that can be used with applications including Adobe Photoshop, Lightroom Classic, Affinity Photo and DxO PhotoLab, as well as being used as standalone applications.
The collection is particularly interesting for photographers because it combines powerful effects with selective editing. You don’t necessarily have to apply an effect to the whole photograph. Tools such as U Point selections, AI Masks and Depth Masks allow adjustments to be targeted at particular areas of an image.
But the most important part of using Nik Collection has nothing to do with pressing a button.
Good editing is usually about knowing when to stop.
What is Nik Collection?
Nik Collection is a suite of specialist photo-editing plugins developed by DxO.
Rather than trying to replace every aspect of a photographer’s normal editing software, the collection provides dedicated tools for particular jobs.
The seven current applications are:
- Nik Color Efex – colour correction and creative effects
- Nik Silver Efex – black-and-white photography
- Nik Analog Efex – analogue and film-inspired effects
- Nik Viveza – global and local colour and tonal adjustments
- Nik Dfine – noise reduction
- Nik Sharpener – sharpening for different output requirements
- Nik HDR Efex – HDR and exposure blending
The applications can be used individually, or combined as part of a wider editing workflow.
That specialist approach is one of the reasons Nik Collection has remained popular with photographers. Instead of searching through hundreds of unrelated controls, you can go directly to a tool designed for the particular job you are trying to do.
Nik Color Efex – colour and creative effects
Nik Color Efex is probably the best-known part of the collection.
It contains a large range of filters and tools for changing colour, contrast, tone and the overall appearance of an image. The current version includes 67 tools and filters, together with newer features such as Color Grading and Halation.
It can be used for relatively subtle corrections, but it also contains plenty of effects that can dramatically change an image.
This is where restraint becomes important.
A filter can make an ordinary photograph look exciting for the first few seconds. Look at it again tomorrow and the effect may suddenly seem rather obvious.
A better approach is often to start with a strong effect and then reduce it.
The aim isn’t necessarily for somebody looking at the finished photograph to say, “That’s a Nik filter.”
Ideally, they should simply think the photograph looks good.
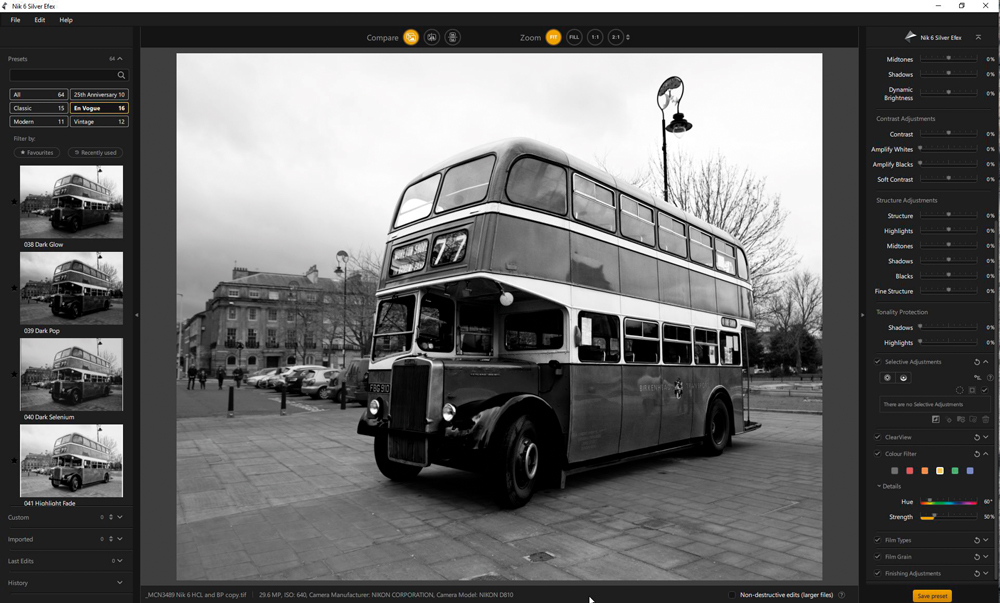
Nik Silver Efex – black and white
For photographers interested in monochrome, Silver Efex is one of the most established tools in the collection.
It provides controls for contrast, tonal structure, film-inspired looks and local adjustments, allowing you to develop a black-and-white image far beyond simply removing the colour.
Black and white conversion is rarely just about making everything grey. The important decisions are about how different tones relate to each other.
A good conversion can change the entire mood of a photograph.
Nik Silver Efex also benefits from the selective editing tools found elsewhere in the collection. In Nik Collection 9, AI Masks and U Point technology can be used to make local adjustments such as dodging and burning without having to build every selection manually.
Nik Analog Efex – creating an analogue look
Nik Analog Efex is aimed at photographers who want to explore the appearance of traditional cameras, film and analogue processes.
It includes effects inspired by characteristics such as film grain, light leaks, unusual lenses, double exposures and other analogue imperfections.
Used carefully, these effects can add atmosphere and character.
Used without restraint, they can quickly become a visual gimmick.
Nik Collection 9 has added further creative possibilities, including Chromatic Shift and Glass Effect tools.
The important question is therefore not whether you can add an effect, but whether the effect contributes something to the photograph.
Nik Viveza – precise control over colour and tone
Viveza is one of the more useful tools when you want to make relatively subtle changes.
It can be used for global adjustments to colour and tone, but its real strength is the ability to make changes selectively.
Perhaps a face needs slightly more brightness. Maybe the background is competing with the subject. Perhaps you want to increase contrast in one area without affecting another.
Traditionally, making these adjustments involved creating selections or masks manually.
Nik’s U Point technology provides another approach: click on the relevant part of the image and adjust it directly.
Nik Collection 9 adds AI Masks and Depth Masks to this workflow, providing additional ways of selecting subjects or areas based on their position within the scene.
For photographers who don’t want to spend ages drawing complicated masks, this can be particularly useful.
Nik Dfine – noise reduction
Noise is an unavoidable part of digital photography.
It becomes particularly noticeable when using high ISO settings, lifting shadows heavily or working with images from smaller sensors.
Nik Dfine is designed specifically for noise reduction. It analyses the image and applies noise-reduction processing based on the characteristics of the photograph.
The trick with any noise-reduction software is knowing how far to go.
Remove too little noise and it remains distracting.
Remove too much and you can lose fine detail and end up with an image that looks unnaturally smooth.
Noise isn’t always something that has to be completely eliminated. Sometimes retaining a small amount of texture produces a more natural result.
Nik Sharpener – sharpening for the final image
Sharpening is another area where the right amount depends on what happens to the photograph afterwards.
Nik Sharpener uses a two-stage approach, with Nik Pre-Sharpener designed to extract detail and Nik Sharpener Output intended to apply sharpening according to the final destination of the image.
That’s an important distinction.
An image prepared for a large print doesn’t necessarily need the same sharpening as one being displayed on a website.
Likewise, an image that looks slightly over-sharpened at 100 per cent on your monitor may not look the same once it has been resized for online use.
Sharpen for the final output rather than simply trying to make the photograph look as sharp as possible on screen.
Nik HDR Efex – working with multiple exposures
HDR Efex is designed for photographs created from multiple exposures as well as for giving a single image an HDR-style treatment.
For traditional HDR work, several exposures can be combined to capture a greater range of brightness than a single exposure can record.
The software handles the merging and provides controls for developing the resulting image.
HDR has developed a reputation for highly processed photographs, but it doesn’t have to look that way.
A carefully processed HDR image can look remarkably natural.
Again, the best result may be the one where the processing isn’t obvious.
U Point: selective editing without complicated masks
One of the features that has helped distinguish Nik Collection for many years is U Point technology.
The basic idea is simple: rather than manually selecting an area with a complicated mask, you can place a control point on the part of the photograph you want to affect.
The software analyses the area around the point and allows adjustments to be applied selectively.
Modern versions of Nik Collection have expanded the selection tools considerably. Nik Collection 9 adds AI Masks for subject selection and Depth Masks for targeting adjustments according to distance within the scene. There are also colour, luminosity and other selection options.
This doesn’t mean traditional masking has become unnecessary.
There will always be situations where Photoshop or another editor gives you more precise control.
But for many everyday photographic adjustments, being able to make a sophisticated local correction without spending several minutes constructing a mask can make a big difference to the workflow.
Photoshop and non-destructive editing
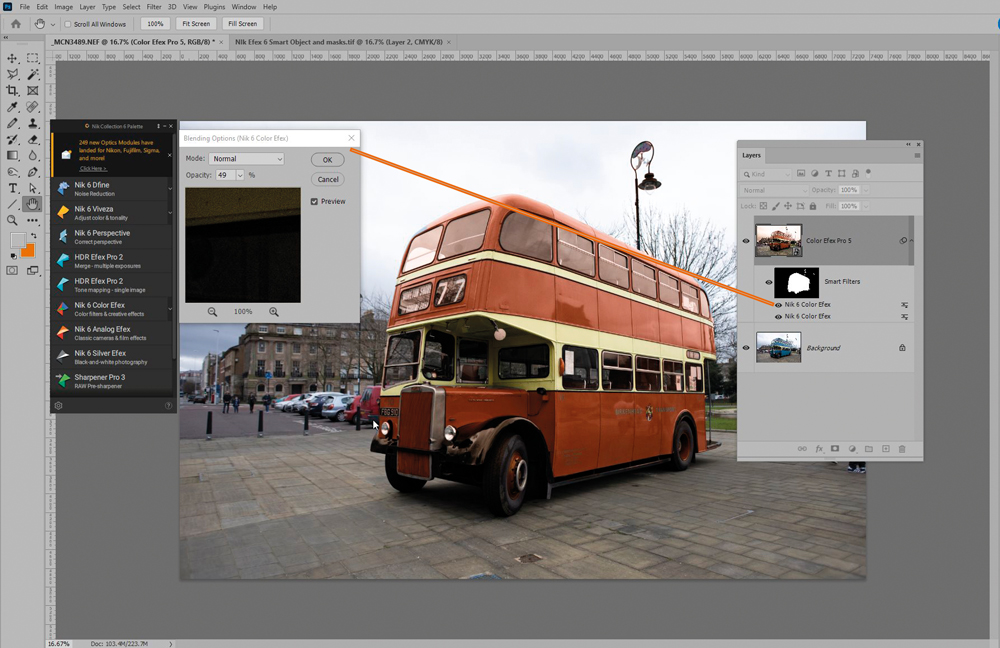
Nik Collection can be particularly useful as part of a Photoshop workflow.
The current Photoshop integration allows Nik adjustments to be applied as Smart Objects, to new layers, or to layers with masks. This means you can retain considerably more control over the result than you would have by simply flattening the effect into the photograph.
This is worth understanding because it changes how you approach editing.
Instead of thinking, “I’m applying this effect to my photograph,” you can think, “I’m creating an editable stage in my workflow.”
If the effect looks too strong later, you can reduce it.
If it works beautifully on one part of the photograph but not another, you can use masking.
And if you change your mind completely, you have the option of going back and changing the adjustment rather than starting the entire edit again.
The danger of too much processing
This was one of the points Mike McNamee made when reviewing an earlier version of Nik Collection, and it remains good advice.
Photography software makes it incredibly easy to keep adding things.
More contrast.
More saturation.
More sharpening.
More clarity.
More drama.
More effects.
Eventually, the photograph can become a demonstration of the software rather than a good photograph.
That doesn’t mean dramatic processing is wrong. There are plenty of genres where a strong, stylised treatment is exactly what the photographer wants.
The important thing is that the treatment should be deliberate.
If you are photographing a landscape, for example, ask whether the processing improves the atmosphere and sense of place.
With a portrait, ask whether the treatment helps the person remain the focus.
With commercial photography, ask whether the editing supports the purpose of the image.
The software should serve the photograph, not the other way around.
Which Nik plugin should you use?
If you’re new to Nik Collection, it can be difficult to know where to start.
A simple way to approach the collection is to choose the tool according to the problem you are trying to solve.
Want better colour or creative effects?
Start with Color Efex.
Want to create a strong black-and-white image?
Try Silver Efex.
Want an analogue or film-inspired appearance?
Look at Analog Efex.
Want to adjust colour, brightness or contrast selectively?
Try Viveza.
Need to reduce high-ISO noise?
Look at Dfine.
Need controlled sharpening?
Try Sharpener.
Working with multiple exposures or looking for HDR effects?
Use HDR Efex.
You don’t need to use all seven applications.
In fact, you may find that you regularly return to only two or three.
Nik Collection is a toolbox, not a magic button
The attraction of Nik Collection isn’t simply the number of filters and effects it contains.
It’s the combination of specialist tools and relatively quick ways of making selective adjustments.
The latest version has moved considerably beyond the Nik Collection 6 reviewed in the original Professional Imagemaker article. Nik Collection 9 now includes AI-assisted selection, depth-aware masking, additional blending modes, new colour tools and other workflow improvements.
But the underlying principle hasn’t changed.
The best use of editing software isn’t necessarily the most obvious use of it.
A subtle adjustment that brings attention to a subject, restores colour balance, controls noise or gives a black-and-white image the right tonal structure may do far more for a photograph than a collection of spectacular effects.
Use the tools to improve your photograph.
And when you’ve finished, try turning the effect down a little.
You may find the photograph gets better.