How to Control Natural Light for Outdoor Portraits
By Dave Montizambert
Natural light can appear to be something photographers simply have to accept. Unlike studio lighting, you cannot put a softbox wherever you want, change the power of a flash or move the sun.
But that does not mean you have no control.
When I work outdoors with available light, I approach it much like I would approach a studio lighting setup. Instead of placing the subject first and then creating the lighting, I look for a location where the existing light gives me the main light, fill light and backlight that I need.
In other words, I place the subject where the lighting works.
This approach can make outdoor portrait lighting much more predictable and can be particularly useful when you have little time, no lighting assistant and no budget for additional equipment.
Think of natural light like studio lighting
I learned lighting in the studio before I started working extensively outdoors, and I believe that was an advantage.
In a studio, identifying your main light is relatively straightforward because you put it there. Outdoors, the light already exists, so you first have to work out where it is coming from and how bright the different sources are.
When using available light, I therefore ask myself:
- Where is the main light coming from?
- Is there a suitable fill source?
- Can I find useful backlight?
- How bright is each source compared with the others?
- Where can I position the subjects so those sources produce the result I want?
This changes the way you approach an outdoor portrait.
Rather than deciding where the family or model should stand and then trying to make the light work, find the light first and put the subjects into it.
A real-world outdoor portrait
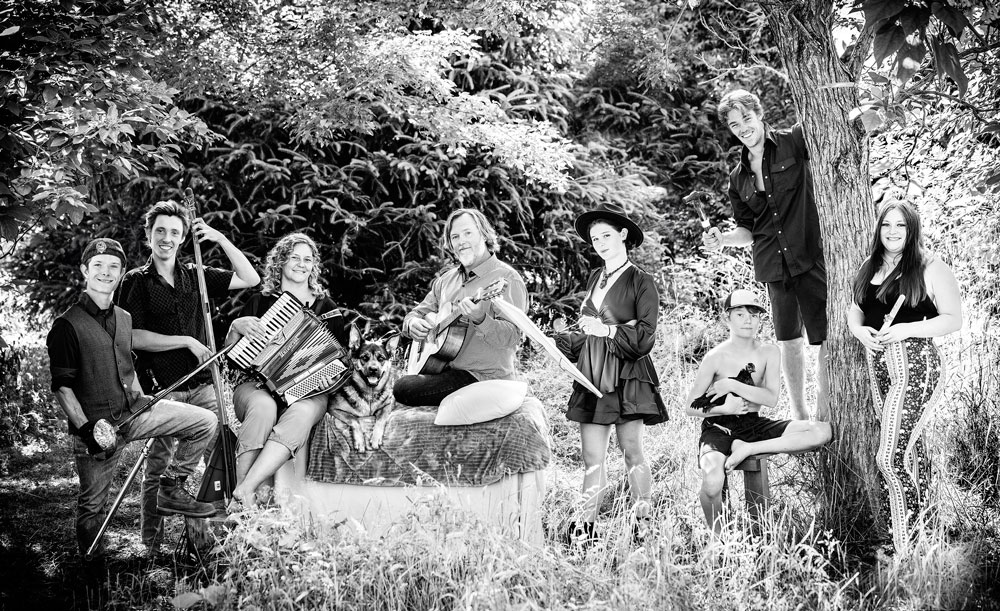
A good example came from a family portrait session at a friend’s hobby farm.
The family was getting together for a large celebration, with several of the children now adults and living away from home. It was a rare opportunity to have everyone together, so I was asked to photograph the family before the dinner.
I decided to give the portrait to them as a present, which meant I wanted to keep the costs of the shoot as close to zero as possible.
There was also very little time available for a conventional lighting setup. Hiring an assistant to position and manage lighting equipment wasn’t an option, so I decided to work entirely with the available outdoor light.
That might sound like giving up control.
It wasn’t.
I simply changed the way I exercised control.
Scout the location before the shoot
The portrait was planned for around 4pm, so I needed to know what the light would be doing at that time.
Fortunately, I had an opportunity to visit the property a few days beforehand. I took a handheld incident/reflective light meter and walked around the grounds looking for suitable backgrounds and lighting conditions.
This is an important part of using natural light effectively.
The location isn’t just about the background. It’s about the light.
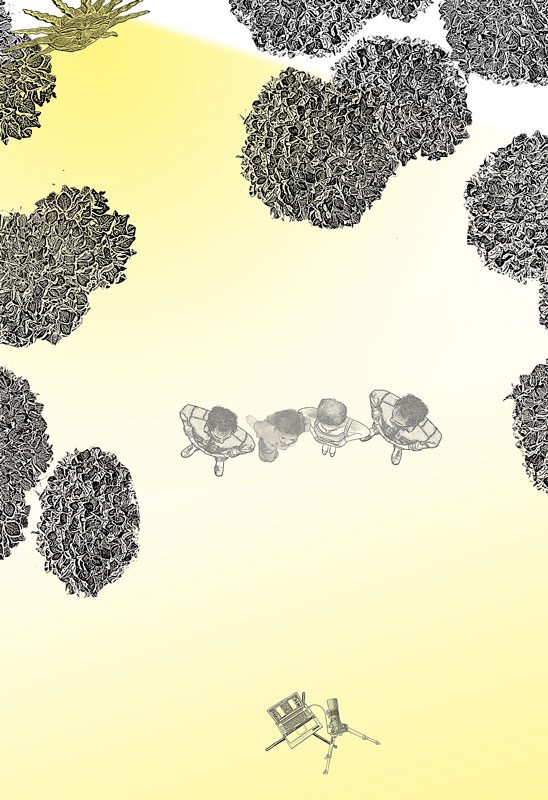
I was looking for an area that would give me frontal illumination while also providing some backlight.
I eventually found a clearing at the edge of a small forest.
The trees provided an important advantage. Their canopy blocked the overhead sky, preventing the subjects from being illuminated primarily from above.
Instead, the opening created a much more useful source of light from in front of the subjects.
A second opening behind them allowed sunlight to provide backlighting.
I had effectively found a natural studio.
Why overhead sky light can be a problem
One of the challenges of photographing people outdoors on a sunny day is the direction of the available light.
Much of the sky is above the subject. This can create downward-facing shadows, particularly around the eyes, producing deep eye sockets and an unflattering appearance.
You can sometimes overcome this by positioning the camera above the subjects and having them look upwards, but that wasn’t appropriate for this portrait.
The forest canopy solved the problem.
By placing the family at the edge of the clearing, the trees above them blocked much of the overhead illumination. The open sky in front of them became the dominant frontal source.
This created much more directional and flattering light.
Controlling the backlight
The second challenge was the difference in brightness between direct sunlight and open-sky illumination.
Direct sunlight can be around four stops brighter than light from the open sky.
If I had positioned the family in full sunlight with open sky illuminating their faces, the backlight could have been extremely bright. The edges of the subjects could have become heavily overexposed.
The trees provided another solution.
The sunlight coming through the foliage behind the family was partially filtered by leaves and branches. This reduced the intensity of the backlight.
I normally look for around a two-stop difference between my main light and backlight when I want a strong, bright backlight that suggests a hot sunny day.
In this location, however, I measured only around a one-stop difference at the brightest point.
That was fine.
The setting was a forest, so the slightly softer backlight suited the environment. Rather than suggesting intense sunlight everywhere, it gave the impression of a bright, sunny day within a cooler, calmer woodland setting.
The lesson is important:
You don’t always need the lighting ratio you originally planned. If the location gives you something different, work with it.
Use a light meter to measure the lighting ratio
When scouting outdoor locations, I like to use a handheld incident light meter.
It allows me to establish the lighting conditions quickly and objectively.
For the family portrait, I set my meter to ISO 100 initially and selected an aperture of f/4.
I then positioned the meter near the subjects with the white dome pointing towards the open sky in front of them. This gave me the exposure required for the frontal main light.
The resulting exposure was around f/4 at 1/40 second at ISO 100.
That shutter speed was too slow for a group of people who might move, so rather than changing my chosen aperture, I increased the ISO.
My final exposure was:
f/4 • 1/80 sec • ISO 200
The aperture was chosen for the depth of field I wanted rather than for exposure.
I wanted the family to be separated from the busy surroundings, so f/4 gave me enough depth of field for the group while allowing the foreground and background to remain relatively soft.
Measure the backlight separately
Once the main exposure was established, I measured the backlight.
I placed the meter near the back of the subjects, with the white dome pointing towards the sun behind them.
The reading was:
f/4 • 1/160 sec • ISO 200
Comparing this with my camera setting of 1/80 sec tells me the relative brightness of the backlight.
The backlight required 1/160 sec for a correct exposure, while my camera was set to 1/80 sec.
Because 1/80 sec is twice as long as 1/160 sec, the backlight receives one stop more exposure than the camera setting would require for that source.
The brightest part of the backlight was therefore approximately +1 stop relative to the frontal main light.
At the darker areas of the subjects’ backs, the difference was approximately -1 stop.
That was exactly what I wanted.
Understanding lighting ratios in stops
This is one reason a handheld incident meter can be so useful for outdoor photography.
Rather than simply looking at a scene and guessing whether the backlight is “too bright”, you can measure the difference between the light sources.
For example:
- 0 stops: The two light sources are approximately equal.
- +1 stop: The secondary source is twice as bright.
- +2 stops: The secondary source is four times as bright.
- +3 stops: The secondary source is eight times as bright.
- +4 stops: The secondary source is sixteen times as bright.
A two-stop backlight can create a strong, bright rim around a subject.
A four-stop difference can be much more dramatic and may push highlights into clipping.
The important thing is not that one ratio is universally correct. The appropriate ratio depends on the subject, location and creative effect you want.
Position people for the photograph, not just the background
Once I had established the lighting, I could concentrate on the portrait itself.
The concept was to have each member of the family pose with something representing their interests.
One family member is a jazz guitarist and performer. Another is a Shiatsu practitioner and musician, so an accordion became a much more practical prop than a piano.
The dog, naturally, was photographed with her favourite human.
I positioned the subjects roughly in a line so I could maintain the desired depth of field while keeping everyone within the useful area of the available light.
This is another advantage of scouting the location beforehand.
When you already understand where the light is coming from, you can concentrate on directing and interacting with your subjects rather than trying to solve the lighting problem at the same time.
Choose your aperture for depth of field
For this portrait I selected f/4 because of the depth of field I wanted.
This is an important distinction.
I don’t normally choose my aperture because the light meter tells me to. I choose it because it gives me the visual result I want.
Once the aperture is established, I use shutter speed and ISO to achieve the appropriate exposure.
This approach keeps exposure decisions separate from creative depth-of-field decisions.
If I want the photograph slightly brighter or darker, I can adjust shutter speed while keeping the aperture unchanged.
If the required shutter speed becomes too slow for the movement of the subjects, I can increase the ISO.
Natural light doesn’t mean uncontrolled light
The phrase “available light” can sometimes make outdoor photography sound as though the photographer has no control.
I see it differently.
You may not be able to move the sun, but you can control:
- where the subject stands
- which direction they face
- where you position the camera
- which background you use
- how much sky illuminates the subject
- how much direct sunlight reaches the subject
- the distance and direction of available light
- the lighting ratio between different sources
- your exposure
- your depth of field
The key is to make those decisions deliberately.
Scout for light, not just locations
When scouting an outdoor portrait location, photographers often concentrate on finding an attractive background.
That’s only half the job.
Ask yourself what the light will be doing when you actually photograph the subject.
A beautiful background can be useless if the subject is sitting in ugly overhead light.
Conversely, an ordinary location can produce a superb portrait if it contains a good combination of directional light, fill and backlight.
Walk around.
Look at the direction of the sky.
Look for areas where trees, buildings, walls or other structures modify the light.
Then use your meter to determine how those sources relate to one another.
Available light can be a practical creative solution
For this particular family portrait, using available light allowed me to keep the production costs close to zero.
There was no need for studio strobes, modifiers, stands or an assistant.
But the compromise was reduced control.
I couldn’t simply move the light three feet to the left. I couldn’t increase the power of the backlight. I couldn’t decide that the sun should be positioned somewhere else.
Instead, I had to be flexible about where and when I photographed the family.
That’s the trade-off with natural light.
But when you learn to read it, available light becomes far more than something you simply have to accept.
You can search for it, measure it, manipulate it through positioning and use it with the same deliberate approach you would use with studio lighting.
Don’t just find a location and put your subjects there. Find the light first, then put your subjects where the light works.
Key takeaways
- Treat outdoor available light like a studio lighting setup.
- Scout locations at the time of day you intend to shoot.
- Look for main light, fill and backlight rather than concentrating only on the background.
- Use trees, buildings and other structures to modify unwanted overhead or direct sunlight.
- Use a handheld incident meter to measure the relative brightness of different light sources.
- Think about lighting ratios in stops rather than simply judging brightness by eye.
- Choose your aperture for the depth of field and look you want.
- Adjust shutter speed and ISO to control exposure without compromising your chosen aperture.
- Be flexible when the location doesn’t provide exactly the lighting ratio you expected.
Natural light may be pre-existing, but it doesn’t have to be uncontrolled.